No Sew Ruffle Tote with Tutorial
Disclosure: This post may contain affiliate links. As an Amazon Associate, I earn from qualifying purchases.
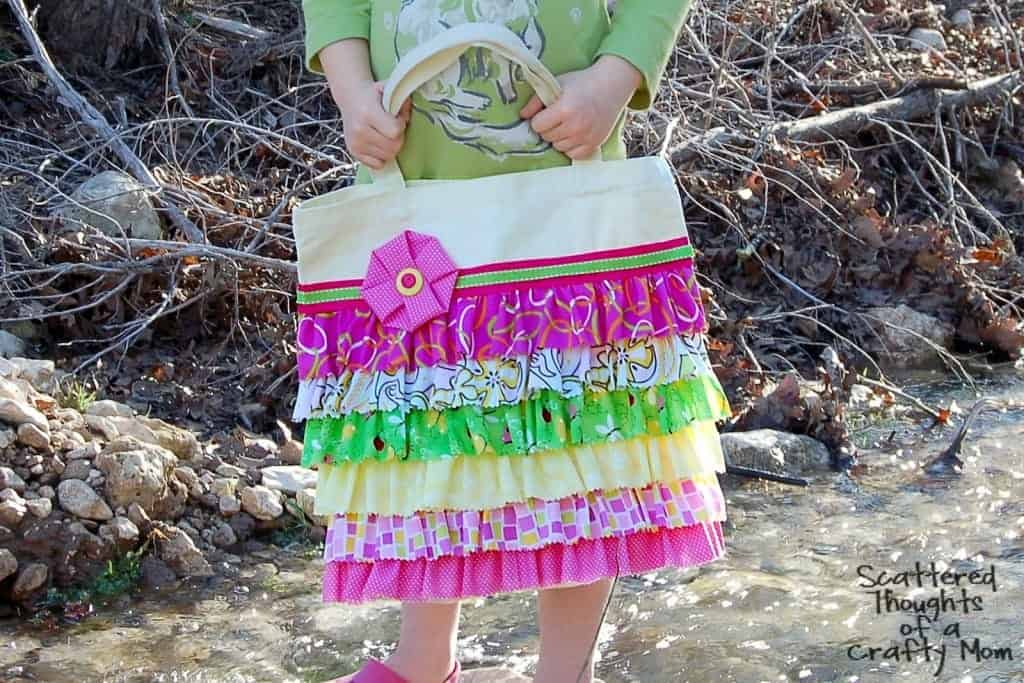
No sewing skills, but you want to make one of those cute Ruffled Tote Bags seen all over Pinterest? If so, this craft has your name written all over it! Today, I’m sharing the tutorial for this adorable No Sew Ruffled Tote Bag, made completely with hot glue and a few craft supplies!

💌 Save this article
For today’s project, I wanted share a tutorial anyone could do.
I tested out my theory that I could create a ruffled tote bag with absolutely no sewing. And guess what- it totally works!
The bag is made with a pre made, plain tote bag, a bit of ribbon, fabric strips, pinking shears and hot glue! (You can find these fabric strips everywhere now, and most of the time they come already cut with the “pinked” or “no-fray” edge. )
Can I just say this bag is his bag is awesome?
Turned out so cute and is perfect as a book bag or overnight bag (For all the seamstresses out there, you can totally sew this project and I’ll include some additional instructions at the bottom of the post.) (See *A)
Make your own No Sew Ruffled Tote Bag:
I originally bought this fabric to make a quilt for my daughter, but I wasn’t “in love” with it. (I have already bought more fabric for her quilt.) I thought the pinks, greens, and yellows in this collection were perfect for a spring tote.
Walmart and Amazon are now selling some pretty darn cute fat quarter and jelly roll bundles. Even though a fat quarter is only 22 inches wide, you can use them for this project. I will show you how at the bottom of the tutorial. (See *B)
Materials needed:
- Tote bag
- About 1/2 yard of fabric (You can do just one fabric or mix several different colors and patterns, you will need more fabric for a larger tote.)
- Ribbon (at least 1/2 inch would be best)
- Ruler
- Scissors
- Fabric marker or chalk
- Hot glue gun and lots of hot glue
Instructions:
Step 1: Get Measurements.
First of all, my tote bag measures 13.5 inches wide by about 13 inches tall. So if your bag is similar in size, then no math for you, just use my measurements! (6 strips 28″ wide x 2.75″ tall)
Width of strips:
If your tote is a different size here is how to figure out the width of your strips: measure the width of the bag, add 1/2 inch and multiply by 2.
Height of strips:
To figure out the height of your fabric strips: measure the height of your bag, and decide how far up the bag you want the ruffled fabric to go. Take that measurement and divide by how many ruffles you want. Add 1 inch to that number and that is how tall your fabric strips should be. (my measurements as an example: My ruffle strips were 28 inches wide by 2.75 inches tall)
Step 2: Cut Ruffle Strips.
1. Cut out your ruffle strips to your measurements. (I cut 6 strips, 28″ x 2.75″.) I used my Pinking Shears for the bottom edge to help with the fraying. (This is a must-have tool IMO.) Regular scissors will be fine if that is all you have, you just may have to trim some fraying fibers off every so often.
2. Fold over the short edges of each ruffle strip, 1/4 inch. Press firmly with an iron to get a good crease.

3. The next step is to “hem” the fabric strip edges. We will use hot glue to do this. I must give this warning… Hot glue is very hot, please be careful! These![]() would be a perfect protective tool to use while working with hot glue.
would be a perfect protective tool to use while working with hot glue.
4. Open the folded edge of your fabric strip and add a small line of hot glue, then fold the fabric back over and press.

Do this on all of your fabric strips.
Step 3: Adding the strips to the bag.
1. From the bottom of your tote bag, measure up the height of your fabric strip minus 1/2 inch. Do this in several spots along the bottom and then draw a straight line across. Then, from that line, measure up your fabric strip height minus one inch and draw another line. Keep repeating this for the number or ruffles you have. See image below for a better explanation.

2. Grab your fabric strips and fold them into fourths. Make a mark with your fabric marker on each fold. This will divide your fabric into four equal sections and will help you distribute the ruffles evenly. Do the same thing with the tote bag.
 |
| See how the blue marks divide the bag into 4 equal measurements? |
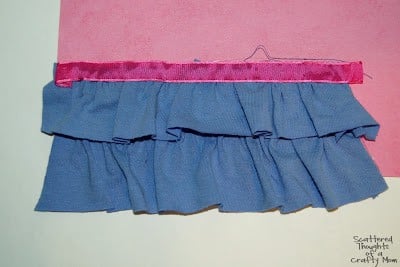
3. Starting at the bottom of the bag, add a 1-inch line of hot glue along the line you drew on the tote bag. Quickly line up the edge of your fabric strip, place it in the hot glue. Using your fingers, slide the fabric backward to make a ruffle. (Remember, the glue is very hot. You have a very small window of time from when the glue is cool enough to work with, but not so cool that it is starting to harden.)

4. Keep going until all your ruffles are glued on. Go back and add more glue to any loose areas.

Don’t be afraid to practice your ruffling first. I practiced on paper and scraps from an old t-shirt:
Step 4: Adding the ribbon trim.
1 Cut a piece of ribbon to the length of your bag plus 1/2 an inch. Use a lighter to heat seal your cut ribbon edges. Fold over one of the ends of the ribbon 1/4 inch, add a drop of glue and squeeze with your fingers; like this:

2. Starting with the edge of the ribbon you folded over, add hot glue to the back of the ribbon and attach it along the top edge of your top ruffle, concealing the glued ruffle part of the fabric.
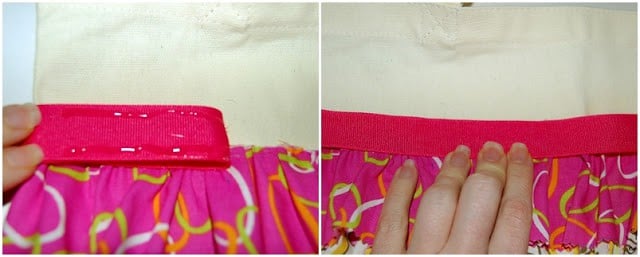
3. Add a spot of glue to any extra ribbon and fold over to make a smooth hemmed edge, then add a little more glue and secure to the bag.
 |
| Yuck! I hate it when my camera focuses on the wrong subject. Bad camera! |
You are done!
I added another color of a smaller ribbon and a fabric flower for a little pop! (You can find the fabric flower tutorial here.)

*A. Sewing instructions: After you cut your fabric, fold over the short edges of each ruffle strip, 1/4 inch. Press firmly with an iron to get a good crease. Sew along the pressed edge, 1/8 inch from the edge. Do this on all of the short edges.
Follow the ruffling tutorial found here to ruffle your fabric strips. Pin your ruffles to the bag and sew right over the ruffling stitch. Do this for all of your ruffles.

When you get to the last ruffle, follow the instructions at step 7. You can sew your ribbon on or just glue it.
*B: Using fat quarters: Cut enough fabric so when you line up the fat quarters, they will equal the fabric strip width you figured earlier PLUS 1/2 inch. Fold, iron and glue all the short edges to make a nice side hem on all the fabric strips.
Divide the fabric into 4 equal parts and mark as we did in step 5. (Pin the two fabric end pieces together if that helps.)
Start attaching your ruffles. When you get to the end of one fabric piece, just start with the other and finish the ruffle. You can barely tell where one piece ends and the other begins.


And just to prove it is not all cupcakes and roses all the time over here. That face, oh my…

Don't miss any more posts!


I love this, but how do you wash this ? I’ve never had to or tried to wash anything that has been hot glued.
Thank you.
You could try gently hand-washing it otherwise I would not reccomend putting it in the washing machine.
Thank you for stopping in and linking up with us this week on #TheWeekendSocial. We love your ideas and hope to see you again this weekend on KitchenDreaming.com. We have pinned, stumbled & shared your link via Twitter.
I'm not crafty at all but I may actually be able to do this. My daughter will love it.
I love this bag. I will make it with a jelly roll (2.5 inch pre-cut strips.) I love the idea of the pinked edges. I will have to pin this to save it for later. Thanks for sharing.
Wow. I just love the colors in this! Makes me wish for spring! Thank you for the great tutorial!
suzy
This is really gorgeous! I love your bag and the way you made it! Thank you for sharing!
Hope you have a wonderful day!
Hugs and love from Portugal,
Ana Love Craft
http://www.lovecraft2012.blogspot.com
Testing…
That´s is so cute! Love it. Congrats for the idea and your blog.
I love this no sew ruffle tote that you created! My daughter would love to have one, so I'm going to bookmark this page!
I'm the Editorial Assistant for Fun Family Crafts and I wanted to let you know that we have featured your tote! You can see it here:
http://funfamilycrafts.com/sew-ruffle-tote/
If you have other kid-friendly crafts, we'd love it if you would submit them. If you would like to display a featured button on your site, you can grab one from the right side bar of your post above. Thanks for a wonderful project idea!
What a darling tote, your tutorial is excellent! We would love to have you link this or any of your posts to our Saturday Show Us How You Rock Link Party. It starts Fridays at 6pm and ends the following Thursday at 10pm, hope to see you there!
Tracy
http://www.madefrompinterest.net/