Free Girl’s Apron Top Sewing Pattern & Tutorial (sz 2 to 6)
Disclosure: This post may contain affiliate links. As an Amazon Associate, I earn from qualifying purchases.
Sew this sweet and simple Apron Top Pattern for your little miss. It’s perfect for summer. The free pattern is available in sizes 2 to 6. Grab your copy today!

💌 Save this article
Free Apron Top Pattern for Girls
I love the simple and sweet look of a breezy Apron Top in the summertime. I’ve wanted to make a top like this for a while and finally put aside some time to figure it out how to do it. This Girls Apron Top came together so quickly that I wanted to share the tutorial and free pattern with you today!
Here is the back view. So adorable, I love the little fabric loops!

My daughter had mentioned she wanted me to make her something purple. Luckily, I hit Hancock fabrics on the right day last month, and most of their cotton fabrics were 50% off.
I thought she would really like this butterfly print, so I grabbed a yard, plus a few others. I also really appreciate it when I find gingham fabrics that are already printed on the bias. (Saves me effort and money!) 
I made her a pair of coordinating shorts from a pattern I picked up off Etsy. Here is the link: Ceci Shorts

Ready to make an Apron top?
Keep reading for the tutorial.
Materials needed
- +/- 3/4 yard of fabric
- my printable pattern (or freezer paper and a well-fitting t-shirt for tracing if you need to create your own pattern for a different size.)
- ruler
- fabric marker
- iron
- Scissors, plus any other basic sewing supplies you might need
Tutorial Tips
Read through the entire tutorial before starting.
If sizes two to six is not what you need, here are instructions on how to make a basic bodice from a well fitting top and how to tweak that bodice pattern to make the apron bodice pattern.
The pattern includes a 1/4-inch seam allowance, and all of the other seam allowances are 1/4 inches unless otherwise stated.
Sewing Instructions:
Step 1: Print the pattern and cut the fabric pieces.
Print the pattern, tape it together, and cut out two bodice pieces. (One is the outer bodice, and the other will be the bodice lining.)

For the straps:
Cut 2 pieces 40 inches by 2.5 inches.
Bodice bottom:
To calculate the width needed for the bodice bottom, measure the bottom of the pattern and multiply that measurement by 3. This is measurement A.

To determine the length (height) of fabric needed for the bodice bottom, hold the top bodice piece to your child and measure down how far you want the apron top to go.
Add 3/4 inch to this measurement for seam allowances
This measurement is “Measurement B”.
Cut a piece of fabric Measurement A (width) by measurement B (height.) (Example: for my 5 yr old, I cut mine 31 inches wide by 13.5 tall)
Fabric Loops:
Cut two small pieces 2 inches by 4 inches for the back loops.
Step 2: Sewing the shoulder straps and back loops.
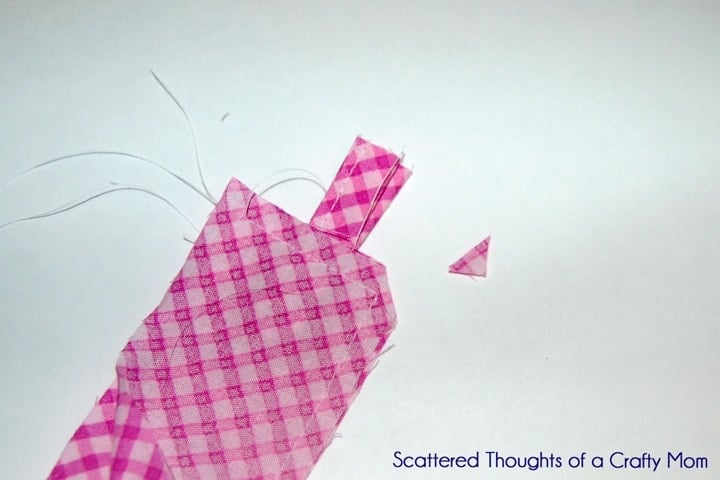
Fold shoulder straps in half long ways, right sides together. Sew along one end and down the side.

Turn the strap right side out and press. Grab the fabric loops and press both as shown.

Sew along the open side on both strips.

Step 3: Assembling the bodice top and lining.
Lay out one bodice piece, right side up. Line up the raw edges of the straps with the raw edges of the bodice top 3/8 inches from the edge. Pin in place.

Line up the fabric loops, looped side in, 1 1/4 inch from the edge. Pin in place.

Sew the straps and loops securely in place, a little less than 1/4 inch from the edge. Backstitch a couple of times. Trim any uneven edges so all raw edges are even.

Lay the 2nd bodice piece over the 1st, right sides together. Sew along the edges as shown, stopping 1/4 inch from the edge.

Clip the inner corner and flip the bodice piece right side out.
Press the seam edges flat.

Step 4: Attaching the Bodice Bottom.
Grab the bodice bottom. Hem both sides by folding over 1/4 inch, pressing, folding over another 1/4 inch, pressing again, and sewing a straight stitch right along the edge.

Next, determine which side of the bodice is the front and which side is the lining. Fold the bottom edge of the lining in 1/4 inch, and press. (Lining only)

To gather the top edge of the bodice bottom, change the stitch length on your machine to the longest setting. Sew a straight stitch along the top, 1/4 inch from the edge. Pull on the bobbin thread while holding the fabric. You should be able to slide the fabric down. Keep sliding the fabric along the thread, gathering the fabric of the bodice bottom until the gathered width is the same width as the bodice top.

Next, right sides together, line up the gathered edge of the bodice bottom with the raw edge of the front piece of the bodice top. Pin in place.

Sew right over the gathered edge. Remove the pins and finish the gathered seam edge with a serger, pinking shears, or a zig-zag stitch on your machine.

Fold the lining back down over the gathered edge.

Press the gathered seam flat, with the seam pointing up. Pin the lining edge in place from the front side and top-stitch the bodice top from the front side. If you miss any of the back folded edges, you can do a simple whipstitch to secure the edge.

Step 5: Finishing the bottom edge.
The measurements I gave you at the top include 1/2 for a folded hem. To make the folded hem, simply fold the edge over 1/4 inch, press, fold over another 1/4 inch, press again, and sew along the folded edge.
Since I used two different fabrics, I wanted to bind the bottom edge in the contrasting fabric.
To do this, cut a strip of fabric 2 inches tall by the width of the bodice bottom plus a couple of inches (just to be safe…)
Iron and fold the same way you did the fabric loops. Then, sandwich the bodice bottom between the folded fabric, pin, and sew. Tuck in the side edges for a finished edge as shown below.


And you are done!

For a little extra detail, I made three rolled flowers and just pinned them on.

Share Your Finished Apron Top In My Facebook Group!
Made this pattern/project?
Please leave a star ⭐️⭐️⭐️⭐️⭐️ rating and/or a review in the comments section below. If you share an image on Instagram, be sure to tag me and use #scatteredmompatterns! You can also share an image to my private Facebook sewing group!
Don't miss any more posts!


Love this pattern!! Turned out beautiful.
Anyone can give an estimate cut measurement for the bottom piece for each size? I am making this in different sizes for my future daughter, so I don’t have anyone to measure.
Jamie, I just found your blog via Craftgossip.
Well, first of all, your daughter is so beautiful. She is a wonderful helper too. A perfect model for this wonderful apron top!
I am going to make a few of these….. I am a gramma of three girls.
I am a mom of two beautiful daughters, and they are grown and married to fantastic men! So my oldest is expecting her second daughter in a few weeks, Christina has sonograms every week since she is high risk bc of thyroid problems. The sonograms are so adorable, she will need a tiny apron top soon.
My younger daughter has her first baby, Lena [named after my sweet momma) 8 months. Being a gramma and having abundant fabric is a blast!
Thank you so very much for sharing your pattern.
Thank you so much!
Adorable and you instructions are really great
Adorable and you instructions are really great
LOVE IT and finally made it! Thanks so much for the awesome tutorial! I plan to use more of your sewing tutorials! 🙂
Supper cute!
I have also made a toddler dress based on your design. I've blogged about it and given you credit at http://ribbonsandbibbons.blogspot.co.uk/2012/07/too-lazy-for-buttonholes.html
Hi,
I made one of these for my 8 year old niece. It looks really cute – Thanks for sharing. I have posted about it on my blog and linked back to you. You can see it here http://ribbonsandbibbons.blogspot.co.uk/2012/07/fitted-apron-top.html
Great tutorial, thanks for putting it together and sharing, I've pinned it to my sewing board!
New follower! Popped over from Whipperberry. Had to pin this. 🙂
Cute top:)
Featuring this at Mop It Up Mondays!! So happy you linked up last week! 🙂
I love this!! Thank you for sharing at Sharing Saturday!! I hope you are having a wonderful week!
Great tutorial! I'm bookmarking this to make one for ME!