No Sew Simple Fabric Bracelet Tutorial (w/ Banadanas)
Disclosure: This post may contain affiliate links. As an Amazon Associate, I earn from qualifying purchases.
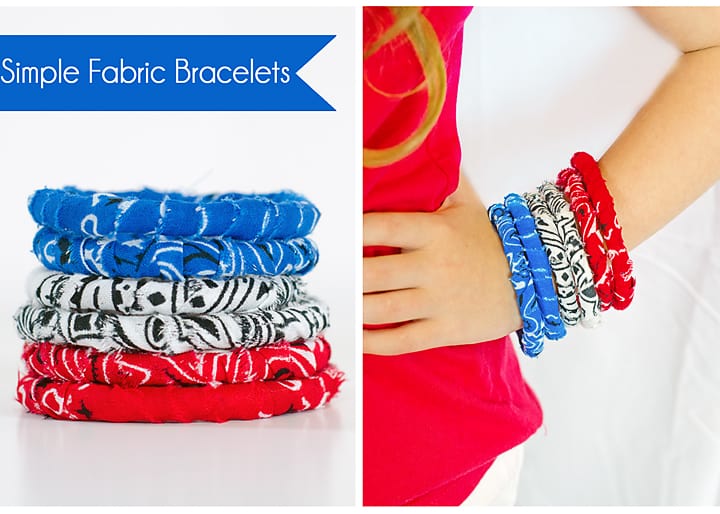
Today I am sharing how we made these easy fabric bracelets. They really turned out great!
(We made so many, we’ve been giving them away to our friends too.)

💌 Save this article
Summer Activity Schedule for Kids
We’ve been fairly busy so far this summer, I can’t believe June is nearly over. I never even had a chance to talk about the activity schedule I’ve set up for my little guys this year. It’s pretty much the same as what I’ve done in years past, (we are still using our jars) we’ve just switched up the days a bit due to twice a week swim lessons and a Thursday reading program we joined.
Our daily routine includes chores, workbooks, computer time, time in the kitchen and lots of swimming, reading and crafts. (I linked to one of the workbooks I bought- love these!
I first saw the workbooks on Zulily, but bought them from Amazon for a dollar or two more so I could get them asap. (Zulily takes like a month to get stuff.) They come in all skill levels, so check them out if you are in the market for new workbooks.)

Easy Bracelet Craft:
One of our favorite crafts so far has been these little bracelets (my son enjoyed making these too). I just love how they came out and they really were easy to make- totally frustration free! I have used this tubing in a couple of bracelet crafts now, it really works great for this type of project. (Remember my Duck Tape Neon Bangles?)
Ready to make some bracelets? Here’s how:
Supplies needed to make fabric bracelets
- fabric strips
- fish tank tubing
- lollipop sticks
- hot glue
Step 1: Tear bandanas or other fabric into 1 inch strips. Remove strings.

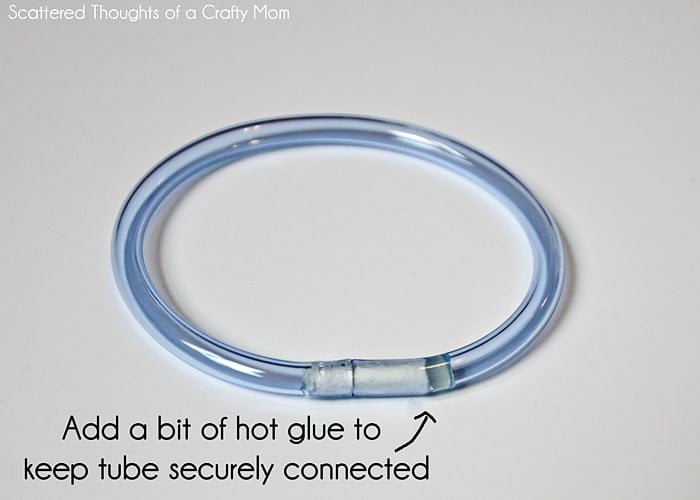
Step 2: Cut tubing to appropriate size for whomever is wearing the bracelet. Snip the lollipop stick into small pieces. Add a bit of hot glue to one end of the tubing and insert the lollipop stick. Add a bit more glue to the other side of the tube and and insert the other end of the lollipop stick to form a circle.
Step 3: Add a bit of hot glue at the start of the wrap to secure fabric to tube. Start wrapping the fabric around and around, twisting when you need to.

Keep going until the tube is completely covered. One bandana strip (22 inches) will cover a small child’s size bracelet. If you run out of fabric, just use a little glue and add another strip. (try to wrap a little extra around the start of the new fabric to cover any seams.) If you are crafting with a very young child, you may need to help them to keep the fabric tight as they wrap.

When you get to the end, just secure with a bit more glue and trim excess fabric.
Ta da, so cute (and so perfect for all our cousins we’ll be seeing for the 4th!)
Don't miss any more posts!

Follow along on:
Feedly, Bloglovin', your favorite feed reader, or signing up via email and have new posts delivered to your email box each week!

What do you use to snip the lollipop sticks?
heavy duty kitchen scissors
Just threw a huge amount of brackets in a craft basket and now taking them and making what is shown to use my old but new now bandanas!!!
Love the Braclets
Great summer fun with grannies.
To make
Thank you for the bandana bracelet instructions. I think I know how I can use up all the leftover masks that I’ve cut out!.
I had to tell you..i just LOVE the idea of the bandana bracelet. THANK YOU soo much for sharing. 🙏🙏 please keep me posted with more of yr ideas. Thank you. Dawn
I just got a sewing machine from a friend and have been looking for ideas to make this will be a perfect way to enjoy using it…
Another suggestion…we used the glow bracelets/chokers that you find at the Dollar Tree store…they come in multiples per pack. On the bracelets we just hot glued the connectors to stay closed but on the chokers we left unglued to make it easier to take it off and on
Just another option…grandkids had a blast making these ?? Fun idea ??
great idea!
Great ideas love to read them all
How many bracelets can you make out if the tubing? Thinking about VBS craft.
I love this idea. I run a nonprofit organization that helps veterans with PTSD . One of the ways that we raise money is making craft and selling them at craft fairs.
Thank you for this idea. I hope I can make them.
I’m sure you will, good luck!
Please let me know if you need craft donations. I have health issues bút I wouldn’t mind helping a bit I love doing crafts and end up with extras. I support good causes it may take me a bit longer but I do get it done.
I’m not a mum yet, but I find your ideas really interesting. Looks a little bohemian to me! I’m also a fan of crafting with fabric! Thanks for the tips.
This project looks fun. I would love to try this with some children. I have a little apprehension about the hot glue part. I see the need for using it to glue the tube ends. Do you think I could use fabric glue for the fabric part of the project? The Fabric Fusion glue I have says that it dries in 2-4 hours and is even washable after 48 hours. I may try this soon if I get a chance, but I would love to get some thoughts on this.
you could try, I would be worried about everything falling apart before drying. I did not let my children use the hot glue gun. I made the tube part, and added a dab of hot glue to attach the bandanna, then let them wrap it. When they were done, (I tightened the wrap for my youngest) and then added the glue myself.
Great for upcoming Independence Holiday craft. I have lots of old bandanas so this will be great. Pinned!
Those are so cute!!!
These are great – my daughters will love making these. Thanks.
These are adorable! And so simple. I'll be trying this and passing it on to my daughters. Thanks for sharing.
Happy Sharefest! I hope you have a lovely weekend and a wonderful new year!
Thanks for the great idea! My daughter and her friend are making crafts with t-shirts next week and these will be perfect!
What a fun idea! Pinned. Lou Lou Girls
These are so cute! Fish tank tubing, something I never would have thought to use like this, but it makes so much sense. And I love that you could make any color or design you want. Thanks so much for sharing at Inspire Me Wednesday. Featuring you in this week's issue.
Genius! Love how they turned out! Thanks for sharing on Sunday FUNday!