Free Apron Pattern (3 sizes toddler/ tween/ adult)
Disclosure: This post may contain affiliate links. As an Amazon Associate, I earn from qualifying purchases.

This free apron pattern includes three sizes: toddler, tween, and adult. It’s designed to be beginner-friendly and uses bias tape to finish the edges and create the straps. No complicated shaping required. You can sew one for yourself or make a matching set for the whole family.
Be sure to grab your copy today and get sewing!

💌 Save this article
Free Apron Pattern
I made a toddler/child-size apron pattern about 5 years ago, and it’s been on my list to redo the apron to include a tween and adult-sized apron pattern for my pattern collection.
Yes, I said 5 years on my to-do list… I am a self-admitted queen of procrastination! But on the bright side, look how cute my apron turned out!!! I’m so happy about it and have been using it all the time.
Totally worth the wait!

Why Sew this Free Apron Pattern from Scattered Mom
This isn’t just another basic sewing project—this is the kind of pattern you’ll come back to again and again.
-
Quick and beginner-friendly: Simple shapes and straightforward construction make this a great confidence-building project.
-
Perfect for gifts: Handmade aprons are thoughtful, practical, and always appreciated
-
Make matching sets: The included sizes make it easy to create coordinating aprons for kids and adults.
-
Great stash buster: Uses relatively small amounts of fabric—perfect for leftover yardage or favorite prints.
-
Endless customization options: Add ruffles, mix fabrics, or play with fun bias tape for totally different looks.
This Apron Pattern is so easy to make!
I love how the aprons turned out.
They are super easy to make, basically two little pieces of fabric wrapped in bias tape. You can use store-bought bias tape, which will make the project even easier and save significant time. Or if you have a special fabric to use, you can add a custom touch by making your own bias tape. (Which is what I did.)

Fabric Used in this Apron Pattern:
The finished aprons featured in this post were created from the Sunnyside Ave fabric collection by Amy Smart of Diary of a Quilter.

Apron Sizing
- Toddler
- Tween
- Adult
Each size is designed for a comfortable fit with enough coverage for cooking, baking, or crafting.
The toddler size will fit an average 2- to 7-year-old, and the tween size will fit an average size 8 to 12. After that, you’ll want to size up to the adult size.
Just imagine all the fun summertime baking you and your mini-me can do in your matching aprons! I love it!
Apron Pattern Variations:
- It’s not in this free apron pattern, but I think a cute option would be to curve the bottom edges and add a coordinating ruffle all around the apron’s bottom and sides. If I ever make another one, I might have to try it.
- A kangaroo pocket instead of a rectangular pocket.
- Cut off the top half and make a half apron.
Where Do I Get the Pattern?
The link for the pattern page in my shop is under Materials Needed. Click the link, add the pattern to your cart, and check out. (takes about 15 seconds for the process.) A copy of the pattern will be emailed to you.

Apron Fit Chart:
- Child/toddler: Fits children about size 2 to 7. (Finished length: 17.25 inches.)
- Tween: Fits kids about size 8 to 12. (Finished length: 22 inches.)
- Adult: Older kids size 13 through adult XL. (Finished length: 27.5 inches.)
Products used and recommended for this project:
- My Sewing Machine: SINGER 9960 Quantum Stylist, my coverstitch: Janome Cover Pro 1000cpx. (If you want a recommendation for a less expensive, but still great machine, check out the Janome JW8100)
- My Serger: Brother 1034D 3 or 4 Thread Serger or you can just use Pinking Shears
- Rotary Cutter
- I love my large ruler and large cutting mat, but you may prefer to start off with a smaller Cutting set
- Dritz Dual Purpose Marking Pen and Fray Check
- Wonder clips (I didn’t use these in the post, but they are just awesome!
- Ball point needles
- Ball Point double needle
- Walking foot

Are you ready to sew an apron?
This is one of those projects you can finish in an afternoon—and once you make one, you’ll probably want to make a few more.
(If not ready to sew just yet, save this pattern for later by pinning here.)
Pin this project for later
Tips for Success
- Press your fabric well before cutting for cleaner lines
- Take your time attaching the bias tape—this is where the finished look really shines
- Use clips or pins generously to keep everything aligned
- If you’re new to bias tape, go slow—it gets easier quickly
Materials needed:
- Apron Pattern (access link found here.) You will need to add the pattern to your cart and check out. The pattern will be emailed to you and then come back here for the sewing instructions.)
- Cotton fabric for the apron body, coordinating fabric for pockets (see fabric amounts below)
- ½-inch double-fold bias tape (store-bought or handmade)
- Thread
- Spray starch/iron
- Basic sewing supplies
Fabric Amounts Needed for Apron:
To make these apron patterns, you will need the following amount of fabric (Estimates based on 40 inches of usable fabric):
Child/toddler:
- Apron body and pocket: 3/4 yards
- Bias tape: 1/4 yard
Tween:
- Apron body and pocket: 3/4 yards
- Bias tape: 3/8 yard
Adult:
- Apron body and pocket: 1 1/8 yards
- Bias tape: 1/2 yard
A Note About Bias Tape
Don’t worry if you’ve never made bias tape before; you can use store-bought if you prefer!
The fabric amounts listed in the “Fabric Requirements” section of this post are based on using the continuous bias tape method. This method is much more efficient and allows you to create one long strip of bias tape with very little waste.
For reference, the approximate amount of bias tape needed for each size is:
- Toddler/Child: 154 inches
- Tween: 212 inches
- Adult: 230 inches
If you choose not to use the continuous bias method and instead cut individual bias strips and sew them together, you will need more fabric to account for extra seams and fabric waste.
As a general guideline, I recommend:
- ⅜ yard for the Toddler/Child size
- ½ yard for the Tween size
- ⅝ yard for the Adult size
I used the continuous bias tape method for my aprons. I’ll be adding a full tutorial for that method soon, and once it’s ready, I’ll link it here.
Pattern Printing Tips:
- To save the pattern, Click the link and save it to your PC. Then open the PDF document in Adobe Acrobat. Don’t print from Google’s online PDF reader; the pattern will not print properly. (It will sometimes cause the pattern to print too small.)
- Before getting started, I recommend printing page 4 only and comparing the 1-inch square to a ruler to verify your pattern is printed at the correct size. (Make sure to choose “print actual size” and the “auto landscape/portrait” printing option.)
- There is also a new option to print only the size needed.
Full pattern layout:

Apron Pattern Sewing Instructions:
Step 1: Print the pattern, tape it together, and cut out the size needed.
Once you have saved the pattern to your desktop and opened it in the free Adobe Reader program, there’s a new printing option for you. You can now print only the size needed. (This pattern only, I’ll slowly go back and start updating the older patterns.) This function is super handy and makes cutting the pattern much less confusing, plus I love that it lets me print in black and white. (That color ink can be pricey!)

Step 2: Cut pattern pieces from fabric.
Cut 1 apron piece and 1 pocket piece. Gather/create the amount of Bias tape listed below.
Amount of bias tape needed (see note about bias tape above):
- Adult: 230 inches
- Tween: 212 inches
- Toddler/child: 154 inches
Step 3: Assembling the Apron.
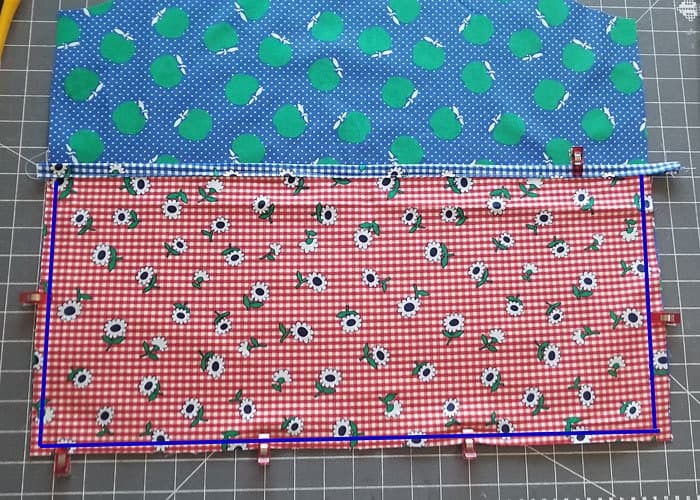
Measure along the top of the pocket piece and cut the appropriate length of bias tape. “Sandwich” the top of the pocket with the bias tape and sew along the bottom of the bias tape. Take care that you catch the edges of the bias tape with your stitches on both sides of the pocket.

Line the pocket piece up with the bottom of the apron and bast around the sides and bottom.
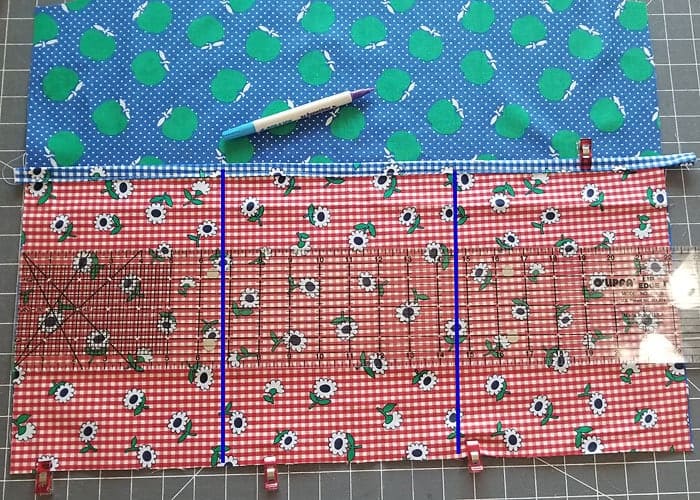
Next, to create pockets, measure the bottom of the apron and divide into thirds. Sew a straight stitch along the dividing lines.
Sandwich the bias tape around the sides and bottom of the apron. Sew along the edge of the bias tape, taking care to catch the tape on both sides with your sewing needle. If you need a visual on how to sew around the corners, I have a little “cheater” mitered corner video tutorial here.

Next cut a piece of the bias tape and repeat for the top of the apron.

Step 4: Adding the ties to the Apron Pattern.
Cut 2 pieces of bias tape to the lengths below:
- Toddler: 44
- Tween: 66
- Adult: 70
Measure down from one end of your bias tape the number of inches specified below and mark that spot.
- Toddler: 15.75
- Tween: 21
- Adult: 22
Staring at the marked spot, sandwich the bias tape, along the curved edge. Pin the bias tape in place.

Finish both ends of the bias tape by folding in and securing with a pin.

Sew from one end of the bias tape to the other end. Repeat on the second side and you are done!
Did you Sew this Apron Pattern?
If you end up sewing an apron, be sure to come back and leave a star ⭐️⭐️⭐️⭐️⭐️ rating and/or a review in the comments section below. If you share an image on Instagram, be sure to tag me and use #scatteredmompatterns! You can also share an image to my private Facebook sewing group!
Don't miss any more posts!

Follow along on:
Feedly, Bloglovin', your favorite feed reader, or signing up via email and have new posts delivered to your email box each week!How to Sew An Apron (free pattern - toddler- tween-adult)

Materials
- Pattern
- Quilting cotton – see fabric amounts above
- Spray starch/iron
Tools
- Sewing Machine
- Basic sewing supplies
Instructions
Step 1: Print pattern, tape together and cut out the size needed.
- Once you have saved the pattern to your desktop and opened it in the free Adobe Reader program, there’s a new printing option for you. You can now print only the size needed. (this pattern only, I’ll slowly go back and start updating the older patterns.)
- This function is super handy and makes it much less confusing when cutting the pattern, plus I love that it enables me to print in black and white. (that color ink can be pricey!)
Step 2: Cut pattern pieces from fabric
- Cut 1 apron piece and 1 pocket piece. Gather/create the amount of Bias tape listed below.
Amount of bias tape needed:
- Adult: 230 inches
- Tween: 212 inches
- Toddler/child: 154 inches
Step 3: Assembling the Apron.
- Measure along the top of the pocket piece and cut the appropriate length of bias tape. "Sandwich" the top of the pocket with the bias tape and sew along the bottom of the bias tape. Take care that you catch the edges of the bias tape with your stitches on both sides of the pocket.
- Line the pocket piece up with the bottom of the apron and baste around the sides and bottom.
- Next, to create pockets, measure the bottom of the apron and divide into thirds. Sew a straight stitch along the dividing lines.
- Sandwich the bias tape around the sides and bottom of the apron. Sew along the bias tape, taking care to catch the tape on both sides with your sewing needle. If you need a visual on how to sew around the corners, I have a little "cheater" mitered corner video tutorial here.
- Next cut a piece of the bias tape and repeat for the top of the apron.
Step 4: Adding the ties.
- Cut 2 pieces of bias tape to the lengths below:
Toddler: 44
Tween: 66
Adult: 70
- Measure down from one end of your bias tape the number of inches specified below and mark that spot.
Toddler: 15.75
Tween: 21
Adult: 22
- Staring at the marked spot, sandwich the bias tape, along the curved edge. Pin the bias tape in place.
- Finish both ends of the bias tape by folding in and securing with a pin.
- Sew from one end of the bias tape to the other end.
- Repeat on the second side and you are done!

Thank you! I look forward to receiving the pattern. I really like the pockets across the front of the apron. I’ve been making individual pockets. So much work!
I understand what you mean about using bias tape strong the curved arm area. I’ve been using twill & it seems to be okay. Maybe I’ll see after the apron is washed?
I made one for my two year old great-granddaughter. Now Mom has asked for one for herself.
Hi I’ve just found your pattern it’s great thanks. I’m a bit unsure of what length to cut the ties and neck loop for the toddler apron as I want to use ribbon so need to cut it separately. Thanks Pam
Thank-you for this pattern I’m going to make all three for christmas
Thank you very much for this wonderful free pattern. I’m going to make the smaller one for my grandson.
Thanks for the pattern,,,question…
How wide did you cut the bias tape?
2 inches
Thank you so much for this free pattern. I have an 18 month old who has taken an interest in baking so I would like to make him a special apron and a matching one for his momma.
I see that this pattern is about 5 years old, but I just found it about 3 days ago, and thought “why not give it a try.” I have been on an apron making rampage for a while now and I was looking for a way to use a truly ugly piece of Christmas themed fabric that I didn’t what to throw away. I used a contrasting print for the pocket, added a teeny pocket to the top and used both red and green bias binding. By that time it was kind of cute. So you helped me save some fabric that otherwise might have lain in my stash forever. I used the tween sized version and it fit my 13 year old granddaughter, who is tall, but very slender. Thanks!
I would post a photo, but no longer do any social media.
Love it!
Great pattern, in fact I’ve drawn in between the lines to get even more sizes. I will send pictures when my aprons are finished.
However, I would like to check a point in the instructions. You mention near the top in your fabrics amount needed that you need 1/4 yard, 3/8 yard and 1/2 yard bias binding for the three sizes. Should this read ‘1/4 inch’, ‘3/8 inch’ and ‘1/2 inch’, meaning the width of the bias tape that is needed? (You mention the lengths needed elsewhere.) Or do you mean you will need this amount of fabric to cut your own bias tape? Although I have made plenty of my own bias tape in the past, I’d generally prefer to work with a longer length than 1/4 yard, as you’ll end up with loads and loads of tiny pieces. But I decided I’d be using ready made for this project to save time – I’ve only a week to make all my aprons!
I love this pattern!! I used it ALL the time!
Thank you for the pattern. It was exactly what I was looking for.
Super cute aprons, just printed the pattern and instructions off. I think this will be a great way for me to use up some of my stash and give homemade gifts to family and friends. I now have 2 homemade sewing gifts (apron and ear warmer headband) and the toffee saltine cracker recipe to make and give. ALL OF THEM FROM YOUR BLOG/NEWSLETTER. I am getting started ASAP.
Thank you very much!!
Awesome! Thank you for the nice comment!
That apron pattern looks so cute. Don’t know how I missed that one. But I need an apron myself, so that will be the one.
Thanks
Thanks in advance for the pattern!
I will use your free pattern to estimate some sizes for nephew cooks. Thanks for the help.
Thank you for this pattern. I will be using store bought bias tape. I am confused how much to buy for a tween apron. Under “Learn How To Sew” it lists 3/8 of a yard (approx. 13.5 inches), but under Step 2 it says gather 212 inches. How many yards of bias tape would you recommend purchasing to make a tween apron? Thank you.
Go with the 212 inches because I also saw 3/8 yard and bought a 3 yard piece but ran out of bias tape.
I used the continuous bias tape method to make my bias tape. I will edit the post to mention that. 3/8 of a yard using the continuous method should result in about 280 to 300 inches of bias tape. I even once made a tutorial for this method with a video and never got around to posting it Maybe I will do that this week.
I see that you use 3/4 yards for the apron and pocket. If I want to use two different fabrics, how much do I need for just the pocket? Thanks! So excited to make this!!
Jamie, could I just add a seam allowance on pattern and turn that under instead of using bias tape?
Sure.