Sequined Raglan Tunic Top Tutorial and Free Pattern in Size 4 to 8
Disclosure: This post may contain affiliate links. As an Amazon Associate, I earn from qualifying purchases.
Learn how to sew a raglan tunic top for girls using this free raglan top pattern in sizes 4, 5, 6, 7, 8.

💌 Save this article
During the holidays, I’d gotten a sales email from Fabric.com advertising fleece was on sale. I clicked over and started browsing the sweatshirt fleece. On the sidebar, (where they have the “you might also like”) I spotted some gorgeous coordinating sequin fabric that was also on sale.
I decided the missy and I needed sequined sweatshirts!
Pink for her and teal for me. (I still haven’t made mine yet, but it’s on the to-do list.)

As you probably know, when ordering fabrics online it’s impossible to be sure exactly what you’re getting until it arrives. Turns out, the pink sweatshirt fleece was very thick, like normal fleece.
Luckily, the fabric for me is a lighter weight, more like french terry. (Looking back on the website, I see that the pink was listed as med/heavy weight and the teal as medium weight- but I still wouldn’t have known the difference unless I had it in my hands to compare.)
The sequined raglan tunic top still turned out really cute, and she loves it. (It’s just a little thicker than I imagined.)

Pattern fit info:
- The Raglan tunic pattern is available in 5 sizes (4 to 8).
- The top is a slimmer-fitting tunic length, but you can lengthen or shorten it to your taste.

Recommended Fabrics:
- You can use sequined fabric or any type of medium-weight knit. with this pattern
- If you do use sequin fabric and try to recreate this look, I recommend using either a smaller/thinner sequin fabric or pairing the sequins with a lighter-weight knit, such as interlock, french terry, or a med/heavyweight jersey.
You will want to use a knit with at least a 50% stretch for ribbing for the neck, bottom and sleeve binding. Something like this: ribbed knit for binding.
Are you ready to make your little one a raglan tunic top?
You are going to love how easy this top is to make!

Girl’s Sequined Raglan pattern and tutorial
Materials Needed:
- 3/4 yard knit or fleece fabric
- ribbing or other stretchy fabric for binding
- very stretchy scrap knit for the cuffs, bottom band and neckline
- pattern
- standard sewing supplies
Pattern notes:
Use a 1/4 inch seam allowance unless otherwise specified.
Sewing Instructions:
Step 1: Print/assemble pattern and cut out pieces.
Download the pattern to your computer and open it with adobe acrobat. (Be sure to print from adobe and not straight from google docs, it will affect the sizing of the pattern.)
Line up the pattern on the fold of the fabric, with the stretch running side to side. Cut a front, back and 2 sleeves. If you are adding sequined fabric, cut a 2nd front piece from the sequined fabric. If you are not adding a sequined fabric, skip to step 2.

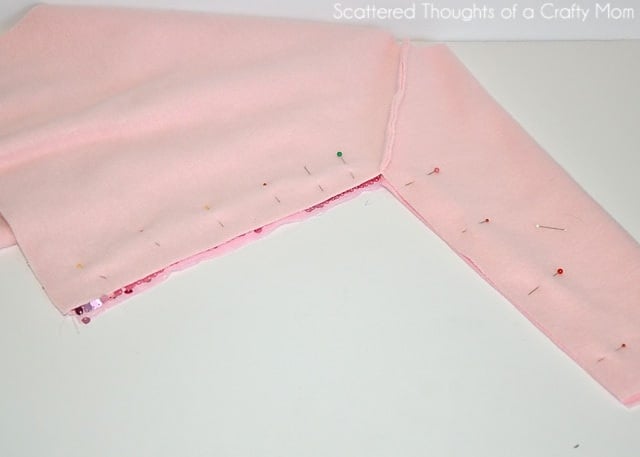
Lay the front fabric piece out on your work table right side up. Line up the sequined front piece with the first piece, right side up as well. Pin in place and baste together using a 1/4 inch seam allowance.
If you are using a fabric with the sequins sewn on, you will want to remove the sequins from the seam allowance. You can see where I started to do that in the photo above. (I began to wonder why I was doing this, and didn’t finish removing the sequins and completed the top. During our first fitting, I discovered why it was important to remove the sequins… The ones that were cut in half, were “pokey” and I had to go back and remove them.) If you are using a fabric with faux sequins that are part of the fabric, I don’t think you would need to remove the sequins, just sew as normal, then trim the seam allowance of the “sequin” fabric to a scant 1/8 inch and then finishing the seam w/ your serger or zig zag stitch.)

Step 2: Assembling the top:
Line up the sleeve edges and the front tunic piece, right sides together. Pin in place and sew along the edge.

Line up the back tunic piece with the back sleeve edges, right sides together, pin and sew.

Line up the front and back. Pin together and sew, from the sleeve (cuff) edge to the bottom of the shirt.

Step 3: Adding the cuffs bottom band and neckband.
Cut your fabric strips to these measurements: (Important! The bottom and neckband are cut on the fold, but not the sleeve band.) If you are not using ribbing, you may need to cut the neckband up to 1.5 inches longer. (If needed, cut the neckline long, sew together and test if it will stretch around the child’s head.)

Fold all the fabric strips in half, right sides together, so the sort edges line up. Sew along the edges, using a 1/4 inch seam allowance. (You should have fabric circles.)

Starting with the bottom band, fold the fabric circle in half, right sides together and press.

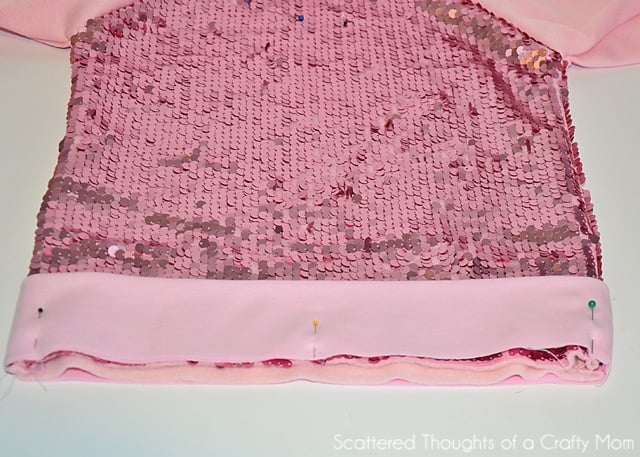
Divide the fabric band into fourths, mark these points with pins or a fabric marker. Mark the center of the front and back side of the tunic. Match up the marks and lining the raw edges of the band and raw edges of the tunic up, pin in place. (A much better photo tutorial of this process can be found in my Tie Front Top tutorial.)


Sew along the edge with a 1/4 inch seam allowance. Gently stretching the band to fit the bottom of the tunic from quarter mark to quarter mark.

Repeat this process for the neckline and sleeve cuffs.


For a more finished look, you may want to gently press your seams flat and top stitch around the neck band. (Use caution if using sequin fabric.) Since fleece and most knits don’t fray, it’s completely optional to finish the inside seams.
You’re done!
If you make one, be sure to come back and share your finished top in my facebook page or tag me on instagram!
Don't miss any more posts!

Follow along on:
Feedly, Bloglovin', your favorite feed reader, or signing up via email and have new posts delivered to your email box each week!


