Reverse Heart Applique Tutorial (+swing tank pattern)
Disclosure: This post may contain affiliate links. As an Amazon Associate, I earn from qualifying purchases.
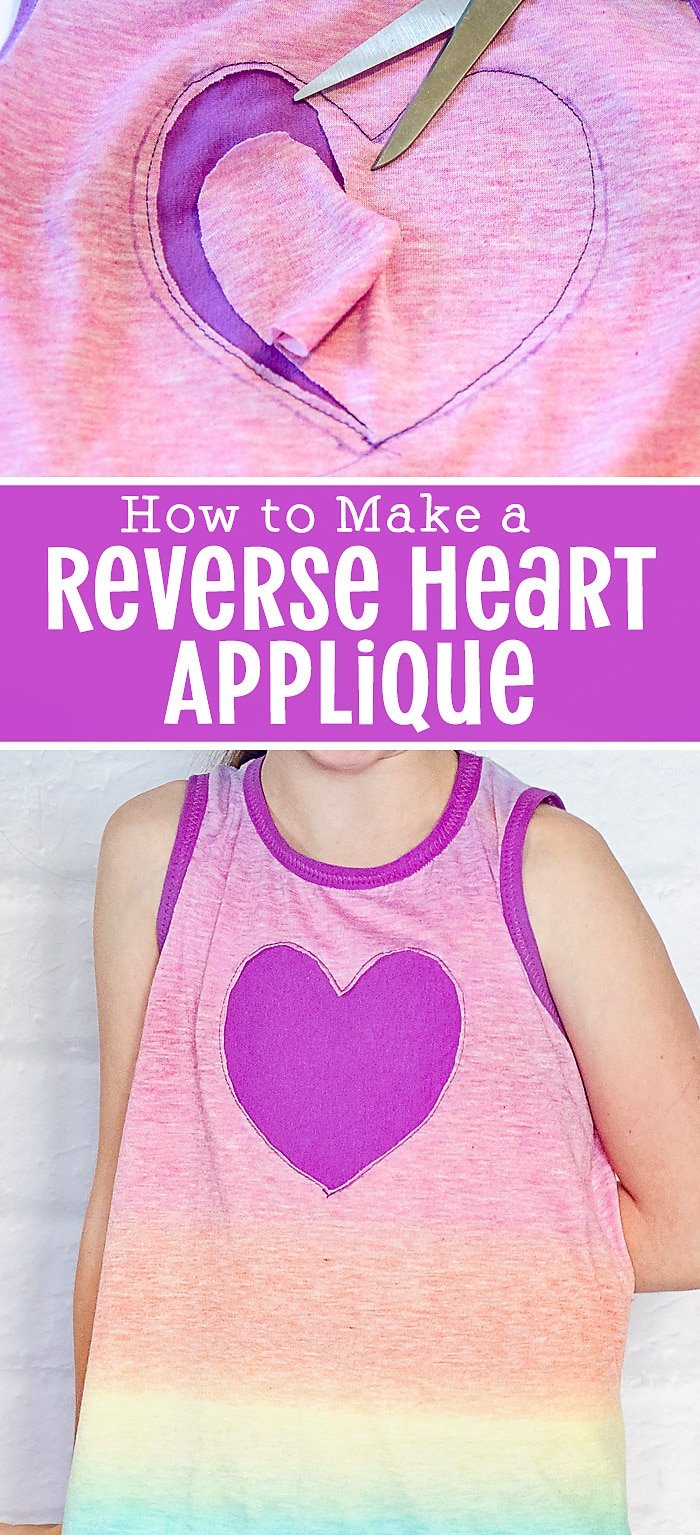
How to make a Reverse Applique Heart on your next sewing project!

Reverse Heart Applique Tutorial (+ free swing tank pattern)
I’ve been playing with the hemline and shape of my tank top pattern. By widening the bottom and changing the shape of the hem, I’ve come up with a new and really cute version. I’ve been seeing this hemline all over lately. It’s called a shark bite hemline!

The top turned out so cute, I think I’m going to try one in my size. Grab a copy of the Swing Tank Pattern here: Swing Tank Pattern.

I just love this heathered rainbow fabric, but after I had my lil missy try on the top, I felt like it still needed something more. I had a bit of the purple binding fabric left over, so I thought a reverse applique heart would be the perfect addition to the top.

What is Reverse Applique:
Reverse applique is an applique method where instead of adding the applique to the top of your fabric/project, the applique is added to the reverse side and stitched in place. The top fabric is then cut away and your contrasting applique fabric peeks through!

Reverse applique is, in my opinion, is much easier than regular applique since you don’t have to worry about completely covering the appliqued fabric’s edges. Simple shapes work best. (like hearts, flowers, stars, etc.)
One of the things that makes reverse applique great is that it is a technique that can be added to a store-bought, already finished item or something you’ve sewn yourself!
How to Sew a Reverse Applique Heart
To make the reverse applique, choose a simple shape and follow the directions below. (If you want to use the heart shape, download it here.)
Materials Needed to Sew a Reverse Applique:
- Shirt
- Applique fabric
- Applique template (Heart template here)
- Pins
- Water-soluble marker or another marking tool
- basic sewing supplies
Reverse Applique Instructions:
Step 1. Determine placement of applique:

Step 2: Trace the template on to the applicate fabric and cut around shape leaving a 1/2 inch border. Pin the applique in place on the inside of the shirt.

Step 3: Sew the applique shape to the t-shirt.
Step 4: Flip the shirt right side out and carefully and neatly, cut along the stitches.
That’s all there is to it. It’s actually a lot easier than a regular applique!
")
She loves these little kitty stuffed animals!

What do you think, would you like to try one of these tops for your little one?

My favorite fabric shop for knits: Funkalicious Fabrics, Girl Charlee, Fabric.com and Etsy
- My Sewing Machine: SINGER 9960 Quantum Stylist
- My Serger: Brother 1034D 3 or 4 Thread Serger or you can just use Pinking Shears
- Rotary Cutter
- I love my large ruler and large cutting mat, but you may prefer to start of with a smaller Cutting set
- Dritz Dual Purpose Marking Pen and Fray Check
- Ball Point needles
- Singer walking foot or universal walking foot
- Blind hem foot.
- Wonder clips (I didn’t use these in the post, but they are just awesome!
Don't miss any more posts!


I believe it’s called a Handkerchief Hemline.
It’s really adorable, I love the fabric. Thank you for all your patterns and tutorials.
This is so cute and what a beautiful girl! I love this! Pinned. We truly love having you be a part of our party. I hope you will get a chance to stop by tonight at 7 pm. It's not a party without you! http://loulougirls.blogspot.com
Happy Monday! Lou Lou Girls
I love the hemline on this tank; it's absolutely adorable! And the colors…. such a sweet look. Thank you for sharing at Inspire Me Wednesday. Featuring you in this week's issue.
This is seriously SO stinkin cute! I love it–what a fun tank! I pinned it to my sewing projects Pinterest board!
Thanks for linking up to our Betwitchin Party! Be sure to come back every Sunday starting at 6am EST over at OurMiniFamily.com to link up your projects again!
~Cathy Mini~
Very cute. Love the cut of the tank and I LOVE reverse applique! 🙂 Great job!
Gina
I'm sure there are many of our party guests that will love this tutorial. Thanks for sharing at #theWeekendSocial. I look forward to more of your creativity. Thursdays 9:00 PM EST. Pinned!
Love the shape of this top and the hemline!
My granddaughter would like this pattern. Thank you for sharing!
You sure a busy gal always sewing adorable clothes for your kids or cooking something delicious. Makes me wish I still had small grand kids to sew for. They seemed to like that Grama had made it for them. Used to sew for my kids when they were young. They get to a certain age and don't want hand made anymore for fear somebody will call them dorky. I was asked to help make shorts for them tho, they're 14 and 17. I am so impressed with all the fantastic clothes you make for your kids. You are an innovator, not afraid to try little different and you succeed so well. Your little girl is so pretty, very sweet.
Happy summer days
Thank you for offering this pattern. It's awesome and so versatile. I recently used the basic pattern to make summer pajamas for my daughter.
I know my granddaughter would like it. On our recent back to school shopping trip she was liking the tops that had extra material sewed into the back that made it twirl. . She seems to have out grown the owl, but the FOX is in. She is entering 4th grade and is 9. She also liked the tie-dyed knit jeans. She never worries much about crocheted pretties as I supplies those and add extra onto ho-hum dresses and tops for her. She still likes ruffles, glitter, and tulle of course!