Free Knot Dress Pattern and tutorial (girls, size 2 to 10)
Disclosure: This post may contain affiliate links. As an Amazon Associate, I earn from qualifying purchases.

Free Knot Dress Pattern: Learn How to sew a Knot Dress with this free printable dress pattern.
A Knot Dress is a super simple dress to sew and is perfect for beginners. The dress is made with quilting cotton and there are no zippers or buttons! The best part is, you can mix and match your fabrics to look just like a Wildflower or Matilda Jane Knot Dress. (What little girl does not love a fun, brightly patterned dress? Plus, you get to say, I made that dress! ![]() ) Be sure to get your free copy today!
) Be sure to get your free copy today!

💌 Save this article
Good News! This Free Knot Dress Pattern/tutorial Now Goes up to a Girl’s Size 10!
I have a sweet new pattern to share with you today! Actually, if you’ve been following along for a while, you can probably tell the pattern is not quite “brand new” as my sweet little miss (featured in these photos) is now in middle school.
The original knot dress pattern was just a hand-drawn bodice that went to size 6. With Valentines Day just around the corner, I thought it would be a good time to update this pattern to a digitized format and add a couple of sizes.
I didn’t bother going up higher than a size 10 due to older girls not really wearing this style of dress anymore. (You could easily take the pattern up one more size by adding 1/4 inch to the bodice pattern piece width, 1 inch to the strap and .5 to the skirt and contrasting band pattern pieces width, and 1 inch to the skirt length. Any larger than that, you will need to grade the pattern to the size you need.)

Valentine’s Day Themed Photo Shoot
I love holiday-themed dresses and I wanted to make a special dress for a cupcake/Valentine’s day photo shoot I had planned for the kids.

I wanted my missy’s dress to be Valentine-ish, but not “scream” Valentine’s Day. That way, she could wear the knot dress anytime.
I came across these pink and brown fabrics at Joann’s that seemed perfect for the occasion. I thought the sweet birdie print fabric apron tied in nicely and helped the outfit not be over-the-top Valentine’s Day.
Isn’t his bow tie cute? You can find the tutorial for the bow tie here: boy’s bow tie He definitely got a kick out of wearing it.

Do you remember my ruffle dress/top tutorial from a few years back? (Odds are, you probably don’t. That sweet little dress didn’t get much love – it was so cute and included 2 pattern sizes.) Anyway, I digress. I used that pattern, with just a couple of tweaks, to make this adorable knot dress for Valentine’s Day.
Knot Dress Details
A knot dress is fairly easy to sew. It has almost all straight seams and no zippers, elastic, or button closures. (Although you will make a buttonhole for the straps.)
- Sizes available – Girl’s – 2 thru 10
- Skill Level – Beginner
- Time Needed – about 4 hours
I was doing all sorts of “mom stuff” and photographing the tutorial process when sewing this dress, and I still finished it in about 3/4 of a day! (A contrasting band instead of a ruffle is an incredible time-saver, lol.)
The construction of this dress is very similar to my halter dress and is very simple. (That halter dress is another one that is great for beginners.)
The printable PDF dress pattern is available in sizes 2 to 10. This knot dress is designed to be roomy and has about 4 inches of ease around the chest area. This added ease allows the dress to slide over your child’s head, shoulders, and hips without too much struggle.
If you desire a tighter fit, you may want to size down, or add a piece of elastic in the back- you can get an idea of how to do that in my halter dress tutorial. (You can always create a quick test muslin with just a front piece and back piece out of scrap fabric to test your fit.)
Knot Dress Variations
This is a great basic pattern that you can easily change up to make it your own. Here are a few ideas to make your own customized knot dress:
- Add a ruffle to the bottom instead of a contrasting band (like this pillowcase dress)
- Add buttons to the straps instead of the knots
- Attach the straps to the front bodice instead of the back and add a single buttonhole to the back bodice so you can have a bow-back top. (You might have to increase the length of the straps to get a bow.)
- Use multiple fabrics in the skirt (like I did here)
- Add a tiered skirt (similar to this tutorial)
- Add pockets, a bow in the front, the list goes on!

PDF Knot Dress Pattern Details
When it comes to printing this pattern, I have included a couple of options for you.
Paper Saving Printing Option:
This knot dress pattern is a bodice pattern piece and a bunch of rectangles. If you want to save paper and ink (and are comfortable using a ruler to draw out shapes,) I have provided cut charts for the skirt, contrasting bands, apron, and straps.
All you need to do is select the size you want to print from the layers tab and print pages 1 to 3. Then cut your pattern pieces according to the charts.
Please note, the cut charts do not instruct you to cut the pattern pieces on the fold, but the printable pattern pieces are designed to be cut out on the fold.

How to Print Only One Pattern Size:
FYI, there’s a new printing option for you! You can now print only the size needed. (This pattern only, I’m slowly going back and updating the older patterns.) This function is super handy and makes it much less confusing when cutting the pattern, plus I love that it enables me to print in black and white. (Color ink can be pricey!)
In the free adobe reader program, click the stacked paper icon and the program will show you the clickable layers. Just toggle the layers you want off/and on. (always leave the pattern marking layer on.)
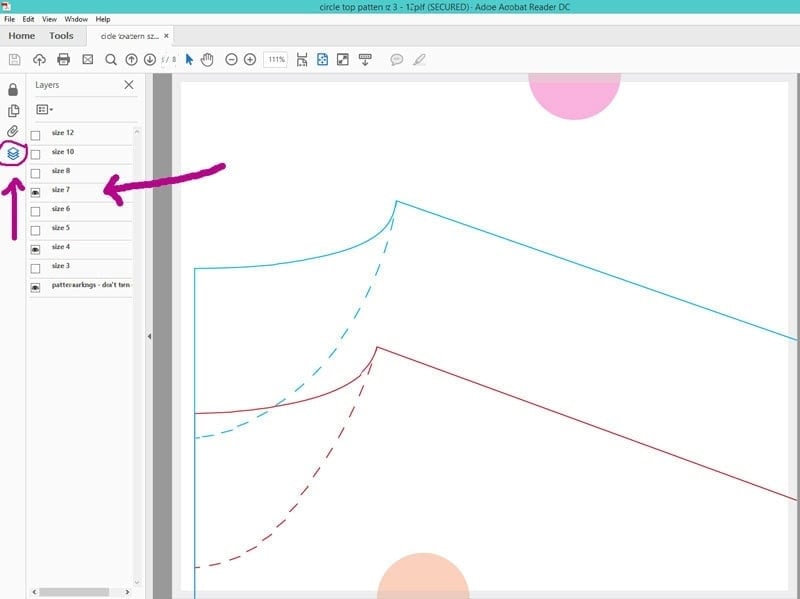
Choose Auto/landscape portrait and actual size and print. (My free patterns are only guaranteed to work and print properly in adobe acrobat reader program, FYI.) You have to watch what pdf reader program you are using, many browsers use their own pdf reader as default.
How to Make a Fabric Saving, Less-Full Skirt
Sometimes fabric can be pricy or if you’re like me, have tons of fabrics in just 1-yard cuts. To save on fabric, I will sometimes do a one fabric piece, fabric-saving-less-full skirt. What I mean by this is I ignore the fabric widths on a pattern and just make my skirt the full width of the fabric. (Most quilting cottons are 40 to 42 inches wide.)
This method works fine up to a size 6 on this pattern, (and is what I did for the photos in this tutorial.)
Please note: Sizes larger than 6 will need a skirt wider than 42 inches.

Knot Dress Pattern Fit Chart

Knot Dress Fabric Requirements:
Fabric required for up to a size 10:
- Bodice: 1/2 yard
- Skirt: 1 1/4 yard
- Contrasting band: 1/4 yard
- Apron: 1/2 yard
- Straps: The straps are 3 inches wide on all sizes. If your fabric does not have a one-way direction, you only need 1/4 yard. If your fabric has a definite up/down, you will need 1/2 yard.
Materials Needed to Sew the Knot Dress:
- Pattern (When printing, be sure to save the pattern to your PC, open it in Adobe Reader, choose auto/landscape, and print at the actual size.)
- Fabric
- Scissors, ruler, fabric pen, thread, iron, and other basic sewing supplies
Products Used and Recommended in this Project:
- My favorite shops for fabric are Fabric.com, girl charlie, Etsy and Bluprint. (My fave for knits is Funkalicious Fabrics.)
- My Sewing Machine: SINGER 9960 Quantum Stylist 600-Stitch Machine with Extension Table, Bonus Accessories and Hard Cover
- My Serger: Brother 1034D 3 or 4 Thread Serger
- Pinking Shears
- Rotary Cutter
- I love my large ruler and large cutting mat, but you may prefer to start off with a smaller Cutting set
- Dritz Dual Purpose Marking Pen
- Fray Check
- Wonder clips (I didn’t use these in the post, but they are just awesome!
How Do I Get the Free Knot Dress Pattern?
To receive the free pattern, visit the pattern page in my shop HERE. <<== click that link
Add the pattern to your cart and navigate through the checkout process. (Don’t worry—this pattern is free; no payment info is asked for.) After the checkout process is complete, you will see a button prompting you to save the pattern. You will also find the link directing you to the page where the pattern sewing instructions are stored.
As long as you enter your email correctly, you will also receive an email with a link to the pattern that directs you to the sewing instructions.
Knot Dress Sewing Instructions
Seam allowances are included and are 1/4 inch unless otherwise stated.
Step 1: Printing pattern and cutting out pattern pieces.
Save the pattern to your PC, and open it with Adobe Acrobat Reader (not the PDF reader in Chrome.) Select your pattern size, choose auto landscape/portrait, scale at 100% or actual size, and print.
I recommend first printing page 2 only and checking that the one-inch square is printed at one inch. Once you have confirmed your printer settings you can print the entire pattern.
Don’t forget, this pattern has a paper-saving option. You can print just pages 1 to 3 and draw out the rectangular pattern pieces from the included cut charts.
Assemble the pattern according to the image above, lining up the outer edges of the gray boxes and the colored, lettered circles. Tape together and then cut the pattern out.
Step 2: Cut out the Fabric Pieces
Transfer pattern markings and cut out pattern pieces. You will have:
- 4 bodice pieces (front and back and lining front and back)
- 2 skirt pieces
- 2 contrasting band pieces
- 2 strap pieces
- 1 apron piece
Tip: If you are low on fabric, don’t forget about the fabric saving skirt option I shared on the Knot Dress Pattern Info/tips page.

Step 3: Assembling the Bodice.
Line up the 2 main bodice pieces right sides together and the 2 bodice linings right sides together. Sew along the sides using a 1/4 inch seam allowance and press the seams open.

Fold the straps in half, longways, right sides together and sew along the long side and one of the short sides. Flip the straps right side out and press flat. Do both straps.

Slip the bodice lining (my lining is the brown fabric) over the bodice, right sides facing each other. Line them up and pin in place. Flip the bodice around so the backside is facing up.

Pull the bodice back piece and back lining piece apart and slide one of the straps in between the layers. The raw (un-sewn) side of the strap will go in first and line up with the raw edges of the top of the bodice, as shown below.

Line the strap up with the pattern markings (about 1/2 inch from the edge) and pin in place. Repeat for the 2nd strap.

Sew along the top edge of the bodice 1/4 inch from the edge, all the way around, front and back.

Snip the corner piece and cut little v’s into the curves of the arm, be careful not to snip into the seam.

Flip the bodice right side out and press the edges flat with your iron.
Topstitch around the entire top edge of the bodice, front and back.

Pull the bodice and bodice lining apart and press the edge of the lining up and to the inside 1/4 inch.

Step 4: Adding the Buttonholes
Buttonholes:
Create a 3/4 inch buttonhole according to your machine’s directions on the buttonhole pattern marking. (All machines are different – so be sure to practice your buttonholes first!) (The buttonhole placement is about 5/8 inch from the top and 3/4 from the edge and 3/4 inch long.


Repeat on the other side for a 2nd buttonhole.
Use your seam ripper to open the buttonhole. (Take care not to seam rip past the top of the buttonhole.) ![]()

Step 5: Assembling the skirt and apron.
Skirt:
Right sides together, sew the 2 skirt pieces together so you have one skirt piece. Do the same for the contrasting band. Press the seams flat.
Wrong sides together, fold the contrasting band in half longways and press.

Lay the skirt fabric out right side facing up and line up the raw edge of the contrasting band with the bottom of the skirt.

Sew along the edge using a 1/4 inch seam allowance and finish this edge with a serger, pinking shears or a zig zag stitch on your sewing machine.
Press the seam of the contrasting band and skirt up. (for topstitching later)
Fold the skirt panel in half right sides together. Sew the skirt sides together using a 1/4 inch seam allowance.

Finish the side seam(s) with your serger, sewing machine or pinking shears.
Turn the skirt right sides out and topstitch around the contrasting panel. The top stitch should catch the finished seam you pressed up.

Apron:
Fold both side edges over 1/4 inch and press, then another 1/4 inch and press again. Sew along the edge.

Repeat the folding, pressing and sewing on the bottom edge of the apron.

Step 6: Gathering and putting the skirt, apron, and bodice together.
To gather the apron, change your sewing machine setting to the longest stitch length and sew a straight stitch across the top of the apron, 1/4 inch from the top edge.
Pull on the top thread and slide the fabric down the thread to gather the top of the apron. Keep pulling and gathering until the apron is about 6 to 8 inches wide. (My size 6, is gathered to 8 inches, you might want to go up/down about 1/2 inch per size.) Spread your gathers as evenly as possible.

Follow the same instructions to gather the top of the skirt. Keep gathering the skirt until it is the same width as the bottom of the bodice.

Fold the bodice in half to find the front center. Mark this spot with a pin or your fabric marker. Fold the apron in half and find the center mark as well and mark it.

Place the apron and bodice right sides together and line up the center marks and raw edges. Use a few pins to hold the apron in place.

To attach the skirt, line up the skirt seam(s) (center or sides) and raw edges with the right sides of the bodice and skirt together.
Start pinning the skirt to the bodice, sandwiching the apron in between.

Once you have pinned about half the skirt, you can flip the skirt and bodice around so the bodice is inside the skirt to make the pinning easier.
After you have pinned the skirt all the way around, be sure to go back and remove the pins you used to hold the apron in place.

Sew right along the gathered seam.

Remove all the pins and flip your dress inside out. The bodice lining you folded and ironed earlier will hide the gathered seam.
You have two options to secure the bodice lining in place, you can do a simple fell stitch or whip stitch by hand.

Or you can do what I do: Flip the dress right side out and with one hand inside the dress and the other hand outside the dress, I pin from the outside and use the other hand to make sure the pins are holding the lining in the right place.
Then topstitch around the bodice from the outside. This will usually catch all of the lining and sew it in place. If you miss anything, you can go back and hand stitch any missed spots.
This method works well. You can see, the only thing I missed was the folded edge in this small area.

Flip the dress right side out and admire your work… Adorable!!
Pin the Knot Dress For Later: ![]()

Now go take some pictures and come back to share. You can share an image to my Facebook group here or tag me on Instagram using the #scatteredmompatterns.
Don't miss any more posts!

Follow along on:
Feedly, Bloglovin', your favorite feed reader, or signing up via email and have new posts delivered to your email box each week!Don't miss any more posts!

One of my favorite patterns is the girl’s Knot Dress.
Does one print this on Portrait or Landscape? When printed on portrait the square is slightly too small and landscape slightly too big.
I just tested it (see here) and it printed at the correct size for me. I used the free adobe reader program on my computer and chose actual size and orientation = auto. (it is set up for landscape printing) Are you printing from your phone or the built in pdf reader instead of the adobe reader? That could cause issues, maybe.
Also, it is a generous fit, so I wouldn’t think 1/8 of on inch or less off would make much of a difference.
The dress is so cute that I wish I had a little one to sew it for but I don’t. The photo shoot turned out so good because you have such cuties to pose for you! What sweethearts!
I recently made this dress in a size 2 for my youngest granddaughter. It was fun to make and she loved the dress but because she is a petite little thing it turned into a maxi-dress! Love the pattern though and my 3 other granddaughters have requested their own!!
Thanks for the tutorial! I followed it to make the first dress I have ever made and it turned out great. I made it for my 18 month old daughter. She loves it too!
Awesome! Thank you so much! It worked great. I will see if I can figure out how to attach a pic of my daughter in hers. I am very much a beginner at sewing and your instructions were fantastic!
I'm glad you were able to get it done! did you end up having enough fabric? I would love for you to share a picture on my facebook page!
~Jamie
Adorable, love the dress!
I am soooooo stinking excited I found your tutorial! I have successfully made my girls their Easter dresses for this year. For someone who has taught themself to sew on her passed mom's 50 yr old machine, reading the antique instructions, your tutorial was super and so helpful. Not sure how to send you a photo, but I have one of the coordinating ones I made for them. Thanks again!
Thanks for the tutorial! Here is mine!!!
I received this email earlier today and thought I would add it to the comments in case anyone else has similar questions. (It sounds like she bought a knot dress pattern and it turned out larger than she wanted it to be. FYI, Knot dresses are usually very wide- if it is too narrow, you won't be able to get it over your childs head and shoulders:
"i have read over your tutorial and I'm not sure I'm doing it correctly do u sew two fronts and two backs together and also my finished product was suppose to be a size 2 according to the pattern I purchased and it is so wide and big around arms it fit my 6 yr old? Any tips on what I could be missing thank you so so much:)"
Yes, you sew a bodice front to a bodice back – and a bodice lining front to a bodice lining back. (then put them together.) It is a very wide bodice top since it doesn't stretch needs to fit over a child's shoulders and hip and is designed to fit over an undershirt.
The finished bodice width should be around 11 3/4 inches. (the actual measurement of the size 2 paper pattern is around 6 1/4 to 6 3/8 on the bottom – depending how you cut it.) Let me know if yours is much wider than this. It may be a printing/printer issue and it might be necessary for me to go back to the tutorial and add measurements to the pattern.
I just put together a size 2 bodice front and back and my 6 year old definitely could not get it over her hips.
What I have done in the past to tighten up a too loose bodice is to add a piece of elastic to the back of the dress/top.
To do this: Create a casing in between the back bodice top and lining. Insert a piece of elastic, (maybe around 10 inches long – you will trim it down once you have customized the fit.) sew the elastic down on one end. Have your little one try on the dress, tighten the elastic and secure with a safety pin. Then sew the other end of elastic down and remove the pin. (Very much the same way I created the casing in this tutorial: (skip to step 4) .
Love this!!! Made this dress for my granddaughter, it turned out so cute! I made the dress in the size 6, and it ended up being way big, So I added side ties so its adjustable! Thank you for your wonderful tutorials
I do tend to make my stuff on the large size(and long). On this dress I was worried she would not be able to pull it over her head, plus I want a few years wear out off anything I make. If an item is lined, you could always add a small elastic casing in the back bodice and if it is single layered, try adding a few rows of shirring.
I appreciate the feedback, I will mention to the readers that they should compare the pattern to something they already own before sewing.
~Jamie
beautiful pictures! love the coloring.
thanks for the (very clear) tutorial!
What a fun photo shoot! I love the lighting!
liZ