How to Make a DIY Fabric Gift Basket (perfect for Mother’s Day!)
Disclosure: This post may contain affiliate links. As an Amazon Associate, I earn from qualifying purchases.

How to Create a Fabric Basket: This DIY Fabric Gift Basket Tutorial is a versatile project that you can tailor to suit any theme or occasion, making it the perfect way to elevate your gift presentation. Whether you’re a beginner or an experienced sewer, this sewing project is both fun and rewarding!

💌 Save this article
Sew a DIY basket for Mother’s Day
Mother’s Day is just around the corner!
Do you have a gift basket planned for Mom this year? If so, I’ve got a great DIY Fabric Basket tutorial to share that will dress up any gift basket!
I love Mother’s Day, don’t you?
Every mom deserves a little pampering on Mother’s Day. This year, I decided to create something special for all the moms in our family (myself included, of course, lol). Thoughtfully curated gift fabric baskets are one of my favorite go-to gifts for occasions like this.
Gift baskets are a great gift option
When you want to combine multiple items or customize a gift to suit a specific person or theme, creating your own DIY gift basket is the perfect solution. Personally, I enjoy selecting my favorite treats and thoughtfully curating each inclusion.

For this Mother’s Day gift basket, I chose a “pampering” theme and carefully selected some of my favorite at-home beauty and self-care products to include. To complete the easy basket, I added a few additional pampering items, all in coordinating, vibrant packaging for a cheerful and cohesive look.

Are You Ready to Sew a Fabric Gift Basket?
This easy fabric basket pattern can be sewn to any size basket and with any fabric to fit your gift or theme. The best news about this project is that you can whip several out in less than 30 minutes. (And even less time if you use store-bought bias tape!)
Fabric Gift Basket Pattern Sewing Tips:
- Use a .25-inch seam allowance
- If you want these baskets to be truly reusable, I recommend using a heavy-weight iron-on interfacing. (Iron it to the back of the lining piece.)
Materials Needed for the Fabric Basket:
- Coordinating fabric (this basket uses fabric cuts that measure 27 inches (w) by 9 inches (h))
- bias tape
- optional heavy-weight fusible interfacing
- rotary cutter/scissors
- needles
- iron
- disappearing ink marker
- basic sewing supplies
DIY Fabric Gift Basket Sewing Instructions
Step 1: Cut out fabric.
(Optional step 1a: Cut a piece of interfacing to 27 inches (w) by 9 inches (h) and iron to the back of your lining fabric.)
Cut two pieces of fabric 27 inches (w) by 9 inches (h)
If making your own bias tape, cut one strip 28 inches (w) by 1.75 inches (h)

Step 2: Sew fabric basket together.
Fold the outer fabric piece in half, right sides together (as shown below), and sew along the side and bottom, using a 1/4 seam allowance. Trim seam allowance 1/8 inch.
Repeat on the lining piece.

Step 3: Creating the boxed corners.
Fold the fabric basket, with the bottom seam up, as shown below. Use a ruler and measure down 2 inches from the top point. Draw a line with a disappearing ink marker. Repeat on the other side.

Sew along the lines you drew.

Trim the excess fabric off the bottom corners.

Check out your awesome boxed corner:

Repeat step 3 on the lining piece.
Step 4. Putting the basket together.
Insert the lining piece into the outer fabric basket piece, wrong sides together, so the design faces up, lining up the side seams.

Sew a basting stitch along the top of the pieces to hold everything in place.

Step 5: Adding binding to the top of the basket.
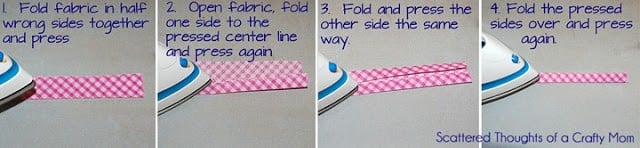
Want to make your own binding? Follow these directions to make your own ==> Easy binding for fabric basket.
Open binding strip.

Line up the raw edge of the binding along the raw edge of the basket. (You can also use the “sandwich technique if desired; I find this way makes for a neater application.)

Fold the beginning edge of the binding over and pin it in place.

Sew the binding in place, right above the 1st crease.

Flip the binding around the edge of the DIY fabric baskets and pin it in place.

Sew along the bottom of the binding, catching both sides in the stitches.

You are done. How gorgeous is that basket!!!

Now fill your fabric bin full of your favorite lip balms, lotions, and other pampering goodies for mom!

As always, if you make one of these gift baskets, be sure to come back and share a picture on my facebook page or tag me on Instagram with #scatteredmompatterns!
Don't miss any more posts!

Follow along on:
Feedly, Bloglovin', your favorite feed reader, or signing up via email and have new posts delivered to your email box each week!DIY Fabric Basket Tutorial Sewing Instructions

Materials
- Coordinating fabric (this basket uses fabric cuts that measure 27 inches (w) by 9 inches (h))
- bias tape
- optional heavy-weight fusible interfacing
- rotary cutter/scissors
- needles
- iron
- disappearing ink marker
- basic sewing supplies
Instructions
(Optional step 1a: Cut a piece of interfacing to 27 inches (w) by 9 inches (h) and iron to the back of your lining fabric.)
- Cut two pieces of fabric 27 inches (w) by 9 inches (h)
- If making your own bias tape, cut one strip 28 inches (w) by 1.75 inches (h)
Step 2: Sew fabric basket together.
- Fold the outer fabric piece in half, right sides together (as shown below), and sew along the side and bottom, using a 1/4 seam allowance. Trim seam allowance 1/8 inch.
- Repeat on the lining piece.
Step 3: Creating the boxed corners.
- Fold the fabric basket, with the bottom seam up, as shown below. Use a ruler and measure down 2 inches from the top point. Draw a line with a disappearing ink marker. Repeat on the other side.
- Sew along the lines you drew.
- Trim the excess fabric off the bottom corners.
- Check out your awesome boxed corner:
- Repeat step 3 on the lining piece.
Step 4. Putting the basket together.
- Insert the lining piece into the outer fabric basket piece, wrong sides together, so the design faces up, lining up the side seams.
- Sew a basting stitch along the top of the pieces to hold everything in place.
Step 5: Adding binding to the top of the basket.
- Want to make your own binding? Follow these directions to make your own ==> Easy binding for fabric basket.
- Open binding strip.
- Line up the raw edge of the binding along the raw edge of the basket. (You can also use the “sandwich technique if desired; I find this way makes for a neater application.)
- Fold the beginning edge of the binding over and pin it in place.
- Sew the binding in place, right above the 1st crease.
- Flip the binding around the edge of the DIY fabric baskets and pin it in place.
- Sew along the bottom of the binding, catching both sides in the stitches.
- You are done.

Are these fabric baskets washable?
yes
Hi!
Do you have a free printable pattern? Please. Thank you.
I believe that tutorial is just a set of dimensions for you to cut out. No actual pattern since it is all rectangles.
This is adorable, what a nice project. Thank you for sharing! And your fabric choice is so cheerful.
This is such a great Mother’s Day idea!!
Cute but what is the finished size of the basket? Thanks
4 by 9 by 5 inches tall.
What a cute and thoughtful gift for mom! Those spring products are great for pampering.
I cannot figure out how you folded the fabric for step 3. Can you either explain it or show pictures illustrating your folds?
Super cute idea!
I’ll make a little video and paste the link here. (doing it now)
here it is: https://youtu.be/eEDlOk4vjjg
I love the idea! This is such a wonderful gift to give for Mother’s Day!
This is awesome, I also love making things myself and I must say I have to try this one out too!!
I love eos and the idea of gifting is a handmade fabric basket adds such a personal touch! Love the fabrics!
Oh my! I am a huge fan of all EOS products. The purple lip balm is my favorite
Cute idea way to present a gift. I didn’t even know EOS made anything other than lip balm. I’ll have to try these other things!
My daughter is trying to teach herself how to sew. Going to give her this post as an idea and see if she can do it on her own!
I love the fabric combinations on this project. My mother in law would love a gift like this.