How to make a Pillowcase Dress without Sewing
Disclosure: This post may contain affiliate links. As an Amazon Associate, I earn from qualifying purchases.
Don’t have a sewing machine? That’s no problem! Learn how to make a pillowcase dress without any sewing! All you need is a bit of fabric, (or 2 bandanas) fabric adhesive and ribbon!
 (Looking for more free patterns? Be sure to check out my free patterns and tutorials page here.)
Would you like to guess at what one of the most frequent comments left on my blog is? It is any variation of “That’s so cute, I wish I could sew…”
There’s no question about it, I really like to sew. At the same time, I want to keep the things I make on this blog simple, so anyone could recreate them easily. Whether they have sewing skills or not.
So today, I am going to show you how you CAN make a pillowcase dress/top with NO sewing! (Of course, you can still sew the pillowcase dress using this tutorial- I’ll point out any changes you would need to make at each step…) If you do sew, you might like my Polished Pillowcase dress tutorial or the Tiered Pillowcase Dress Tutorial.

You’ll be surprised at how easy it is.

Materials needed to make a No-Sew Pillowcase Dress (In our case, it is more of a top):
- 2 Bandanas (I got mine at walmart for $.99)
- Iron-on hem adhesive (be sure to look at this link to make sure you are getting the right stuff)
- Iron
- Ruler
- 75 inches (+/-) of 7/8 inch grosgrain ribbon
- Safety pin
- Fray check or lighter
How to Make a NO-SEW Pillowcase Dress:
Instructions:
Step 1: Creating the armhole seams.
Layout your bandanna, wrong side up. Starting at the top left side, with your ruler, measure over 5 inches from the edge.

At the 5 inch mark, fold the edge over as shown.

Using your iron press in a good crease.
(If you are sewing, trim the folded piece 1/2 inch from your folded mark. Fold the new edge over 1/4 inch, press, fold over another 1/4 inch, press again and sew along the folded edge, do this on both sides for each bandana.)

Tear off a piece of hem tape that measures from edge to edge of your folder corner as shown.

Trim the edges of the hem tape so the length fits just under the edge of the bandanna.

Open the flap and place the hem tape up against the crease you ironed.

Fold the bandanna back over and iron according to the directions of your hem tape. Follow the same process on the right side of the bandanna and then repeat on the 2nd Bandanna.

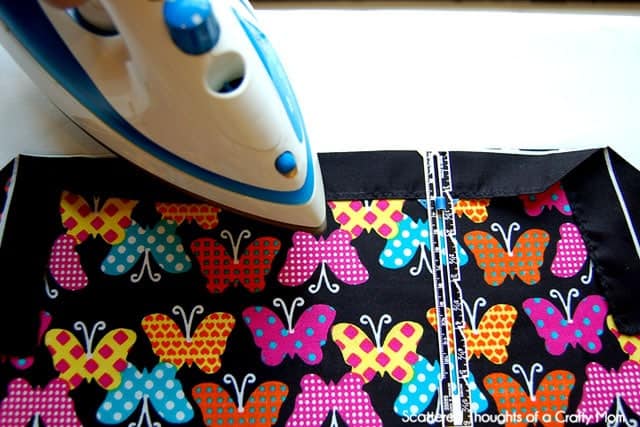
Step 2: Make the neckline casing.
The wrong side still facing up, fold the top edge of the bandanna over 1 1/4 inch and use your iron to press in a good crease.
(If you are sewing, sew along the bottom edge of both bandannas.)
Measure out another length of the hem tape to match the edge you just folded over. Trim the hem tape so it fits right under the edge.

Place the tape right along the bandanna edge and press according to the package directions. (Make sure you are putting the hem tape at the edge of the bandanna and not at the crease. We are making a casing for the shoulder ties.) Repeat on the 2nd bandanna.

Step 3: Side seams.
Lay the 1st bandanna out on the ironing board, right side facing up. Measure out a piece of hem tape the length of the side of the bandanna from the armhole to the bottom edge. Trim well.

Lay the edge of the 2nd bandanna right side up, along the edge of the 1st bandanna. Trim off any overhanging hem tape. Press well! This seam will get the most wear and tear. Repeat on the other side.
(If you are sewing, line up the bandannas right sides together and sew along the edges, press the seams flat.)

Step 4: Add the ribbon for the shoulder ties.
Using a safety pin, run the ribbon through the front and back casing. At this point you can leave the ribbon in one piece and have the tie on on shoulder or you can cut it in half and have a tie on each shoulder. Using a lighter or fray check, seal the edges of your ribbon and you are done!
Have fun!

Just a couple of notes on this project:
1. In the photos I took yesterday of my daughter wearing the pillowcase dress/top, I had used bias tape for the shoulder ties. I replaced the bias tape with ribbon today and the ribbon works SO MUCH better!
2. I washed and dried the dress/top on normal and the hem tape held up well, but for subsequent washing’s I will hand wash and line dry to help keep the hem tape intact.
3. I used bandannas for this project because they already have seams. But if you have a pair of Pinking Shears, you could use any fabric you want. (You could recycle old sheets, tablecloths, curtains, clothing, etc…) Before I learned to use my serger, I used my pinking shears all the time.
4. You could also try fabric glue that is applied just like regular glue. I have never tried it, but am curious if any one has. If you have, would you leave me a comment and tell me how it holds up?


Looking for a few more fun, no sew projects? Be sure to check these out:


Don’t miss any more posts! You can follow along on Feedly, Bloglovin’, via blogger using the Google Friend Connect widget, your favorite feed reader, or by signing up via email. Just click on one of the icons below:

All I have to say is Thank you a million times over.
Thank you! And you are welcome.
I LOVE SEWING, so would much rather sew it together than use an iron or glue. It really comes out cute.
i wanted to know if you had measurements I would use for a 3-4 month old? I’d love to make these and embellish them with embroidery. Thank you for sharing, I am sewing machine challenged!
Hello from your newest follower!!! I love this dress!! And the fabric is beautiful!! Definiately going to be on my to-do list now for my little girl!!
also when you are using fabric that is not bandanas because bandanas already have a seam on them do you make a seam on the fabric or just leave it be…
do you have any measurements on different sized for this ranging from 0-5t?
thank you so basically for smaller girls you just tie the straps tighter…
Yes, that's right.
~Jamie
Great idea. A pretty pillow-case with the closed end opened would work too, with the same construction plan. Also for a larger person why not 2 large flowered scarves?
Katie
What an awesome project! Almost makes me wish I had a little girl, but I am thinking of trying this on one my size. Its simply adorable.
This is great, especially because I don't sew! lol. I want to try to make these for my 2 year old and 6 year old for a Disney trip, any idea how much fabric I would need to buy or what size to cut it to?
Hi, a bandanna is about 22 inches by 22 inches and a typical cut of cotton fabric is 41 to 44 inches wide (And it will shrink when you wash it, but so does a bandanna.) So try to find a fabric that is 44 inches wide. You can cut your oldest daughter's 22 inches wide and it would be ok if the little ones was only 20/21 inches. For length, measure from the childs collarbone to the length you want and add 2 inches to that measurement. As an example, for the 2 year old, you would need 2 pieces 21 inches wide by about 22 inches long and maybe for your older daughter, you might need 2 pieces 22 inches wide by about 30 inches long. (This is just a guess, you need to measure your girls.) You might be able to get away with one yard of fabric depending on the length of dresses you decide on…
Hope this helps,
Jamie
This is Adorable! I Love it! I Really want to try and make this for my daughters 1st birthday party! 🙂 I have fabric, and want to know what size should I cut it to?
Thank You so Much!
@Jdle1203: If you have enough fabric, fold it in half and cut it 17 inches long and 16.5 inches wide (unfolded the fabric is 17 by 33 inches.)
Good luck!
~Jamie
Hi Jamie,
I am from India and I needed some information of the bandana's. I liked the bandana you have used for the dresses and I see that you bought it from Walmart. I searched the walmart website but I just found a black,white and red bandana set there. I have a friend in US who can buy these for me. So can you tell me which section to search for and also do they have many prints like the one you picked always in store? If you have any online option do share the link.
Thanks,
Roopali
Hi, I have seen these bandannas in different area all over Walmart. Sometimes they are with the ladies accessories over near the hats, other times I have seen them on their own little display near the check out lines. I have a few more photos of some of their other bandannas in this post: https://www.scatteredthoughtsofacraftymom.com/2012/02/banana-dress.html. I am sure if your friend took a photo to show to a Walmart employee, they will help her find them…
Good luck,
~Jamie
Very cute bandanas -to very sweet dress! Thanks for sharing!
I haven't sewn a thing since 8th grade home economics class, so this is perfect for me. I don't have any girls, but I have nieces that would love a dress/shirt like this. Thanks!
What a great idea! I just re-pinned your dress and will be attempting to make one for my daughter. Wish me luck! 🙂
Cheers,
Char
Just stopping by to let you know that you've been featured at The Gunny Sack! http://www.thegunnysack.com/2012/06/who-was-stuffed-in-gunny-sack-week-39.html
This is a wonderful idea! I hate sewing, but I just made a dress for my daughter without a problem. Thanks so much!
You had me at, "no sew!" I am featuring this greatness at tonight's link party!
Kim
http://too-much-time.com
How adorable! I wonder if I could make one to fit my quickly growing daughter. As for the fabric glue, I tried it not too long ago and was less than thrilled. It tends to be stiff and didn't hold all that well.
Such a cheerful dress. I'm so glad it doesn't require any sewing! 🙂
That is genius! Thanks for the no-sew idea – I need that! Beautiful! All the fabric you choose is awesome!
Thanks for linking up-!
Stacey of Embracing Change
Thank you so much for linking up to last week's Tuesday Confessional! I've featured your post, so head on over and grab a new brag button.
http://www.craftyconfessions.com/2012/05/tuesday-confessional-features-from-last.html
I hope to see you at this week's party going on now!
~Macy