Off the Shoulder Flutter Sleeve Top for Girls (sz 6 to 14)
Disclosure: This post may contain affiliate links. As an Amazon Associate, I earn from qualifying purchases.

I’ve got a fun new, Off The Shoulder Top Sewing Pattern for girls to share with you today! This one is more for the older girls and it comes in sizes 6 to 14.

How cute is this off the shoulder top for girls? It’s basically a sized down version of my ladies top, but with slightly looser elastic and a halter tie (to compensate for the looser elastic, lol.)

I can not tell you how much my little missy loves this top! It took me a couple of tries to get it right, but this top is definitely a quick sew.
In the first version, I followed the same elastic cutting suggestions in the ladies top, but she complained about the tightness bothering her, so I loosened up the fit and just added a halter tie. (Although the top did seem to stay up without the tie, we didn’t want to take any chances.)
I used a light/medium weight stretch knit on her top and since the knit doesn’t fray, I was able to skip the step of “pre-finishing” the sleeve and bodice edges. (I did not have any trouble, but I’ve sewn about 6 of these tops now, lol. Everything just takes a bit of practice.)

I have to say, the trim really made this top. I think it came out even cuter than my version did! When choosing your fabric, definitely consider something that will coordinate with a fancy trim.


Ready to sew this top?
Girls Off the Shoulder Top Sewing Pattern Instructions
Materials needed:
- Pattern Click that link to download pattern)
- fabric (up to a yard)
- 1/2 inch elastic
- iron
- binder clip or wonder clips
- basic sewing supplies
Products used and Recommended:
- My favorite fabric shop for knits: Funkalicious Fabrics and Girl Charlee. My favorite shop forcottonsand other fabrics: Fabric.com.
- My Sewing Machine: SINGER 9960 Quantum Stylist, my coverstitch : Janome Cover Pro 1000cpx
- My Serger: Brother 1034D 3 or 4 Thread Serger or you can just use Pinking Shears
- Rotary Cutter
- I love my large ruler and large cutting mat, but you may prefer to start off with a smaller Cutting set
- Dritz Dual Purpose Marking Pen and Fray Check
- Wonder clips (I didn’t use these in the post, but they are just awesome!
Pattern Tips:
- 3/8 inch seam allowance
- Light, flowy fabrics recommended (rayon, knits, voile, polyester/silk type fabrics) I used a sturdy stretch knit fromgirlcharlee, though this print is no longer available
- Topis designed to hit at the hip. To shorten or lengthen, cut pattern at waist level and redraw side seam.
Fit Chart:

Sewing instructions:
Step 1. Print pattern, tape together, and cut out the size needed.
Step 2. Cut pattern pieces from fabric
Fold the fabric in half and cut two sleeves and a front and back bodice piece and a strip for the halter tie
Halter tie measurements: 42 inches by 1.25 inches

Step 3. Measure for elastic.
Measure around your chest, just under armpits. Multiply the chest measurement by .9 and add 1 inch to that number.
This is the length of elastic needed for the top of bodice. Cut one piece of elastic to that measurement and then cut the elastic into two equal pieces. (You are cutting the elastic into two pieces because we apply it to the front and back separately.)

Measure loosely around the top of the bicep.
This number is your arm elastic measurement. Cut two pieces of elastic to your measurement (one for each sleeve.)
Step 4. Hem the Sleeves.
Hem the bottom of the sleeves, by folding over 1/4 inch, pressing with the iron, folding over another 1/4th inch, press again and stitch.
Step 5. Adding elastic to sleeves.
If working with fabric that frays, you will need to “finish” the top edge of the sleeve. You can finish the edge with a serger, zig zag stitch or fold the edge over 1/4 inch and press with iron. (If your fabric has difficulty holding a pressed edge, using fabric starch will help.)

Divide inner/top side of the sleeve into four equal sections, mark the sections with fabric marker or pins.
Divide sleeve elastic into four equal sections and mark them. Pin the elastic and top edge of the sleeve together at the marks.

Stitch the elastic to the sleeve with a long wide zig-zag stitch, stretching as you go.

Change the machine stitch to a long straight stitch. Fold the elastic edge over and carefully sew along the edge of the elastic, stretching the elastic as you go. (You will be sewing through the elastic.)

(Note: I forgot to hem the sleeve before adding the elastic, I quickly realized it would have been easier to hem first, so don’t forget!)
Step 6: Adding elastic to the front and back bodice.
Follow the exact same steps as above for the front and back bodice piece. (Finish the top edge, divide elastic and fabric in fourths, attach elastic with zig zag, fold elastic over and sew elastic down with a long straight stitch.)


Step 7: Assembling bodice and sleeves.
Line up sides of bodice top and bottom, right sides together.
Fold the sleeve in half wrong sides together.

Insert sleeve in between bodice top and bottom.

We want to baste a sleeve edge to the front bodice and the other sleeve edge to the back bodice.
Pin sleeve and bodice together and sew a basting stitch through the elastic, down to the bottom of the sleeve, 1/4 inch from the edge.

Use a binder clip or a wonder clip to hold all four layers in place. Sew bodice together at sides, from top to bottom with a 3/8 inch seam allowance. Go slowly through the elastic to keep layers from shifting.

Trim any ragged edges

Finish the side seam with a serger or zig-zag stitch on your sewing machine.

Repeat for the opposite side.
Step 8. Hem the bodice.
Hem the bottom of the bodice by folding over 1/4 inch, pressing with iron, folding over another 1/4th inch, press again and stitch.
Step 9. Add Trim if desired.
Step 10: Add halter tie.
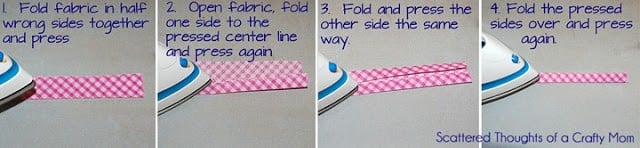
Fold halter tie as shown:
Sew a straight stitch down the open side of the Halter tie.

Tie a knot in both ends:

Stitch tie to top center edge of top:

You are done! Time to show off your work.

Don’t forget, if you end up sewing one of these tops, please come back and share a photo of your finished project in my private Facebook group or tag me on Instagram (@scatteredmom) with #scatteredmompatterns!
Don't miss any more posts!

Follow along on:
Feedly, Bloglovin', your favorite feed reader, or signing up via email and have new posts delivered to your email box each week!

Thank you very much for your kindness to give us for free girly patterns and instructions. I am grateful about all the 14 size patterns for my sweat girl. Please please please resize-if possible- older patterns you have already given us up to 14 size because my daughter is growing…very fast.Thanks again for your work, I wish you all the best for you and your family.
I am definitely working on this as my daughter is already into 10s and 12s too.
Super cute! Love the pom poms. Pinned. Visiting form Inspiration Monday..