Learn How to sew a Flirty Fall Skirt in all sizes with this super easy…
Rainbow Zipper Pouch Tutorial
Disclosure: This post may contain affiliate links.
I love my new Rainbow Zipper Pouch! Anything bright and rainbow colored is especially popular around here, and who couldn’t use a new pouch? It’s the perfect project if you have been wondering what to do with leftover zippers.
Rainbow Zipper Pouch tutorial
The zipper pouch works perfectly as a break-away clutch to put inside a larger tote. It’s so bright and colorful, you’ll always be able to spot it! (I have a feeling I’ll be making a 2nd one of these when my little missy comes home from Nana’s house…)
I always wanted to make a regular pouch with a zipper top, but since one of my sponsors (Zipper Lane) sent me so many zippers, I thought I would make my interpretation of a “zipper pouch”.
All the zippers actually work, so you can open it any place you want!
(Zipper Lane sells wholesale priced YKK zippers, you can get 100 7 inch zippers for $28. Perfect for big projects, you just need to plan ahead since they ship from India and it takes a little bit longer…)
Do you want to make one too? It really is easy, you can use any size zipper to get different shaped bags…
Of course, it doesn’t have to be rainbow, I picture it in a red and navy blue or all black for boys. Or how about a cute pencil bag in your school colors?
How to make a Rainbow Zipper Pouch
Materials needed for the ultimate zipper pouch:
- Several zippers (I used 13 7 inch zippers)
- Sewing machine
- zipper foot (not mandatory, but it helps)
- Sharp needle
- Hand sewing needle and thread
- iron
- extra fabric or bias tape if you would like to add a hand strap
- fray check (optional)
Instructions:
Unzip your zippers and begin sewing the zippers together. (right sides together) Carefully line up the metal zipper edge pieces when sewing together.
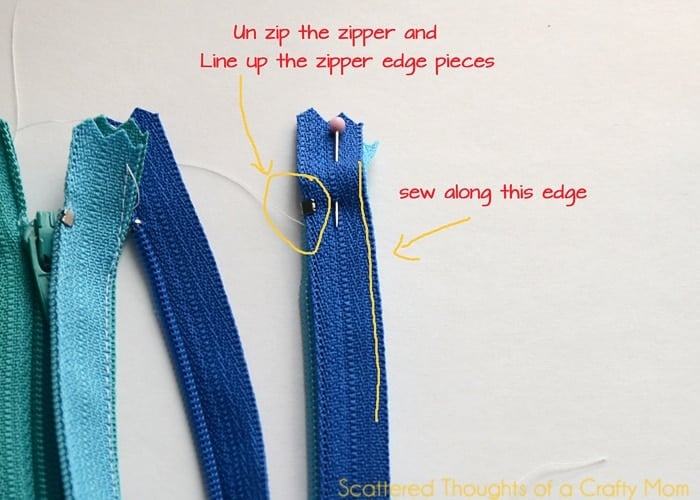
As you get close to the other end of the zipper, slide the zipper closed to move the zipper pull out of the way.
Keep sewing the zippers together. Once the zippers are all sewn together, fold the zippers in half (right sides together,) to make a pouch and sew the two end zippers together.
To sew the along the sides of the pouch, you will need to open the zipper. At this point, I had trouble keeping the zippers in a perfect line. The only way I could keep them lined up was to sew a tiny basting stitch to keep them in place, shown below. (You could also try binder clips or wonder clips.)
If you would like to add a hand strap, cut a piece of bias tape to the desired length and sew along the edge.
Fold the bias tape in half and slide it inside the pouch, lining up the edges as shown below. Pin in place.
Sew along the sizes of the pouch, getting as close to the metal zipper stops as possible.
Then flip the pouch right side out and gently press with edges with a warm iron.
There you go! Isn’t it cute! If you make a zipper pouch, please come back and share your creations on my facebook page or tag me on Instagram using the #scatteredmompatterns!
Like this Zipper pouch tutorial? Be sure to pin it here:
Amanda says
Are you kidding me?! This is awesome!! Who knew.
Kristie says
This is adorable. I need to order me some of those zippers. Thank you for sharing!
Erin Biggers says
Thanks for sharing where you got the zippers from. After seeing the picture yesterday on Insagram I was dying to see the tutorial. I will definitely put this on my list to sew. I can already see my girls stealing it though. 🙂
Emily Thompson says
wow! So fun! I love these and have never made one. Your tutorial is great, so is the tip for cheaper zippers :o) I stopped over from Ginger Snap Crafts… would love to have you come check out my link party..
VR Make up Nails Beauty says
buenisimo tutorial!!!!gracias!!!!
Kelsey Poofy Cheeks says
I love it Jamie! Pinned! 🙂
Jenna Pennell says
This is so great! Pinned it so I can remember to give it a try one of these days! Although I haven't quite mastered zipper sewing yet, so this may be a challenge for me… Visiting from Ginger Snap Crafts!
SONIA says
Me encanta!! Que bonito, práctico y sobre todo original. Me gusta de estuche para el colegio o para ir a la playa. Un Saludo
Sonia
Christina at I Gotta Create! says
Now that is fantastic!! LOVE.
<3 Christina at I Gotta Create!
Wildly Original linky party is open
Desiree @ The 36th AVENUE says
This is too cute!
Thank you so much for visiting my party…♥
Charlotte Rigby says
Thanks for sharing, this is amazing, I always wanted a pencilcase made of zippers when I was a kid, it looked so cool!
Ana Lopes says
So lovely!!! Love the colors combinations! Thanks so much for sharing the great tutorial! Would love to have you visit me sometime.
Have a fabulous week!
Hugs from Portugal,
Ana Love Craft
http://www.lovecraft2012.blogspot.com
Wendy says
this is fabulous! I wanted to pin it and it looks like Pinterest has been disabled…
Scattered Thoughts of a Crafty Mom says
Thanks! Pinterest sometimes acts funny, but it seams to be working now…
~Jamie
OnceUpona Sew says
Wow, I can't believe how easy you made this look. Love the bright zippers!
Heather says
I.Am.In.Love! I already have a thing about zippers. I make flowers, shamrocks, bunnies, headbands and anything else I can out of them. Because of my love of zippers I was super jealous to read about the delivery of zippers you received! I can't wait to try this!
Alexandra Abarca says
Muy linda y original idea, gracias por compartirla.
Feliz fin de semana.
Ale
Costa Rica
Marriah says
That is awesome! I love it.
Hani Shabbir says
What a fun pouch! Love it..
missbossypants says
Love this! Having troubles pinning it though….
Scattered Thoughts of a Crafty Mom says
I don't know what is up w/ pinterest… A few people have mentioned they are having trouble pinning, but there are others with no problems at all. Let me know if you figure out the issue…
~Jamie
Britni @ Hubby Made Me says
Greatest idea EVER!!! I love it so very much! And I want one. Or two. I'm terrified of sewing zippers so this should probably be my worst nightmare, but I really want to try it! 😉 Too cute!
[email protected] says
This is the funnest pouch ever! I really wish I could sew – this is fab!!
Debbie says
This is something else! Very clever idea indeed!
Danielle Wood says
Wow – this is beautiful! Found it at the Craft, Create & Inspire Party – so glad I did!!
Have a great weekend!
Danielle
SewMuchCrafting.com
Danielle Wood says
I'd love for you to link this up at the Pinterest Power Party! It's such a fabulous project!
Happy Thursday!
Danielle
http://www.sewmuchcrafting.com/2013/03/pinterest-power-party.html
Ajaire says
I just love the execution of this idea! So well done!
Fancy That Notion says
This is so cool! I definitely want to make myself one of these:) I found you at the Flamingo Toes link party!!!
Emily says
This is SO super creative… I'm a little intimidated, but I've pinned it to try later!
~Emily
http://tossedsaladlife.com
TidyMom says
I LOVE this! so cute!!
Thanks for linking up to the party!
Cheryl @ Sew Can Do says
Awesome & love that it opens everywhere! Pinning this lovely for sure. Thanks for linking to the Craftastic Monday party at Sew Can Do!
Schulz Family says
visiting from I should be mopping the floor. This is great. Love it.
Kelly says
Wow, this is SUPER cool. I LOOOOVE it! Thanks so much for linking up to Monday Funday!
kelly @ view along the way
http://www.viewalongtheway.com
[email protected]'s Mansion says
So so cute!, I really should try this, zips scare me it might be a good start point
Christine says
CONGRATS!!!!!! You have been featured at The DIY Dreamer! YAY!! Come on over and grab your featured button, you deserve it!!
Terri Paulson-Sasaki says
This is too cute. Thanks for sharing. I am your newest follower.
Terri
Soul Wishes
Sherry of Pondered Primed Perfected says
So very cute! I would love one of these. Time to dust off the sewing machine 🙂
bunnyface says
This is so awesome! And I LOVE the bright rainbow zippers. I would've never thought to make something like this, it is such a brilliant idea for a fun pouch!
Virginia says
So cute, and bright. I love it! Seem like one of those projects that is so easy, once you wrap your head around it!
CREATIVE MIND says
LOVEEEEEEEEEEE it 🙂
Katie @ Creatively Living says
Love, love, love it! I'm including it in my fashion round-up from the Monday Funday link party! Thanks for linking it up!
–Katie
Kara says
This is fabulous!!
Mandatory Mooch says
What a great project, Jamie. So much fun. I would love for you to share at my Tasty Thursdays linky party going on right now. Thanks, Nichi
Kathy Moody says
This is so awesome! What a fabulous idea! Thank you so much for sharing at A Bouquet of Talent! So thrilled you shared with us! Happy Friday!! YAY!! 🙂
hugs
Kathy
Chelsea @ Making Home Base says
SO CUTE! I'm so scared of zippers – it's an irrational fear but this adorable pouch is totally inspiring me to try it out!
Tora´s Vintage Dream says
Love it 🙂 so very very cute, and I can see me making one…… or two or……… LOL thanks for you super easy tutorial 🙂
La Pecora Nera says
Hi, I love it! Great tutorial and thanks for sharing us!
Hugs from Italy, Emanuela
[email protected] says
So adorable, Jamie!! You are one creative lady, my friend.
Randi~Dukes and Duchesses says
I love that so much!
KellyS says
Just saw this today on the Janome facebook page. Love it! Pinning it to try someday. And I am now following you on IG (@_livelovecreate)
Koisas da Beth says
so beautiful!
Necla Dilek says
kesinlikle harika, çok yaratıcı tebrikler…
[email protected] ben de beklerim bloğuma..
Dom z mozaikami says
Genialny w doborze kolorów i wykonaniu . Super. Pozdrawiam z Polski. Ala
Ans Straatman says
I made one too. But yours is nicer!;-)
Nathan Bryant says
Would you trim those edges off in the last picture before turning inside out? I just imagine them being in the way as extra material in the inside…
Jamie says
They didn't really bother me, so l didnt trim them. If you do decide to trim them, I think you might need to seal the edges with a lighter or fray check.
~Jamie
cucicucicoo: ecological living says
So gorgeous! Love the way the colors are put together, too! 🙂 Lisa
박현정 says
I try to make around once and wonderful they would like to piece of work.
Hannah says
LOVE THIS! I want to make something similar out of 9” zippers I found!
Thanks for the tutorial!
CJ says
Wondering if you’ve tried alternating the zippers (i.e. left opening, right opening) or would this not work? It seems alternating the pulls would make it less bulky & more balanced.
Jamie says
That’s a good suggestion, I have not tried it yet.