Rainbow Zipper Pouch Tutorial
Disclosure: This post may contain affiliate links. As an Amazon Associate, I earn from qualifying purchases.
Make this Amazing DIY Zipper Pouch all from zippers. Kids love pouches, they are easy to make and a great way to use up leftover zippers.

💌 Save this article
Rainbow Zipper Pouch
I love my new Rainbow Zipper Pouch!
Anything bright and rainbow-colored is especially popular around here, and who couldn’t use a new pouch? It’s the perfect project if you have been wondering what to do with leftover zippers.
DIY Zipper Pouch Tutorial
The zipper pouch works perfectly as a break-away clutch to put inside a larger tote. It’s so bright and colorful, you’ll always be able to spot it! (I have a feeling I’ll be making a 2nd one of these when my little missy comes and sees this pouch, lol)

I always wanted to make a regular pouch with a zipper top, but since I had so many leftover zippers, I thought I would make my interpretation of a “zipper pouch”.
All the zippers actually work, so you can open it any place you want!

How to make a Rainbow Zipper Pouch
Do you want to make one of these adorable DIY zipper pouches too?
It really is easy, you can use any size zipper to get different shaped bags. And of course, it doesn’t have to be rainbow! I picture it in a red and navy blue or all black for boys. Or how about a cute pencil bag in your school colors?
Materials needed for the ultimate DIY zipper pouch:
- Several zippers (I used 13 7-inch zippers) Great deal on 8-inch zippers.
- Sewing machine
- zipper foot (not mandatory, but it helps)
- Sharp needle
- Hand sewing needle and thread
- iron
- extra fabric or bias tape if you would like to add a hand strap
- fray check (optional)
Instructions:
Step 1: Sew the Zippers together.
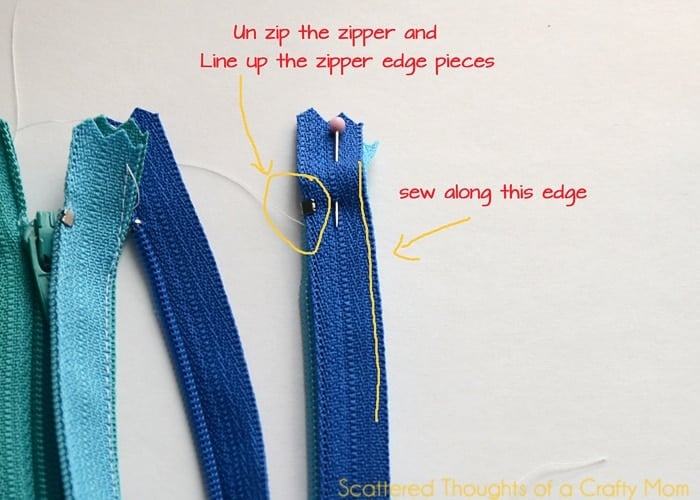
Unzip all the zippers and begin sewing the zippers together. (right sides together) Carefully line up the metal zipper edge pieces when sewing together.

As you get close to the other end of the zipper, slide the zipper closed to move the zipper pull out of the way.

Keep sewing the zippers together.
Step 2: Make the pouch.
Once the zippers are all sewn together, fold the block of zippers in half, right sides together, to make a “pouch.” Sew the top edge together, so you have a “tube” of zippers.
Next, sew along the sides of the pouch. It helps to open the zippers halfway. (The pull tab gets in the way of the presser foot.)
If you have trouble keeping the zippers in a perfect line, you may need to sew a tiny basting stitch to keep them in place, as shown below. (You could also try binder clips or wonder clips.)

If you would like to add a hand strap, cut a piece of bias tape to the desired length and sew along the edge of the bias tape.
Fold the bias tape in half and slide it inside the pouch, lining up the edges as shown below. Pin in place.

Sew along the sizes of the pouch, getting as close to the metal zipper stops as possible.


Then flip the pouch right side out and gently press with edges with a warm iron.

There you go! Isn’t it cute! If you make a zipper pouch, please come back and share your creations on my facebook page or tag me on Instagram using the #scatteredmompatterns!

Like this Zipper pouch tutorial? Be sure to pin it here:

Don't miss any more posts!


