DIY Cat Ear Headband Tutorial w/ Template
Disclosure: This post may contain affiliate links. As an Amazon Associate, I earn from qualifying purchases.

Today I am sharing how to make a DIY Cat Ear Headband Tutorial.
Do you have a cat lover in your house? What’s more perfect for your little kitty fan than a Cat Ear Headband?

I’m supposed to be spending my time this week working on the Halloween Costumes for my kids, but I’ve been procrastinating and working on mostly non-productive stuff… (I’m really good at that, lol!)
So far this week, I’ve managed to make this little cat ear headband for my daughter. I will get her little kitty cat costume finished up over the next couple of days, but in the meantime, she is very happy to just wear the headband around! Let’s just hope we don’t loose it before Halloween!
The headband is really cute and even though I won’t be dressing up, I may have to make one for myself as well…
***Update- I did finish her costume, you can see it here: DIY Kitty Costume.***
To make the Cat Ear Headband, you need:
- Cat Ear template (Print here
- 2 colors of felt (I used brown and pink)
- needle and matching thread
- Fabric Covered headband
- batting/Stuffing
Instructions:
Print the cat ear template and cut out the pieces. Line up the template on the felt and cut out 4 of the larger pieces and 2 of the smaller pieces.

Center the smaller piece of felt in the middle of the larger piece. Align the bottom of the smaller piece above where the larger piece starts to curve. (I didn’t mark that on the photo below, but hopefully you can see what I mean.) Hand or machine stitch the smaller pieces to the larger pieces. I did use my machine, but I used a blanket stitch that kind of looks like a hand stitch.

Line up 2 of the larger triangles (one embellished and one not with the embellished side facing in) and stitch along the sides as indicated below. Leaving about a 1.5 inch opening.


Flip the ear right side out.

Fill with stuffing.

Using matching thread, hand stitch the opening closed.

Hand stitch the ears in place onto the fabric covered headband. (Be sure to start in the back, if you are anything like me, your stitches will probably improve as you go.)
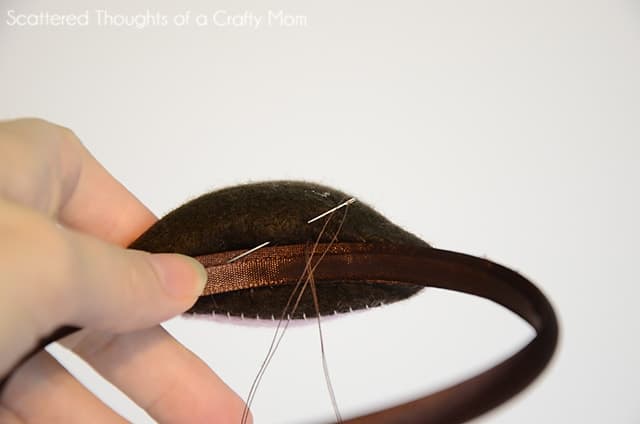
For a little something extra, I hand stitched a bit of furry trim to the center of our headband…

They turned out really cute, now I just need to finish the actual costume!


Don't miss any more posts!


These are super cute! Thanks for sharing with us at Your Designs This Time.
Emily & Erin
Super cute! Love it. Pinned. Lou Lou Girls
So cute!! Would love it if you linked up on my blog hop http://www.w-t-fab.com/search/label/bloghop. Also let me know if you'd like to follow each other!
This headband is super cute! I'm featuring tonight at my link party!!
Kathryn
destinationcraft.blogspot.com
So cute! The stitches and super cute feathers, adorable! I may need to copy this for our family costume: we're going as lion (my Shihtzu), tiger (my Jack Russell terrier), bear (me), "oh my" (the hubs)! Can you tell that I don't have kids? Ha!
Chrissy
http://www.everydaywiththejays.blogspot.com
Such a cute headband! I love that pink fur!
That's about as cute as it gets! 🙂 Great tutorial!
Too cute!! Great tutorial.
Katie
http://www.funhomethings.com
Soooo cute and easy love it Stopping by from weekend wrap up
This is just too adorable!
How cute is that! My daughter would LOVE this headband. Although I am in the procrastination boat right there with you… I've been planning to work on her costume this week too, and so far it hasn't happened yet! Glad to know I'm not alone 🙂 Although you are ahead of me now so I better get started 🙂 I would be thrilled if you shared this at my Throwback Thursday party! I hope to see you there and thanks for sharing 🙂 http://www.hubbymademe.com/throwback-thursday-no-15/
So Cute. My kids would love a set of these for our dress up bin 🙂
We'd love for you to share this post at our Finished Friday Linky.
Uber cute! Heading to a crafts store soon Jamie!
Adorable!
New follower from Catch a Glimpse Thursday and I loveee these!! Now if only I can learn how to sew haha I may have to settle for hot glue!
Samantha
hooahandhiccups.blogspot.com
So cute and great tutorial! Thanks for sharing
LOVE the ears! The tutorial is FABULOUS!
Thanks so much for sharing this at The DIY Dreamer… From Dream To Reality!
Thanks for the tutorial: I have two days to come up with a Cat Woman costume for my daughter, this will help hugely!
So cute! I just made bat ears tonight so this is a little familiar, but I did it onto a piece of elastic to make a stretchy headband…maybe I should have tried a solid one!
Perfect for a halloween costume. You did a great job with the tutorial too. Thanks for sharing at DIYbyDesign.