Easy Fabric Christmas Tree Ornaments
Disclosure: This post may contain affiliate links. As an Amazon Associate, I earn from qualifying purchases.
Get creative this holiday season and make your fabric Christmas trees! Follow our step-by-step guide to craft beautiful handmade fabric trees with scrap fabric and glue – it’s fun, easy, and the possibilities are endless.

💌 Save this article
No Sew Fabric Christmas Trees Craft
Decorating your home with handcrafted ornaments is one of the best ways to add a personal touch to your holiday season. If you’re looking for a fun and simple craft project that also helps utilize leftover fabric scraps, try creating these adorable fabric Christmas tree ornaments!
These decorations are incredibly easy to make, sewing your ornaments or making a no-sew version with just a bit of glue. Personally, I found that I preferred the no-sew version as it gave the trees a fluffier, more organic appearance.
Why Make Fabric Christmas Tree Ornaments?
- Use up fabric scraps: This project provides an excellent opportunity to use up leftover fabric from other sewing projects. Plus, it’s an eco-friendly crafting option that helps reduce waste.
- A perfect handmade gift: These ornaments make a thoughtful, personalized gift for family and friends or an attractive addition to your own tree.
- Fun and easy project: This craft is suitable for all ages and skill levels, making it a great activity to do with children or a group of friends.
- Customizable: You can easily mix and match fabrics, colors, and patterns to create unique and personalized ornaments that match your holiday décor or express your creativity.
- No-sew option available: If you’re short on time or not comfortable with sewing, the glue-based version of this project is just as charming and easy to make.

Make these fabric Christmas Tree Ornaments your own
While the basic design of these fabric trees is super cute, don’t be afraid to get creative and put your personal touch on the project. Here are a few suggestions for how you can expand upon the original concept:
- Add embellishments like beads, sequins, or buttons to bring even more sparkle and personality to your ornaments.
- Add your ornaments to a piece of jute twine or bias tape to make garland.
- Experiment with different sizes to create a variety of trees that can be hung together in a festive cluster.
- Attach small gift tags to personalize your ornaments further, including a special message, holiday greeting, or even the recipient’s name.
- Combine the fabric Christmas tree ornaments with other handmade decorations, like painted pinecones or cinnamon stick stars, to create a unique and natural hanging ornament set.

More Holiday Crafts
FAQ’s
Is it possible to make this project with felt instead of fabric scraps?
Absolutely! Felt can provide a thicker, more stable texture for the ornaments while remaining easy to work with. Felt will fray less than some woven fabrics when cut, resulting in a “cleaner looking” finished project, which should hold up well over time. When ironing felt, make sure to use a low temperature. Felt is also thicker, and you may want to start with triangles instead of squares and just fold the felt over once.
What are the best fabrics to use for handmade Christmas ornaments?
Various fabrics can be used for fabric Christmas ornaments, including cotton, felt, denim, and even velvet. You could try this craft with whatever scraps you have lying around. Felt is a popular choice as it is easy to work with and can be cut in various shapes and sizes. Velvet is also a great option for creating elegant and sophisticated-looking ornaments, while cotton is perfect for creating playful and fun holiday decorations.
Do I need any special equipment to make handmade ornaments?
Not at all! If you don’t have a rotary cutter and mat, the fabric can be cut using regular scissors. And if you don’t have a sewing machine, you can use hot glue, household glue (I used a gluestick), or even hand sew these ornaments together using a needle and thread.
What are some tips for embellishing handmade ornaments?
There are so many ways to embellish these handmade ornaments. Adding sequins, beads, ribbons, or star-shaped buttons to your ornaments can provide a festive touch. You can also use embroidery techniques or heat transfer designs to add personalized messages, such as names, dates, or designs to your ornaments.
Ready to Make These Fabric Christmas Trees?
Let’s gather our supplies and get crafting!
Materials needed
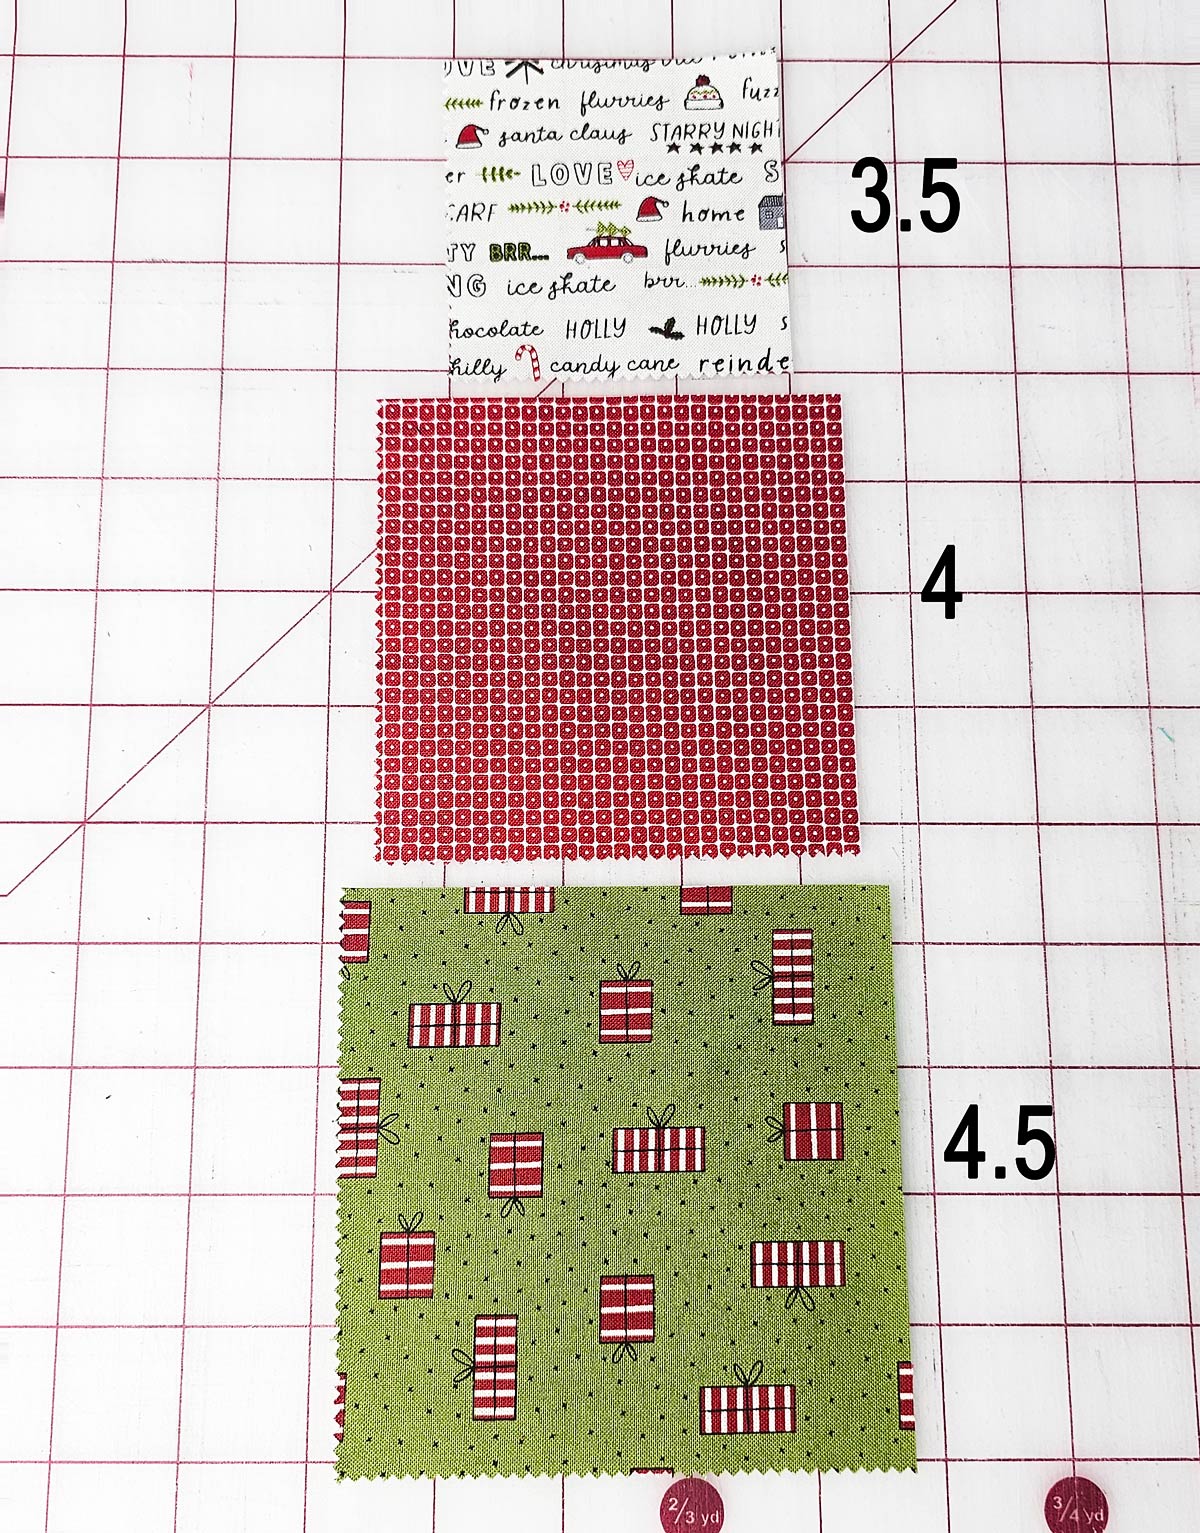
- Scrap Fabric – You will cut 4.5, 4, and 3.5-inch squares for each tree. I used a Holiday-themed Charm pack so my fabric Christmas Trees would be coordinated.
- Ruler
- Rotary cutter or scissors
- Glue and/or pins – Glue if making the no-sew version. Hot glue, household glue, or a glue stick will work, as well as pins if sewing.
- Twine – Jute, twine, ribbon, or baker’s twine all work well.
- Optional: pinking shears

Instructions
Step 1: Organize and cut fabrics.
Lay out all your scraps and decide what piece you want where, and then cut your fabric pieces to 4.5 inches for the bottom piece, 4 inches for the middle piece, and 3.5 inches for the top piece.

Step 2: Fold and press the fabric pieces.
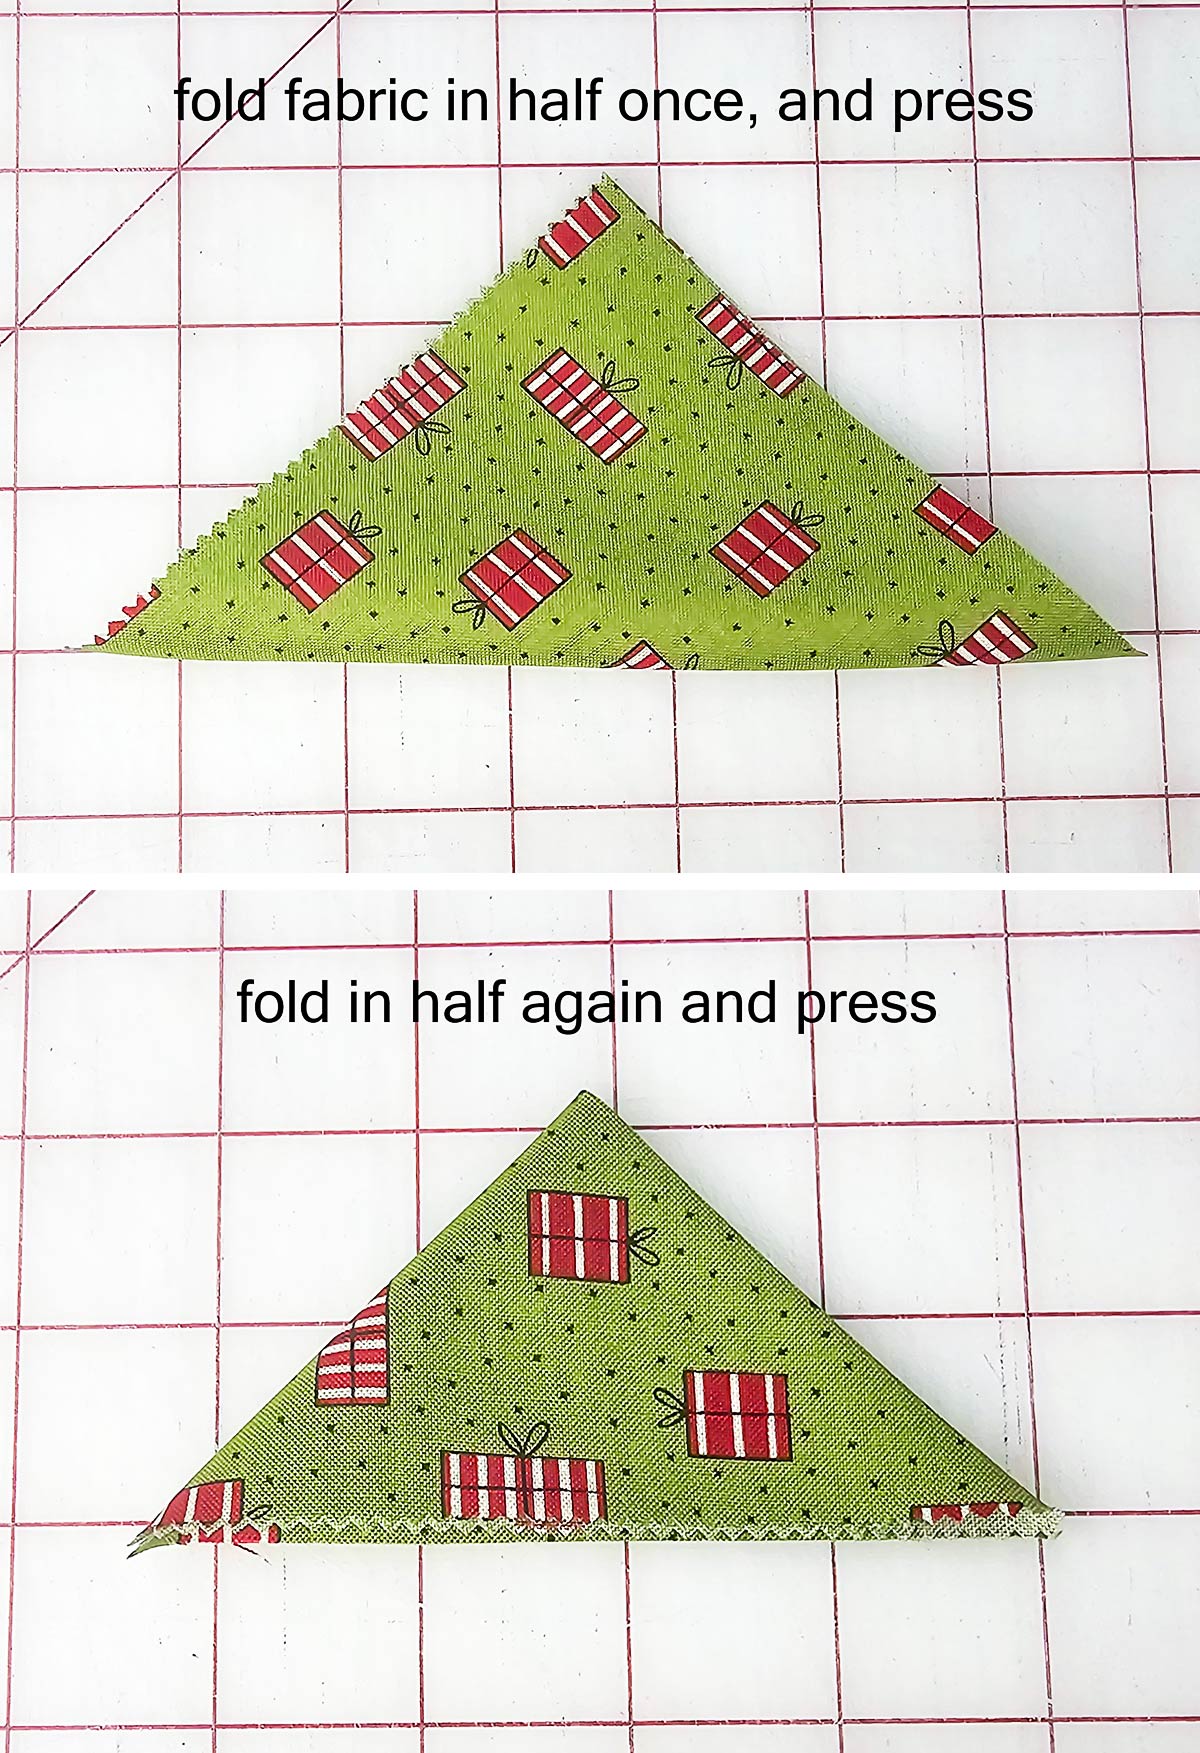
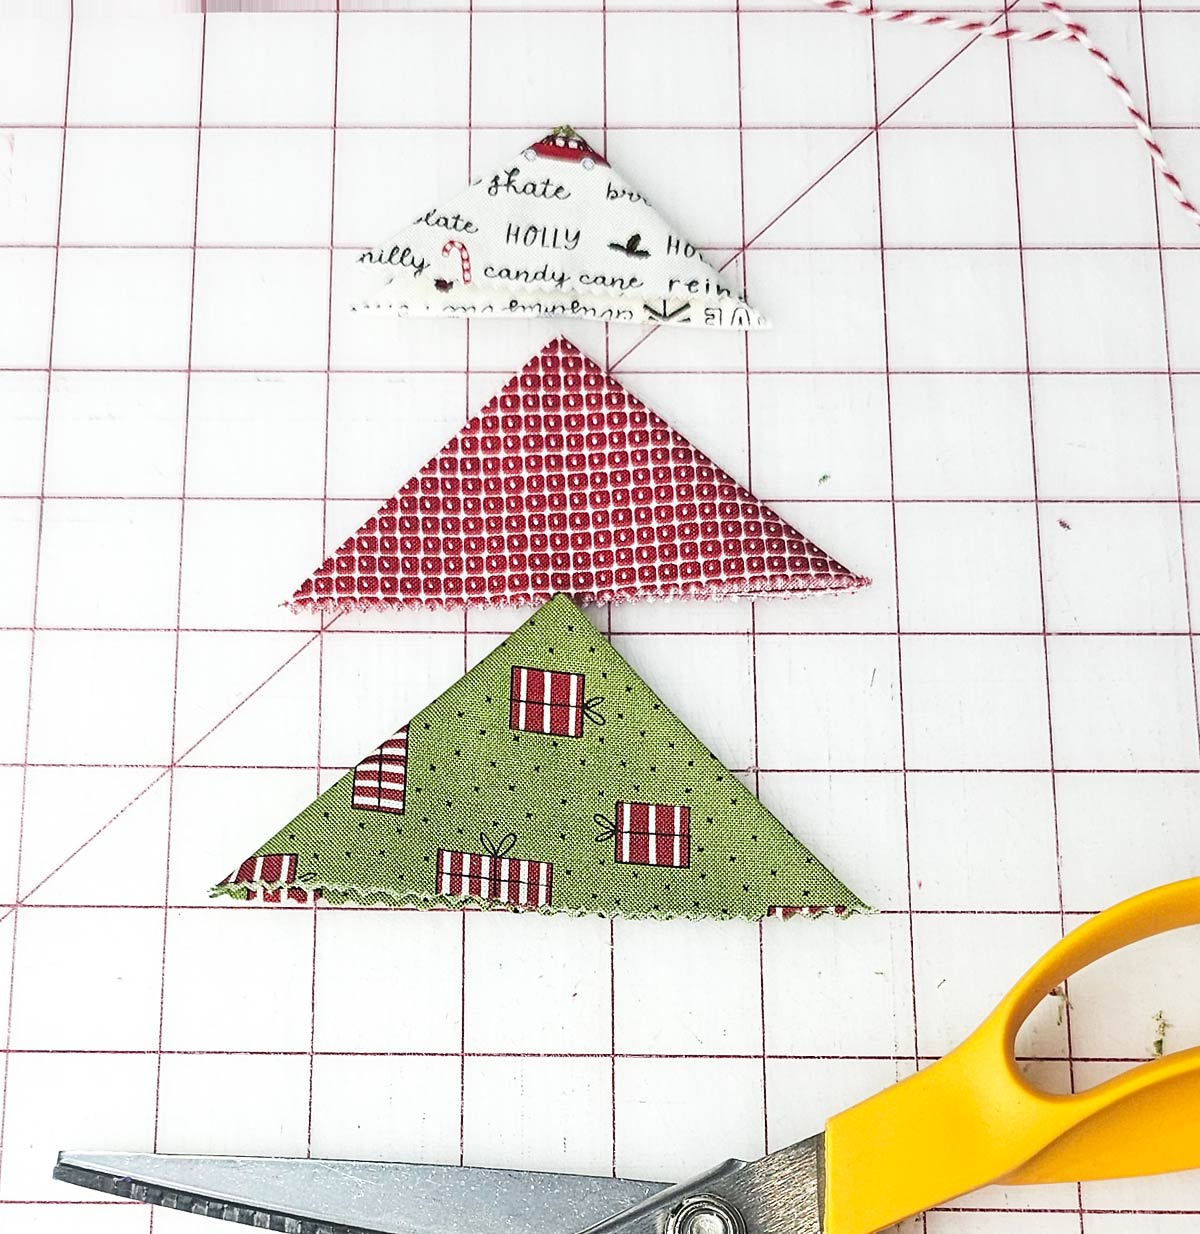
Fold one of the fabric pieces in half, corner to corner, and press. Fold it half again and press again. Repeat this process until all your fabric pieces are folded into triangles.

Step 3: Add the hanging loop.
Cut a piece of ribbon or twine to about 10 inches.

Working with one of the smaller top pieces, open up the folded fabric and add a bit of glue to the top corner. Fold the twine in half and place the two raw ends into the glue. Add more glue if needed.
Add a line of glue along the edge of the triangle and press closed.

Add a line of glue along the edge of the middle and bottom triangles as well.

Optional Step: Add a decorative edge
If you would like, you could use your pinking shears to add a decorative edge to the bottom of your triangles.

Step 4: Assemble your Trees
Carefully open the bottom of the middle triangle and add a dot of glue (as shown below). Place the tip of the bottom triangle in the opening and squeeze it closed.

Repeat this process with the top and middle triangles.

That is it, you are done. Now go make a bunch more!
Optional Step: Sewing around the Fabric Christmas trees.
If you wish to add a bit of sewing around the edges of your trees to make them sturdier, sew, using a shorter stitch length all the way around the trees, about 1/8 inch from the edge.

Did You Make This Fabric Christmas Tree Craft?
Please leave a star ⭐️⭐️⭐️⭐️⭐️ rating and/or a review in the comments section below. If you share an image on Instagram or Facebook, be sure to tag me and use #scatteredmomrecipes!
Don't miss any more posts!

Follow along on:
Feedly, Bloglovin', your favorite feed reader, or signing up via email and have new posts delivered to your email box each week!How to Make Fabric Christmas Trees

Get creative this holiday season and make your fabric Christmas trees! Follow our step-by-step guide to craft beautiful handmade fabric trees with scrap fabric and glue – it’s fun, easy, and the possibilities are endless.
Materials
- Scrap Fabric – You will cut 4.5, 4, and 3.5-inch squares for each tree.
- Ruler
- Rotary cutter or scissors
- Glue and/or pins – Glue if making the no-sew version. Hot glue, household glue, or a glue stick will work, as well as pins if sewing.
- Twine – Jute, twine, ribbon, or baker’s twine all work well.
- Optional: pinking shears
Instructions
Step 1: Organize And Cut Fabrics.
- Lay out all your scraps and decide what piece you want where, and then cut your fabric pieces to 4.5 inches for the bottom piece, 4 inches for the middle piece, and 3.5 inches for the top piece.
Step 2: Fold And Press The Fabric Pieces.
- Fold one of the fabric pieces in half, corner to corner, and press. Fold it half again and press again. Repeat this process until all your fabric pieces are folded into triangles.
Step 3: Add The Hanging Loop.
- Cut a piece of ribbon or twine to about 10 inches.
- Working with one of the smaller top pieces, open up the folded fabric and add a bit of glue to the top corner. Fold the twine in half and place the two raw ends into the glue. Add more glue if needed.
- Add a line of glue along the edge of the triangle and press closed.
- Add a line of glue along the edge of the middle and bottom triangles as well.
Optional Step: Add A Decorative Edge
- If you would like, you could use your pinking shears to add a decorative edge to the bottom of your triangles.
Step 4: Assemble Your Trees
- Carefully open the bottom of the middle triangle and add a dot of glue. Place the tip of the bottom triangle in the opening and squeeze it closed.
- Repeat this process with the top and middle triangles.
Optional Step: Sewing Around The Trees.
- If you wish to add a bit of sewing around the edges of your trees to make them sturdier, sew, using a shorter stitch length all the way around the trees, about 1/8 inch from the edge.


