Girls Knit Tank Top Pattern and Tutorial (size 3 to 16)
Disclosure: This post may contain affiliate links. As an Amazon Associate, I earn from qualifying purchases.
Learn how to sew a Tank Top with this free Girl’s Tank Top Pattern and tutorial. (sz 3 to 16)

💌 Save this article
Good News! This Free Tank Top Pattern now goes up to a Girl’s Size 16!
I’m really excited about this new pattern I have for you today! It’s a super simple and basic tank top pattern for girls in sizes 3 to 16. Even though this pattern is super simple, so many variations can be sewn with it. (And yes, I have quite a few of these variations planned!)
The Perfect Patten for Upcycling Old T-Shirts
Recently, I’ve been working on cleaning out my craft room. Part of the process involves clearing out my stash of items to be upcycled and other unused crafting supplies. (It’s so hard to decide what to part with…) I have a recycling box full of old tops and tees from when a shorter length was in style.
I’m a fantastic procrastinator, so instead of working on my craft room clean out, I came up with this little tank top pattern as a way to up-cycle some of my old shirts I wasn’t ready to part with. I absolutely love using old shirts for little girl projects. The best part is that you can often reuse the bottom hem which saves a lot of time in finishing the project.

Why This Knit Tank Top Is So Great To Sew!
I just love these little tank tops. It’s a basic pattern, but can be embellished so many ways.
- The tank top pattern consists of just two pattern pieces plus binding, so it’s super quick to sew.
- The top is designed to have a not-too-fitted silhouette, with a high neckline and non-gaping armholes. Not too risque and so perfect for playtime!
(In the photo above, the floral tank on the left and pink stripe top on the far right were both upcycled from old t-shirts. The fabric in the middle is a stretchy knit from funkalicious fabrics.)

View from the front. (I always loved this pink top striped top, it was just too short for me… but just the right size for my little missy.)

View from the back:

Just for fun, I added a banded bottom to the striped top. (The perfect easy way to finish the bottom of your top if you are afraid to hem knits.

This basic tank top is just begging for you to make it your own! It’s super versatile, and I have already used it to create a few additional items for my missy. (Like this Summer Nightgown, Tank Dress, and Swing Tank.)
Where do I get the Pattern?
The link to access the pattern can be found under “materials needed“
Tips For Sewing With Knits:
- Use a ballpoint/stretch needle
- Sew seams with either a serger, stretch stitch, narrow zig zag or a straight stitch with a longer stitch length and a slightly loosened tension. (Make a couple of practice stitches on your fabric to see what works best.) I also like to use this “lightning bolt” stretch stitch on seams that need strength but a little give. (For my project I used a combination of straight stitch and serger for seams and zig zag on the hems.)
- Use spray starch when pressing hems. Sew hems with a zig zag, twin ball point needle, narrow zig zag with a long stitch length or a straight stitch with a long stitch length and a slightly loosened tension or leave raw. (also helps to use a walking foot.)
- If you find your fabric keeps getting pulled inside the needle plate, place a small piece of tissue underneath the fabric so the feed dogs have something to grip.
Ready to sew one of these tank tops?
Knit Tank Top Pattern and Tutorial (sz 3 to 16)
Save the sewing instructions by pinning here ==>> 
Knit Tank Top Pattern Info:
- Enter your name and email to download the pattern. Save it to your PC, open the pdf document in adobe acrobat reader. (Don’t print from directly from google’s online version of adobe reader. It will sometimes cause the pattern to print to small.)
- Seam allowance is included and is 1/4 inch with a 1/2 inch bottom.
Fit Chart:

Materials Needed:
- Stretchy knit fabric (1 yard for the largest size) or an old stretchy t-shirt, rib knits work great.
- Ribbed knit for binding
- Pattern
- ball point/stretch needle
- iron
- basic sewing supplies
- optional:
- walking foot
- double needle for binding
Products used and recommended in this post:
- My Sewing Machine: SINGER 9960 Quantum Stylist (600-Stitch Machine with Extension Table, Bonus Accessories and Hard Cover)
- My Serger: Brother 1034D 3 or 4 Thread Serger or you can just use Pinking Shears
- Rotary Cutter
- I love my large ruler and large cutting mat, but you may prefer to start of with a smaller Cutting set
- Dritz Dual Purpose Marking Pen and Fray Check
- Wonder clips (I didn’t use these in the post, but they are just awesome!
- Ball Point/stretch needles
- Ball point/stretch double needle
- Singer walking foot or universal walking foot
- Knit fabric suppliers: Funkalicous Fabrics and Fabric.com
Binding tips:
- The pattern for the neck binding is designed for a ribbed knit with a minimum of 75% stretch with good recovery (Fabric Fairy has a lot of good quality ribbed knit choices.) If using a binding fabric with less stretch, Measure the neckline and cut a fabric strip 10% less than the measurement (multiply the neck measurement by .9)
Sewing Instructions:
(Seam allowances are 1/4 inch unless otherwise specified.)
Step 1: Printing and assembling the pattern.

Step 2: Cut out Pattern Pieces.
Fold the fabric in half, with the stretchy-ness running from side to side. Line up the bodice pattern pieces on the fold and cut one front and one back.
Cut out one neck binding (on the fold) and two arm binding (on the fold). Ribbed knit works great as binding. (If you are concerned that your binding fabric is not stretchy enough, you can cut it an inch or two longer and just trim off the excess later.)
Step 3: Assembling the top
Line up the front and back pieces right sides together and sew along ONE shoulder seam, using a 1/4 inch seam allowance.

Line up the front and back necklines with each other to find the center point and mark it with a pin. (Remember the front neckline is longer/deeper, so the center point will not be the shoulder seam.)

Step 4: Attach the binding
Find the center point of the neck binding and mark it. Line up the edge of the binding with the edge of the tank neckline, right sides together. Pining them in place at the center marks.

I recommend using a stretch stitch to attach the binding to the tank. (The stitch I used looks like this, but a very narrow zig zag would work too.)

My sewing machine kept pulling the fabric into the machine at the first few stitches, so I placed a piece of tissue under the fabric to help get it started.
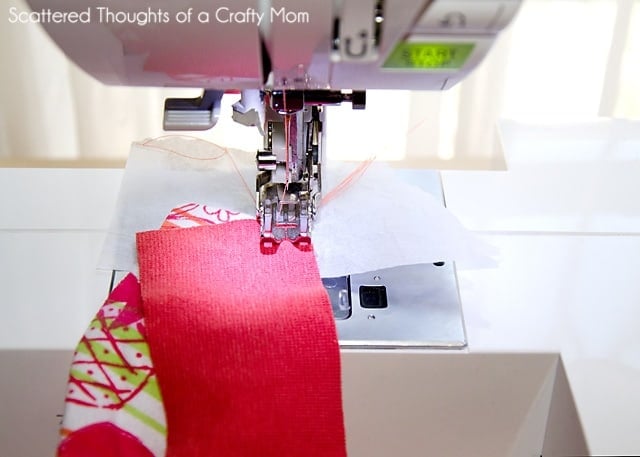
Sew the binding to the tank, stretching it as you go (1/4th inch from the edge).

Flip the fabric over and press. Make sure to press the seams toward the top of the top.

(The original photos didn’t show the next step very well, so I recreated it for you on scraps…)
Flip the binding over to the wrong side of the fabric. enclosing the seam and pin in place. Be sure to put the pins on the right side of the top. (I tried not using pins, but it definitively make a neater finish if you take the time to use pins.)


Using a wide, long zig-zag stitch, stitch the binding in place. Sew on the front side so you can see what you are doing. Remove the pins before they reach the sewing machine foot. (For a prettier finish, you could use a double needle or coverstich for this step.)

Flip the top over and carefully trim the excess binding.


Step 5: Finish Assembling the Top
Line up the other shoulder seam and sew together.

Repeat the binding process for the two arm holes. Line up the front and back pieces and sew the front and back together using a 1/4 inch seam allowance.

For my top, I was able to reuse the shirt’s original hem, so I’m done.
But if you’re using knit yardage, you can leave the bottom edge raw or fold the hem up 1/2 inch and sew using a long wide zig-zag or double needle.
If you leave it raw, you may wish to trim off the extra half-inch. (For the striped top, I added a 2 inch band at the bottom.)
You’re done! Have your little one try on her new top and go take some pictures!

Share Your Finished Play Shorts In My Facebook Group!
Made this pattern/project?
Please leave a star ⭐️⭐️⭐️⭐️⭐️ rating and/or a review in the comments section below. If you share an image on Instagram, be sure to tag me and use #scatteredmompatterns! You can also share an image to my private Facebook sewing group!
Don't miss any more posts!

Follow along on:
Feedly, Bloglovin', your favorite feed reader, or signing up via email and have new posts delivered to your email box each week!

This looks great thank you
Could you use the same fabric for the binding or do you need to use ribbing?
you can, you will just have to experiment with the stretch.