Shabby Chic Placemats
Disclosure: This post may contain affiliate links. As an Amazon Associate, I earn from qualifying purchases.
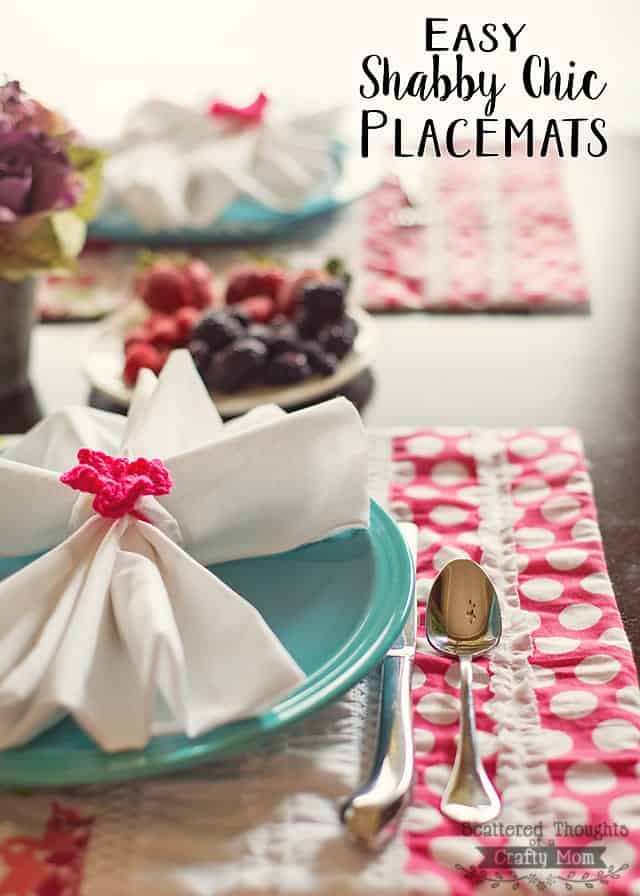
Have you ever made placemats? They’re such a quick and easy project! A few weeks back, I made these gorgeous Shabby Chic placemats for my Mother’s Day Brunch coming up. I adore how they turned out and wanted to share them with you today (plus how I made them.)
💌 Save this article

(By the way, if you’re reading this post in a feed reader or on your phone, I just updated my header image. Be sure to click over and check it out!)
I spotted this already-pieced-together fabric at Hobby Lobby. (The fabric looks like this straight off the bolt.)
I’ve seen similar fabrics at other fabric stores too. I tried to find it online so I could link to the fabric, but I think it’s one of Hobby Lobby’s seasonal fabrics, which aren’t always listed online – plus I have no idea what it’s called, so no luck. If you have a Hobby Lobby nearby, you could look for it next time you are there. I just love it! When I get tired of it as placemats, I might just have to open them back up and stuff them with pillow stuffing and make throw pillows out of the placemats! (I’ve done that before, in this post.)

The good news is, you can use any type of pre-quilted or pre pieced fabric for these placemats. If you are searching online, look for “cheater quilt fabric.”
I made these placemats using my Reversible Placemat tutorial, with one small change. (The placemats are solid white on the other side)

The original tutorial calls for iron-on interfacing. Turns out, I didn’t have enough interfacing for 6 placemats. There is one thing I never have a shortage of, and that’s white muslin. Since I wanted the placemats to have a bit of weight to them, I decided to line them with the white cotton muslin.
To do that, I just cut a piece of the muslin, (same size as the placemat) lined up the pieces wrong sides together, and sewed a few straight lines along the seams of the shabby chic fabric.
Just like quilting, but using regular fabric instead of batting. (Free motion quilting is on my list of skills to improve, so I think I’ll make another set of these in a summer-themed fabric and practice my free motion quilting.)

After I “quilted” the muslin to the front piece, I continued on, following the original tutorial. Instead of topstitching these, I hand stitched the openings closed.

What do you think- perfect for Mother’s Day, right?
Products used and recommended in this post:
- My favorite shops fabric are Fabric.com, girl charlie and Stylish Fabrics. (My fave for knits is Funkalicious Fabrics.)
- My Sewing Machine: SINGER 9960 Quantum Stylist 600-Stitch Machine with Extension Table, Bonus Accessories and Hard Cover
- My Serger: Brother 1034D 3 or 4 Thread Serger, my coverstitch: Janome Cover Pro 1000cpx
- Pinking Shears
- Rotary Cutter
- I love my large ruler and large cutting mat, but you may prefer to start of with a smaller Cutting set
- Dritz Dual Purpose Marking Pen
- Fray Check
- Wonder clips (I didn’t use these in the post, but they are just awesome!
Don't miss any more posts!


So pretty, love the colors and texture! Will be featuring them at this weekends Creative Collection link party, yay! XO
They're so pretty! They wouldn't go down well with my boys but I might make some just for me!
Your placemats are just lovely! I'm pinning these to inspire me when I decide to make my own set of placemats!
Navy Wifey Peters @ The Submarine Sunday Link Party
Oh my LOVE the placemats Jamie!!
Super cute, idea! I think I have everything to make them too!
I love this fabric and these placemats are so pretty. I will have to find this fabric but I see a skirt for my granddaughter out of it. Thanks for sharing.
These look so pretty- I wish I could sew, I would make these immediately!
I stopped by from Frugal Crafty Home.
Pretty!! I've got a Craft Gossip post scheduled for this afternoon that links to your tutorial: http://sewing.craftgossip.com/?p=82385 –Anne
Thanks Anne!
Hi, Jamie ~ I'm visiting from the Pinworthy Projects Link Party. I love these placemats, and that fabric is awesome! I'm going to have to hit my local Hobby Lobby to see if I can get a hold of some of that fabric. Thanks for sharing and have a great weekend!
Thanks Tiffany!