Family Room Window Treatments (with a Lined Curtain Panel Tutorial)
Disclosure: This post may contain affiliate links. As an Amazon Associate, I earn from qualifying purchases.
Lined Curtain Tutorial: I’m excited to share my tutorial for making my family room curtains with you today!
")
💌 Save this article
new lined curtain panels for my living room
I just finished sewing up a set of new lined curtain panels for my living room!!
I’m thrilled with how fabulously they turned out. The curtain panels make a world of difference when you compare the before and after photos. (My husband has even expressed an actual opinion, which is something that doesn’t usually happen, lol.)
My living room window placement is just a bit awkward. I wish the windows were more centered (vertically) on the wall or maybe an additional set of smaller rectangular windows in the upper area. With the awkwardness, I had difficulty deciding how high to hang the curtains. (The top of the window or the top of the wall?) After making my hubby spend at least an hour holding the fabric in both positions, I split the difference and went 10 inches above the window.
Here is a shot of the entire window. (I plan on changing out the curtain rod for a much more substantial-looking wood rod and brackets—I think that will help with the blank wall space.)
*Update: I still haven’t changed out the rod, but we did replace the carpet with the same tile that runs throughout the most of the downstairs. See it here: New tile. Next I plan to update the furniture and get a new area rug!)

I’ve spent what seems like a couple of months on this project. The first month I spent browsing different ready-made panels at every single online shop I could think of. I needed a panel that was at least 110 inches, maybe more. I couldn’t find anything in the right color and length for less than $100 per panel.
Next, I started browsing fabric. I looked at a couple of local shops. (Hancock’s and Joann’s.) I think I ordered at least 12 different swatches from Fabric.com. (Luckily, they are only $.75 each.) I finally settled on this Faux Silk fabric in Gold![]() .
.
The fabric was $7.98 a yard, plus I had a 15% coupon, and they always have free shipping for over $35, with no tax for most states. The price couldn’t be beat, so I ordered 14.5 yards. (I think I have enough left over for two pillows and some decorative kitchen towels.
Here is a before and after photo:

Big difference, right? (It’s like day and night, Ha ha)
Now, on to the tutorial…
How to Sew a Lined Curtain:
Step 1: First you need to determine the length you want the curtains to be.
I used a large tape measure to test out different heights around my windows. You also need to take into consideration how you will be hanging the curtains. Through rod pocket or clip rings? A one inch clip will add about two inches to the total length and a 2 inch clip will add about 3.
Once you have decided on your length, you need to consider how wide to make the rod pocket and bottom hem. I needed to balance out my long panels, so I went with a 7 inch bottom hem and a 3 inch top hem, which gave me about a 2 3/4 inch rod pocket.
To determine the amount of fabric per panel: (my numbers are in parenthesis)
Take your desired finished length (113)
+
your top hem length (3)
+
your bottom hem length (7)
+
amount for seam allowances and room for error 2 to 4. I went with (3)
=
inches needed per panel (126)
For the liner panel:
Cut it to the same measurement as your desired finished length. (113)
Step 2: Cut your curtain panels and liners to the length needed.
This was almost the toughest part, especially if you are making a panel that is super long. I rolled my fabric out on the tile in my entry way and had my husband stand on one end and me on the other. We used a tape measure, ruler and fabric marker to make the marks as even as possible before I cut the fabric.
Step 3: Hem the bottom edge of the liner panel.
My liner fabric was cotton, so I was able to iron in a good crease and did not have to use pins.
Fold over about a 1/3 inch, press, fold over another 2 inches and pres again.

Pin if needed and sew along the top edge. No need to do any thing to the top edge of the curtain liner. It will get tucked into the rod pocket.
If your curtain panels are made from a fabric that shreds like crazy, you will want to finish the edge either with a serger, a zig zag on your sewing machine or with pinking shears. Mine was fraying terribly and I was loosing inches, so I serged my edges. If you are using a finely woven cotton, you may not need to.

Step 4: Put together the curtain liner and panel.
Lay out the curtain panel on the floor, the wrong side up. Lay your liner panel on top of the curtain panel, the wrong side down. The curtain liner top should be approximately 3 inches or so from the top.
Move the liner panel up, and a little bit out of the way so you can fold up and pin the bottom hem.
Fold up the bottom edge the number of inches you want your bottom hem to be, plus one inch. (So for me that was 8 inches.) Fold the extra inch under and pin securely in place. Using a ruler or tape measure to stay accurate, do this all the way to the other edge. My bottom hem is 7 inches.

Pull the liner back down to about 2 inches from the bottom hem of the curtain panel and even it up all around, smoothing out all the wrinkles and evening up the edges as best you can.

Step 5: Create the top hem/rod pocket.
Get out your tape measure and extend it out to the desired finished length of your curtain panel. (For me that was 113.) This way, when we fold the top edge over to create the rod pocket, the panel will be at the correct length.
Fold the top hem over just like we did the bottom, this time using the measuring tape to help you figure out how much of the extra fabric to tuck under. I made my rod pocket three inches and I tucked it under around an inch of fabric.

Do the entire top/rod pocket edge.

I used the tape measure to keep the panel even all the way across.
Step 6: Sew the bottom hem:
Once the top and bottom hem is pinned, take the curtain to your sewing machine and sew the bottom hem about 3/8 of an inch from the top folded edge. Sew the bottom hem only!
My fabric would not really hold an ironed edge, so I stopped bothering after the first panel, but if your fabric will hold a crease it is enormously helpful to iron the edges down before sewing. Just be careful not to melt your pin tops.
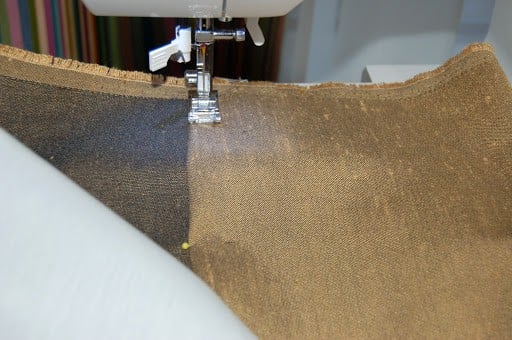
Step 7: Hem the sides:
Once you have sewed the bottom hem, lay the panel back on the floor so you can fold over the side hems. Smooth out the wrinkles as best you can and line up the liner and curtain panel edges as straight as possible.
Starting at the bottom, fold the edge over about half an inch, and fold over another half inch and pin securely in place.

When you get to the top/rod pocket part of the side hem, open up the top hem just enough to continue folding up the side hem, then pin the top hem back in place.


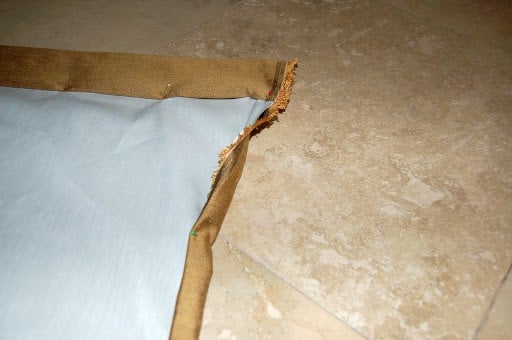
Take the curtain panel to your machine and start sewing up the side seams, about 3/8 inch from the inside edge. When you get to the top/rod pocket edge, be sure to unfold it and sew all the way up the side seams.
See how I sewed all the way up the edge and then folded it back over to create the rod pocket?

Step 8: Sew the top hem to create the rod pocket.
Sew the top rod pocket using a 3/8 inch seam allowance.

Tie off and trim any loose strings and you are done!!!

Hang your new curtains and admire how good they look!
Don't miss any more posts!


Did you use any weights in the bottom mitered corners of these drapes to make them hang correctly?
No, they were very long and the fabric was heavy, so weights were not necessary.
My wife and I are planning to revamp our living room window to look just the same as yours! 🙂 We wanted a wider view of our backyard, since our kids play outside most of the time and we want to keep our eyes on them while they play. The classic look of your family room looks great! It matches your nice chimney at the center. Great Job!
Kermit Lukacs