Last week, I finished up a pink faux fur vest for my daughter that had been in my to do pile since November, (click the link to see it). After finishing the vest I decided to whip up a matching muff. She looked adorable in the vest and muff. (Chopped bangs and all...) As for sewing the muff, I just made it up as I went along. After looking through the pictures, I decided the muff looked a little too wide. I wanted to make one more to get the measurements right before I posted the tutorial for the Hand-Warming Muff. Rather than take apart her pink faux fur muff, I just used a sweater from my recycle pile to make the new one.
The good part is, I made two! So a lucky reader can win on of my Hand-Warming Muff's for their own sweet princess! (Or prince, it could go either way...)
Here is the Tutorial, it is super easy:
Materials needed:
12 x 14 inch fabric for the top, (fleece, faux fur, sweater knit, flannel, etc...)
8.5 x 14 inch fabric for the lining: (I used fleece)
Batting (depending on the thickness you may want to double up (mine was low loft, so I did 2 pieces for extra warmth and thickness)
About 13 inches of coordinating ribbon or double fold bias tape.
ruler
scissors
coordinating thread
Directions:
First, cut your fabric. The top fabric piece should be 12 inches wide by 14 inches long. Cut the inside/lining piece 8.5 inches wide by 14 inches long. Cut the batting 12 inches wide by 12.75 inches long.
Lay the top fabric piece right side down on to your work space. Center the batting on the wrong side of the top fabric piece, so that 1/2 inch of the top fabric shows on top and bottom.
Pin the batting to the fabric securely. Next we need to mark the fabric for where we will "quilt" the batting to the top fabric. 
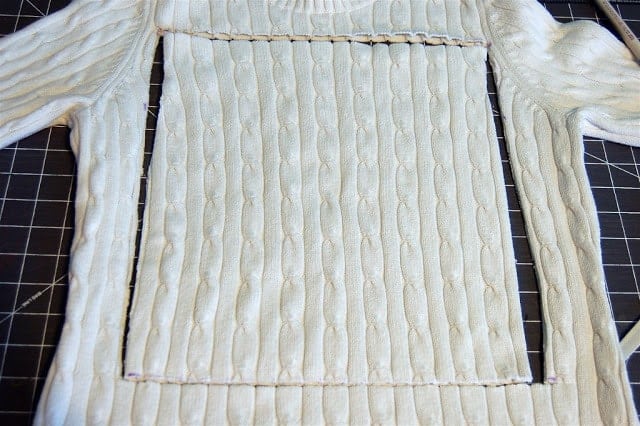
Draw lines on the fabric based on the diagram below.
Sew a straight line of stiches down the lines marked red. This will attach the batting to the top piece.
Next lay the fabrics on your workspace in this order:
batting side down, top piece right side up
fleece right side down.
Then pin the sides of the fabric together, it will look like this:
Sew 3/8 of an inch from the edge of each side, being careful to catch all layers in the stitch line. Flip the fabric right side out.
Then, right sides of the muff together, pin the edge closed. Since the batting was 1.25 inches shorter, you should be able to line the edges up fairly evenly and get the pins through.
Cut your ribbon or bias tape to about 13 inches. If you are using bias tape, just sew the open edge closed. Pin the edges of the ribbon into the seam you just pinned.
Sew a straight stitch down the unfinished edge of the muff, right along the edge of the batting. That should be about 3/8 to 1/2 inch from the edge. You don't want the batting sticking out of the seam, so you may need to push it back in as you sew the seam. (You may run in to this if your batting is extra thick.) When you get to the ribbon, make sure you sew around the edge of the ribbon so it does not hang out past the seam. (If you look close at my muff in the picture below, you can see how I let the edge of my ribbon show.)
Flip the muff right side out and you are done!
If you are inspired to create something based on this tutorial, I would love to see it! I have created a new Flickr Group for you to share your creations. Here is the link: Creations inspired by Scattered Thoughts of a Crafty Mom. (Please share, you might get featured!)
If you are not already a follower, but would like to be, you can subscribe using the Google Friend Connect widget, through a reader, or signing up via email. Just click on one of the icons below:
Thanks for visiting!
I will be linking up to some of these fabulous linky parties.
Pin It
Tweet


I'd love to win this, but sadly I'd be selfish and keep it for myself! Ha! I can't help it, I get cold hands!
ReplyDeleteI met a lady once when I was dressed as a victorian and had a muff, she said she'd have loved one when she was a little girl... if ever I went back there and her stall was there i'd love to give it to her.
ReplyDeleteI just found your blog on Ucreate and love the simplicity of your tutorials! A Nook cover is one of the next things on my list and it never would have occured to me to quilt it. Love the look! My town is stuck in more snow than I'm used to, so I'd probably be selfish and keep the muff for myself and share with my roommate. f8breaker (at) gmail (d0t) com
ReplyDeleteEnter me!!! I am a follower!
ReplyDeleteIf I won this i would give it to my little sister! She always borrows my gloves!
sauriola@cwu.edu
Cute idea! I love up cycling!
ReplyDeleteThis comment has been removed by the author.
ReplyDeleteEnter Me.
ReplyDeleteThe muff is adorable. I love that you lined it with fleece to make it extra cozy. If I won the giveaway, I would give it to my niece. Thanks for the great tutorial. If I don't win at least I can make one. I'm a follower. I receive your updates by email.
Enter me! This muff is so adorable and I love it! I have a grand niece that would love it! I am a follower. Thank you for entering me.
ReplyDeleteJulie
Wow, super cute. Please enter me!! :) I'll give it to my daughter, she will love it. Thanks.
ReplyDeleteIndira
craftyhomemade7atgmaildotcom
You are so creative. This project is cute.
ReplyDeleteHow cute!!!
ReplyDeletem ^..^
Enter me!!
ReplyDeleteThank you for linking up to Show Your Stuff last week, I have this week's edition up and invite you to come back:
ReplyDeletehttp://juliejewels1.blogspot.com/2012/01/show-your-stuff-7.html
So pretty and warm!
ReplyDeleteI now follow you, and this is amazing, as a child I always dreamed of having a muff like this. I would love to give this to my daughter down the way, or find a special young girl in my neighborhood who would cherish this as much as I would have when I was young :)
ReplyDeleteI'd love to invite you to link up with us for Fun Stuff Fridays. http://www.toysinthedryer.com/2012/01/fun-stuff-fridays-7.html
ReplyDeleteHey, just stumbled upon you and LOVE the blog...follower now! I am just starting my own blog and doing my first link up, would love for you to link up if you can! You can find me over at www.thebluemasonjar.blogspot.com Thanks!
ReplyDeletexoxo Erin@bluemasonjar
Love this. I use to have a little fur coat when I was younger and it had a muff. My oldest daughter would love this! And with all the stuff on my to do list, winning one would be nice. Just started following. Love the blog.
ReplyDeleteEnter me! I would use this for my nine-year-old or my five-year-old. It's a wonderful idea!
ReplyDeleteOooh, enter me! I would love to give this to my daughter :o)
ReplyDeleteGreat idea...and such a cute model!
ReplyDeleteLOVE this! It's completely impractical for where I live considering that it's currently 73 degrees outside, but it's so cute I might do it anyway! : )
ReplyDeleteYou've got quite the adorable model there as well! : )
Great projects, as always, Jamie!
Thanks so much for linking up your awesomeness with Feature Friday Free-for-All! : )
Beautiful muff and a great tutorial too! Not to mention the fabulous photos! :)
ReplyDeleteThanks for linking to a Round Tuit!
Hope you have a fabulous week!
Jill @ Creating my way to Success
http://www.jembellish.blogspot.com/
Oh that is lovely! I'm sure the pictures don't do it justice :)
ReplyDeletePlease enter me! I follow you! I would LOVE to win this for my little girl! She LOVES girly stuff!
ReplyDeleteEnter ME!! I would give it to my flower girl :)
ReplyDeleteI love it! I will be making some :) Please enter me in your giveaway! Thank you so much for having it! Your pictures are beautiful and the model super cute. I would gift it to my cousin.
ReplyDeleteI love it, it brings back memories for me when I was young. I always felt so "special" when I add one on. Your tutorial is great! thanks for letting us know how to make, I will be making one for my granddaughter! Thanks for sharing you creative inspiration at Sunday's Best Party. I "pinned" this.
ReplyDeleteHow darling is this!!! My girls would go gaga over this. Now to find a sweater at the thrift store!
ReplyDeleteOh, enter me! Did I make it? This is SOOOO adorable! My little girl would just FLIP over it!
ReplyDeletenaomipaxton@yahoo.com
Oh I love muffs! This totally reminds me of the little fur one I had as a girl :) What a great tutorial too, so glad I stopped by.
ReplyDeleteShelley
http://westermanfam.blogspot.com
ENTER ME
ReplyDeleteI'm a follower. I would give this to my youngest daughter. She is 7. ;-) Thanks for linking up at Trendy Treehouse. Pinning this! TOO CUTE!
Tara
trendytreehouse@me.com
What a great idea! Thanks for the tutorial, it would have taken me a LONG time to figure out how to do that! Enter me for the giveaway, please - my niece walks a fair distance to work downtown, and it is COLD and SUPER WINDY there, so I'd love to give her a muff!
ReplyDeletethis is so fun! I love that you used an old sweater. Such a cute way for littles to keep warm. I am having a Make a Gift on the 25th Party on Blissful and Domestic. I would LOVE for you to link this up,. It makes for a great gift idea too!
ReplyDeletehttp://blissfulanddomestic.blogspot.com/2012/01/make-gift-on-25th-christmas-leg-warmers.html
cute idea,I remember having one of these :)
ReplyDeleteAwesome.. super cute!
ReplyDeleteThanks for linking up at Create and Inspire Party.. Hope you can join us tomorrow for another awesome party plus a giveaway!
Angie from A Little Inspiration
So cute!! Thanks for linking up and don't forget about registering for my current giveaway....
ReplyDeleteRamsign Giveaway: Porcelain Enamel Sign {up to $99 value}
XO, Aimee
I just wanted to let you know I featured your adorable muff warmer on Blissful and Domestic tonight. Stop by and grab a button:>
ReplyDeletehttp://blissfulanddomestic.blogspot.com/2012/02/25-wearable-refashions.html