How to make a Pillowcase Dress without Sewing
Disclosure: This post may contain affiliate links. As an Amazon Associate, I earn from qualifying purchases.
Don’t have a sewing machine? That’s no problem! Learn how to make a pillowcase dress without any sewing! All you need is a bit of fabric, (or 2 bandanas) fabric adhesive and ribbon!
 (Looking for more free patterns? Be sure to check out my free patterns and tutorials page here.)
Would you like to guess at what one of the most frequent comments left on my blog is? It is any variation of “That’s so cute, I wish I could sew…”
There’s no question about it, I really like to sew. At the same time, I want to keep the things I make on this blog simple, so anyone could recreate them easily. Whether they have sewing skills or not.
So today, I am going to show you how you CAN make a pillowcase dress/top with NO sewing! (Of course, you can still sew the pillowcase dress using this tutorial- I’ll point out any changes you would need to make at each step…) If you do sew, you might like my Polished Pillowcase dress tutorial or the Tiered Pillowcase Dress Tutorial.

You’ll be surprised at how easy it is.

Materials needed to make a No-Sew Pillowcase Dress (In our case, it is more of a top):
- 2 Bandanas (I got mine at walmart for $.99)
- Iron-on hem adhesive (be sure to look at this link to make sure you are getting the right stuff)
- Iron
- Ruler
- 75 inches (+/-) of 7/8 inch grosgrain ribbon
- Safety pin
- Fray check or lighter
How to Make a NO-SEW Pillowcase Dress:
Instructions:
Step 1: Creating the armhole seams.
Layout your bandanna, wrong side up. Starting at the top left side, with your ruler, measure over 5 inches from the edge.

At the 5 inch mark, fold the edge over as shown.

Using your iron press in a good crease.
(If you are sewing, trim the folded piece 1/2 inch from your folded mark. Fold the new edge over 1/4 inch, press, fold over another 1/4 inch, press again and sew along the folded edge, do this on both sides for each bandana.)

Tear off a piece of hem tape that measures from edge to edge of your folder corner as shown.

Trim the edges of the hem tape so the length fits just under the edge of the bandanna.

Open the flap and place the hem tape up against the crease you ironed.

Fold the bandanna back over and iron according to the directions of your hem tape. Follow the same process on the right side of the bandanna and then repeat on the 2nd Bandanna.

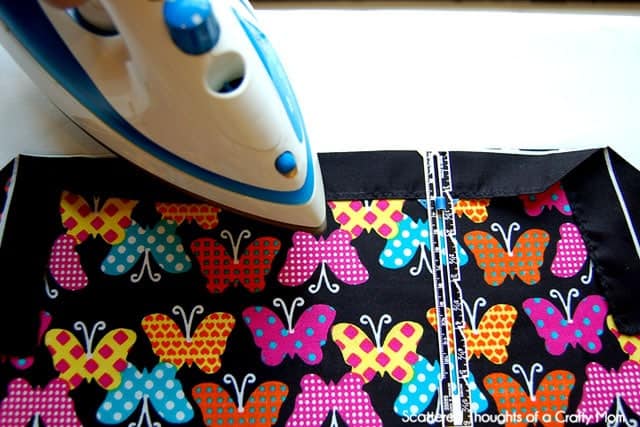
Step 2: Make the neckline casing.
The wrong side still facing up, fold the top edge of the bandanna over 1 1/4 inch and use your iron to press in a good crease.
(If you are sewing, sew along the bottom edge of both bandannas.)
Measure out another length of the hem tape to match the edge you just folded over. Trim the hem tape so it fits right under the edge.

Place the tape right along the bandanna edge and press according to the package directions. (Make sure you are putting the hem tape at the edge of the bandanna and not at the crease. We are making a casing for the shoulder ties.) Repeat on the 2nd bandanna.

Step 3: Side seams.
Lay the 1st bandanna out on the ironing board, right side facing up. Measure out a piece of hem tape the length of the side of the bandanna from the armhole to the bottom edge. Trim well.

Lay the edge of the 2nd bandanna right side up, along the edge of the 1st bandanna. Trim off any overhanging hem tape. Press well! This seam will get the most wear and tear. Repeat on the other side.
(If you are sewing, line up the bandannas right sides together and sew along the edges, press the seams flat.)

Step 4: Add the ribbon for the shoulder ties.
Using a safety pin, run the ribbon through the front and back casing. At this point you can leave the ribbon in one piece and have the tie on on shoulder or you can cut it in half and have a tie on each shoulder. Using a lighter or fray check, seal the edges of your ribbon and you are done!
Have fun!

Just a couple of notes on this project:
1. In the photos I took yesterday of my daughter wearing the pillowcase dress/top, I had used bias tape for the shoulder ties. I replaced the bias tape with ribbon today and the ribbon works SO MUCH better!
2. I washed and dried the dress/top on normal and the hem tape held up well, but for subsequent washing’s I will hand wash and line dry to help keep the hem tape intact.
3. I used bandannas for this project because they already have seams. But if you have a pair of Pinking Shears, you could use any fabric you want. (You could recycle old sheets, tablecloths, curtains, clothing, etc…) Before I learned to use my serger, I used my pinking shears all the time.
4. You could also try fabric glue that is applied just like regular glue. I have never tried it, but am curious if any one has. If you have, would you leave me a comment and tell me how it holds up?


Looking for a few more fun, no sew projects? Be sure to check these out:


Don’t miss any more posts! You can follow along on Feedly, Bloglovin’, via blogger using the Google Friend Connect widget, your favorite feed reader, or by signing up via email. Just click on one of the icons below:

If you are concerned about the hem tape holding up, use the variety in the red package. Same brand and product line as the tape you linked, but the red label is their “no sew” ultra bond version.