Easy Chevron Stenciled Pillow (w/ Fabric Spray Paint)
Disclosure: This post may contain affiliate links. As an Amazon Associate, I earn from qualifying purchases.
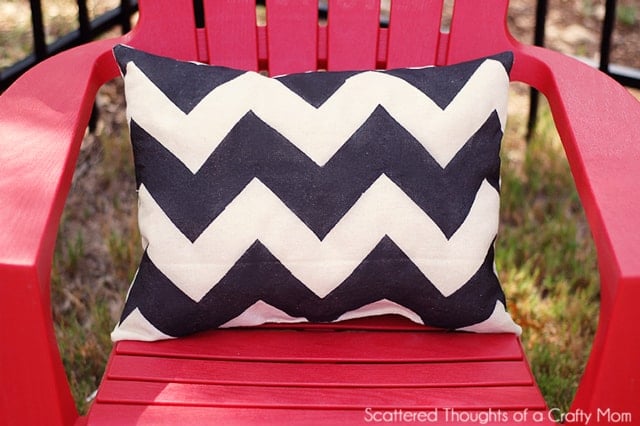
I received a goody bag full of products from one of my sponsors, Fashion Art Projects. One of the items they sent was Fabric Spray Paint. I’ve had several ideas floating around on what to do with the spray paint, and I finally settled on stenciling a pillow. (I resisted as long as I could, but have now jumped on the Chevron bandwagon!)
I finished up the second pillow last night (after I took these pictures) and they look so cute on our red Adirondack chairs!
Taping off the stencil definitely took longer than the painting and sewing put together, but for small projects, its probably not worth buying a stencil. I came up with a fairly easy stencil taping method that I will show you below.
Would you like to make a chevron stenciled pillow too? Here is how I did it!
Materials Needed:
- Pre-washed fabric
- Fabric Spray Paint
- Ruler with angle markings (Or some other tool to measure angles.)
- tape measure
- disappearing fabric marker
- wide tape (1.75 inches)
- exacto knife (Not necessary, but makes cutting easier than scissors)
- sewing supplies
Using the first line you drew to line up your ruler, draw more lines all the way across the fabric, 4 inches apart. Then repeat the process going the other direction so you have cris-crossing lines across the pillow front.
Start lining up your tape pieces along your markings.
Keep going.
Until it is all done:
Next, following the instruction on the spray paint bottle, paint your pillow front.
Once the paint has dried remove the tape.
Place the 2 pieces of fabric right sides together and sew aound the edges, leaving a 2 to 3 inch opening for the stuffing.
Stuff your pillow and hand sew the opening shut.
That’s it, now sit back and admire your pillow!
Have fun!
Would you like to see more of this kind of project? You can sign up to follow along using the Google Friend Connect widget, through a reader, or signing up via email. I would love to have you as a follower! Just click on one of the icons below:


I will be linking up to some of the linky parties found here.

Thank you for linking up last week!
Your project is featured this week 🙂 please grab an I have been featured button …
Looking forward to seeing what you have been upto this week !!!
Claire xox
Such a clever tutorial! I would love for you link this up at my first LINK PARTY!
http://www.thecreativeorchard.blogspot.com/2012/08/tutorial-link-party.html
Great technique/tutorial to get those perfect zig zags. Thanks for sharing with air your laundry friday, Jamie! xo Jami
You just saved me some stress on my brain. Thanks for being so smart!
Great pillow. I have never had much success with fabric paint, but this makes me want to try it again! Thanks for sharing. xoxo, Tauni
Cute! Too bad chevron print has to be so labor intensive! I love the look and have been experimenting with the easiest/fastest way to do it. Now I have one more technique to try 🙂
You had me at EASY and then followed by CHEVRON. Love the black and white against the gorgeous red. Really makes an incredible statement! Thanks for sharing your creative inspiration with Sunday’s Best – you helped make the party a success!
Beautiful!
I love it – the black and white is stunning!
Thanks for linking up this week to the Creative Inspirations Linky Party!
Stacey of Embracing Change
Looks great! I have not tried the spray fabric paints. I would be thrilled for you to share this at Gettin' Krafty!
http://kraftykat76.blogspot.com/2012/08/gettin-krafty-with-it_27.html