Easiest Fleece Hat and Scarf Set Ever!
Disclosure: This post may contain affiliate links. As an Amazon Associate, I earn from qualifying purchases.

Ready to make the Easiest Fleece Hat and Scarf ever? You can sew this super Easy Fleece Hat and Scarf Set in 15 minutes flat!

Easy Fleece Hat and Scarf Set
I’ve had this darling kitty print fleece just sitting around in my stash, taking up space for far too long.
Every time my Missy see’s it, she asks, “When are you going to make my blanket out of this fabric?” (When we picked it out, a blanket was the original plan.)
And each time she asks about the fabric, I feel guiltier and guiltier, so I figure I better use it soon.
This girl certainly does not need another blanket, but we can always use more cold weather gear.
So a Fleece Hat and Scarf is what the fabric will become!

The scarf and hat took about 15 minutes to put together and oh my goodness did it come out cute!
My kitty crazy girl, could not have been more pleased. (I don’t know if you can make out what she is wearing in this picture, but she wears a kitty themed outfit or hair accessory to school 1 to 2 times a week!)

I have several fleece hat tutorials on the blog, the one you see in todays post can be found here: Easy fleece hat tutorial.
Keep reading for the coordinating scarf tutorial.

If you don’t have a child handy to measure, here is a hat measuring chart that may be helpful.
You can find a less feminine fleece beanie here: Free fleece beanie hat pattern
Easy Fleece Scarf Tutorial
Materials needed for the scarf:
- 14.5 by 60-inch piece of fleece
- 2 strips of fleece 1/2 inch wide by 8 inches long
- basic sewing supplies
Instructions to make the scarf:
Step 1. Cut Fabric
Cut a piece of fleece to 14.5 inches wide by 60 inches long and 2 smaller strips to 1/2 inch wide by about 8 inches long.

Step 2: Sew the scarf tube.
Fold fleece, right sides together, lining up the long sides.
Measure 4 inches from the ends of the scarf and mark spots with a pin. Starting at the location of 1st pin, sew along edge with a 1/2 inch seam allowance. Stop sewing at 2nd pin. (this is where the fringe starts.)

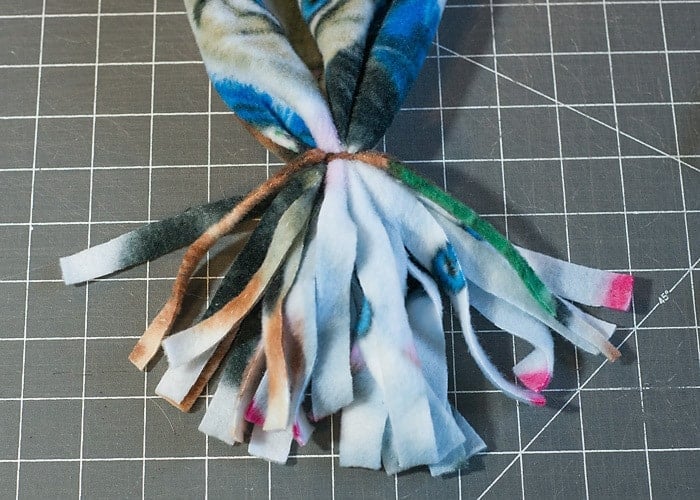
Step 3: Cut the Fringe
Flip scarf right side out.
Measure up 4 inches from the end of the scarf and cut the scarf edges into scant 1/2 inch strips.
Repeat on the other side of the scarf.

Step 4. Finish the ends.
Using the small strip you cut earlier, gather the fringe and tie a tight knot right where the firing begins. Trim the strip ends so it is the same length as the scarf fringe.
That’s it, you are done!
Quick tip: Since the fabric nap on my scarf was one way, I cut my scarf in half (before sewing the side seam) flipped it around and sewed it back together. This put an extra seam in the middle but made it so the pattern faced the same direction when she wears it.


Enjoy!
If you make one of these, be sure to come back and share your version on my facebook page or tag me on Instagram and use #scatteredmompatterns.
Don't miss any more posts!


Thanks for the scarf/hat pattern, just in time for fast Christmas gifts for 4 GD’s, 8-14. Off to find perfect fabric! I assume you pre-wash and dry the fleece?
A question on your PJ pants, do they run narrower than the Big 4 patterns, which are often huge on slender figures? Or how much to narrow the legs? We appreciate you have added sizes as your model/daughter has grown. Few patterns for teens, then they go into Women’s Small, but need length–my oldest one is almost 5’7″ already, and many volleyball/BB players here are over 6 feet!
Which pj pants? I do have a knit leggings pattern, The leggings pattern is designed for very stretchy knit fabric and I would say it runs around average. (Has a negative ease for a snug fit.) The fit was actually based on a pair of leggings from the children’s place many years ago. If your child is especially tall you may need to add length. When cutting the fabric, just compare a set of leggings that fit.
Great little supper easy project
Had some crazy multi colour leopard print fleece I’ve had for ever, now it’s a cool scarf. Going to make matching arm warmers next x
Ok I have followed a lot of links for hat pattern and only pattern I could get to pop up is the scarf. I need to make some cancer fleece caps. Help
Hi, most people use this pattern: https://www.scatteredthoughtsofacraftymom.com/free-beanie-hat-pattern-4-sizes/
I Love these! We just moved to VA from San Diego and I am freezing! I have some beautiful wolf fleece and some pawprint fleece. I guess I could mix it, couldn’t I?
Cute! And the kitty fleece is the best!! I’ve got a Craft Gossip post scheduled for tomorrow that features your tutorial: http://sewing.craftgossip.com/?p=91313 –Anne
Thank you!