• Skip to primary navigation
  • Skip to main content
  • Skip to primary sidebar
  • Home
  • Recipes
    • main dish
    • dessert recipes
    • Appetizers
    • Breakfast Recipes
    • sides/snacks
    • drinks
    • low carb
    • Recipe round ups
  • Sewing Tutorials/Patterns
    • Girls Sewing Patterns and Tutorials
    • Ladies Sewing Patterns and tutorials
    • Boys Sewing Tutorials and Projects
    • scarves/hair accesories/hats/etc.
    • Quilting Projects
    • Home Sewing Tutorials
    • No Sew Fabric Projects
    • Sewing Round-ups
    • Sewing Inspiration
  • Crochet/Crafts/DIY
    • Crochet Projects
    • crafts
    • Outdoor DIY/Home Projects
    • pets
    • Lifestyle
  • About
    • Shop My Equipment
    • About Me
    • Contact Info
    • Work With Me!
    • Privacy Policy
    • Terms, Conditions and Disclosures
    • Frequently Asked Pattern Questions
  • Nav Social Menu

    • Facebook
    • Instagram
    • Pinterest
    • RSS
    • Twitter
scattered thoughts of a crafty mom logo

Scattered Thoughts of a Crafty Mom by Jamie Sanders

Inspiring you to sew, cook and create.

Related Posts

  • Best Free Sewing Patterns of 2017
    Readers Favorite Best Free Sewing Patterns and Craft Posts of 2017

    I love looking back on all the sewing and craft projects I've completed throughout the…

  • Best Free Sewing Patterns of 2016
    Best Free Sewing Patterns of 2016

    The Best Free Sewing Patterns of 2016 from Scattered Thoughts of a Crafty Mom!  (And…

  • DIY Stay Put Kitchen Towels
    Stay Put Kitchen Towels

    DIY Stay Put Kitchen Towel Tutorial See this empty drawer? It's where I keep my…

  • Learn how to make these DIY Decorative Tea Towels. These towels area fabulous way to use up all fabric scraps and add a little color to your decor!
    DIY Decorative Tea Towels

    These DIY Decorative Tea Towels are a fabulous way to use up all fabric scraps…

  • Make a bling-ed out version of a Raglan Tee for your lilttle miss with this free Raglan T-Shirt Pattern!
    Blinged-Out Raglan Tee (free pattern)

    I took my lil' missy with me on a recent trip to Hobby Lobby.  She…

Home / quilts / Free Motion Quilting – Embellished Towels

Free Motion Quilting – Embellished Towels

quilts, Sewing

Disclosure: This post may contain affiliate links.

Working on your Fee-Motion Quilting skills?  This Free Motion Quilted Hand Towel Tutorial Is just what you need to help improve your quilting skills!

free motion quilting

Ever since I started dabbling in quilting, free motion quilting has been on my list of things to learn.

Over the holidays, I ordered a generic quilting/darning foot to fit my machine.  I figured I should start with a small project, and thought a cute and girly set of hand towels for my daughter’s bathroom would be perfect.  (I also used this technique on her tooth fairy pillow as well.)

quilted towels

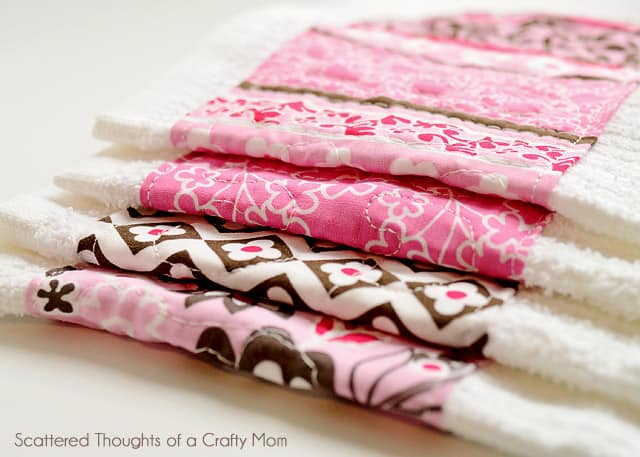
I grabbed a set of 4 towels on my last trip to Wal-mart and while I was there, found this cute little fat quarter set of coordinating pink and brown fabrics.

pink fat quarter set

Adding the fabric to the towels was super easy, you’ll love the results!

embellished towels

Free Motion Quilted Towel Tutorial:

Cut a piece of fabric about an inch taller and wider than your towel.

Fold the edges of the 2 long sides and one short side over 1/4 inch and iron them flat.

Pin the fabric in place, lining up the one ironed short side with the side of the towel and fold the other side in/under to line up with the other side of the towel.

Then, sew along the edge of the fabric about 1/8 inch form the edge, all the way around the towel.

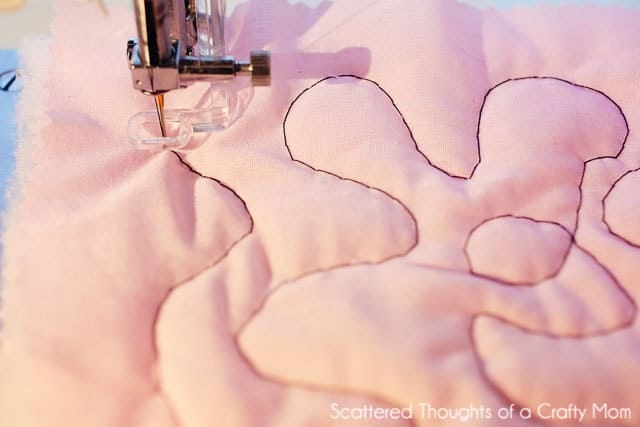
If you want to try a little quilting yourself, make sure you are using quilting needles (they are very sharp), otherwise you may have problems with your bobbin thread getting tangled up and not looking pretty.

Here is a shot of the quilting foot.  The presser foot is all the way in the down position, notice how high up it sits?  This makes it much easier to move the fabric around.  (Make sure you lower the feed dogs too.)

I am not very artistic, so my loops and swirls are pretty sad looking, but when you use a thread that blends better you can’t even tell…

It’s hard to see in these pictures, but I quilted different patterns on each towel.  (Actually, I left the photo below fairly large.  To see the details better, right click and open the picture in a new window an you can see it up close.  This function only works when you are reading on my blog page- not in a reader or the email version.)

I traced the floral design on the floral fabric.

embellished handtowels

I love the free motion quilting for small projects like this, but I’m not 100% sure I would do it on a full or queen size quilt.  It seems like it might take longer or be more difficult than straight line quilting.

What do you think?  Have you free motion quilted a large quilt on a regular sewing machine?  I would love to hear how it went for you or just get more advice…

Looking for more easy Quilt projects?  Check these out too!

Free Zig Zag Quilt Pattern

Quilted Camera Case

Simple Fat Quarter Quilt

Don't miss any more posts!

Follow along on:

Feedly, Bloglovin', your favorite feed reader, or signing up via email and have new posts delivered to your email box each week!

January 30 · 31 Comments

Previous Post: « Baking with Kids: Mini Chocolate Cupcakes
Next Post: Boy’s Bow Tie Tutorial »

Reader Interactions

Leave a Reply Cancel reply

Your email address will not be published. Required fields are marked *

Comments

  1. Jen says

    January 30 at 9:11 pm

    This is the thing I want to learn this year too. I just did my first thing earlier this week (a kindle cover)…starting small, but hoping to do a whole quilt soon.

    Reply
  2. Bethany says

    January 30 at 11:04 pm

    How cool! My SIL just did this on a quilt for Christmas, and each time I see it, I'm blown away. I would need a LOT more practice before I could do something like free quilting. Good job! Does your daughter like them?

    Reply
  3. Amye Gumbinner says

    January 30 at 11:12 pm

    These are really great!!! You should sell them on Etsy. Very creative!

    Reply
  4. Karen says

    January 31 at 12:48 am

    Very nice Jamie! I love the fabric and your quilting came out wonderfully!

    There are many great tools that you can use to FMQ on your domestic machine. I recommend getting a pair of Machingers Gloves. You can get them for under $10 and they help so much when you are quilting larger items on your Domestic. Check out my blog for titles with FMQ and see some things that I've learned to do – and for two very talented ladies who FMQ on their Domestic check out Joanne Thread Heads' blog and Leah Days' blog. These ladies inspired me to quilt on my own machine — just as you inspire me to make wonderfully beautiful things for my grand daughters! Thank you and best of luck – email if I can help further!
    Karen
    http://karensquiltscrowscardinals.blogspot.com/

    Reply
  5. Sunae Reilly says

    January 31 at 6:14 am

    I am so nervous to try quilting, but this looks like a great beginner's project! I might have to invest in a quilting foot for my sewing machine 🙂

    Reply
    • Grandma Sue says

      March 1 at 10:29 pm

      If others can do it so can you. Remember when making swirls, to leave enough room to come back OUT again. We had an expert come to our club, and she says, "practice on a quilt sandwich (fabric, batt, fabric) for 15 minutes a day to get the hang of it. I think we all have a fat quarter lying around we really don't like much. Or just use muslin. If you use contrasting thread you can really see where you may have goofed. But that's ok, you're only practicing.

      Reply
  6. Danni Baird @ Silo Hill Farm says

    January 31 at 10:42 am

    Those are so very pretty and possibly even a novice like me can make some pretty towels! Thank you for sharing this!

    Reply
  7. [email protected] says

    January 31 at 2:41 pm

    Those are beautiful!

    Reply
  8. Leisa B says

    January 31 at 3:51 pm

    Cute idea! I'm sure your daughter loves them 🙂

    Reply
  9. Rhiannon says

    January 31 at 9:11 pm

    sooo cute! i wanna try! I gotta get me a quilting foot AND needles. I didnt know there was a special needle for quilting!

    Reply
  10. Meredith says

    February 1 at 12:20 pm

    Have only attempted a couple of very small projects for free motion quilting and I'm always thinking I will keep trying. This is a great idea and they look super cute.

    Reply
  11. Betsy @ Anna Nimmity says

    February 1 at 4:54 pm

    Adorable!

    Reply
  12. Kerry @ Made For Real says

    February 1 at 9:28 pm

    Too cute – I love it!

    Reply
  13. Daree Johnson says

    February 2 at 2:29 am

    I love this idea! It is the first piece of inspiration I have seen for my bathroom in a long time!!! Thank you for posting this 🙂

    Reply
  14. K Coake says

    February 2 at 2:30 am

    They look so pretty. Thanks for the lesson/tutorial. I had never seen all the needles and presser foot that is used. Very neat.

    Reply
  15. Jamie -Better With Age says

    February 2 at 6:09 am

    Wow, good job! Thanks for sharing. I'm a new follower 😉
    Jamie~ Better With Age
    PS: Love your name 😉

    Reply
  16. Cathy @ My 1929 Charmer says

    February 2 at 8:47 pm

    I've always wanted to free quilt, but for some reason feel a little intimated by it. Maybe now not so much1 Your towels are so pretty, and love the fat quarter fabric. Thanks again for showing us how!

    Reply
  17. havingfunatchelleshouse says

    February 3 at 2:30 pm

    Those are very cute little towels. They would make a great little gift!

    Thanks for sharing at Sharing Saturday!

    Reply
  18. Jessica Pelasky says

    February 3 at 11:26 pm

    Jess here…co-host of "Shine on Fridays" this week! Thanks for linking up!

    I'm a newbie sewer, but this looks so easy! I pinned it for later!! 🙂

    Don't forget to enter my fabric giveaway! 🙂

    http://www.pluckys-secondthought.com/fabric-giveaway-sponsored-by-fat-quarter-shop-by-the-sea-fat-quarter-bundle/

    Reply
  19. Carol says

    February 4 at 2:18 am

    Super cute idea, and so easy with the availability of so many fun & colorful fat quarters.

    Reply
  20. Hilary says

    February 4 at 5:00 am

    These look super! I love free-motion quilting, but the arm on my machine is so short I can't do anything bigger than a crib sized quilt. My son needs new towels in his bathroom, this was just the inspiration I needed 🙂

    Reply
  21. Suzan says

    February 5 at 12:19 am

    I do most of my quilting on my domestic sewing machine. The trick is practice. Lots and lots of practice. Another thing to remember is "no guts, no glory". Take risks and push yourself. You will be surprised at how quickly your skills will develop!

    Reply
  22. Tanya @ Greetings From the Asylum says

    February 5 at 3:44 pm

    This is something I really want to try! Thanks for the tip about the quilting needles. I would have jumped in with the same old needle I always use. I am visiting from Sugar Bee!

    Reply
  23. Kelli says

    February 5 at 5:56 pm

    Cute towels!! Popped over from the Sew Can Do party. 🙂

    Reply
  24. Jill says

    February 6 at 3:32 am

    Your towels look beautiful! What a great way to try out the free motion quilting!
    I've only made one quilt – I enjoyed it and would like to learn more! It's on my long list of things to do!!!

    Thanks for linking to a Round Tuit!
    Hope you have a fabulous week!
    Jill @ Creating my way to Success
    http://www.jembellish.blogspot.com/

    Reply
  25. Alison Bayne says

    February 6 at 9:44 am

    Saying hi from the UK – found you on Frugal Days Sustainable Ways and am following you now! These towels look GREAT, something I really want to try. If you fancy doing a guest post on Mumtopia, let me know 🙂 http://mumtopia.blogspot.co.uk/

    Reply
  26. Emily Thompson says

    February 7 at 12:44 pm

    cute! I have not tried the free motion quilting on my machine… but I know it can do it. Yours turned out SUPER cute! I host a Tuesday link party that I would LOVE for you to come check out. http://www.nap-timecreations.com

    Reply
  27. Christine says

    February 11 at 3:50 pm

    Oh so CUTE and practical!!

    Thanks so much for sharing this at The DIY Dreamer… From Dream To Reality last week!!!

    Reply
  28. Grandma Sue says

    March 1 at 10:35 pm

    Dear DIY Dreamer: Your quilting is nice. We had a lady come to teach us at our quilt club. She recommends a 10" X 12" quilt sandwich to practice on 15 minutes a day. One tip of hers was to remember that you need space to come out of your swirl or whatever. Don't just go in real tight. I love outline quilting. It's pretty easy; just keep echoing your flower or whatever. When you feel you've gone far enough, do another one; maybe a leaf and made a nice vee or curve to join the two outlines or echoes.

    Reply
  29. Laurie Spencer says

    January 26 at 2:08 pm

    The embellished towels are a great idea! I think you should give yourself a chance. I bet you can do a large quilt. I have done small quilts mostly stitch in a ditch, then I did a twin-sized quilt for my granddaughter and did many different kinds of free motion quilting in the different blocks; some of the quilting was better than others, but I learned a lot. This past year I tackled a king-sized quilt to give as a wedding gift to my son. I did an overall pattern of meandering; it turned out wonderfully! I was so pleased. I did it on my home Janome sewing machine. I think what helped me is I got experience doing the twin quilt growing my confidence along with learning how to start and stop and hold my hands etc. I know you can do it! (Really like your blog and projects)

    Reply
    • Jamie says

      January 27 at 12:08 pm

      Thank you! A king project was quite a project to take on. I still may do a full sized quilt for my missy. (If we can agree on fabrics, lol.)

      Reply

Primary Sidebar

Never Miss a project or Delicious new Recipe

You may share 1 photo and up to 3 lines of text, under the condition that proper credit is given to scatteredthoughtsofacraftymom.com.
(Must be a clear link back to shared content & do not remove the watermark.) For more information see: Terms and Conditions.
Scattered Thoughts of a Crafty Mom is a participant in the Amazon Services LLC Associates Program, an affiliate advertising program designed to provide a means for sites to
earn advertising fees by advertising and linking to Amazon.com.  For more info, read full Terms and Conditions & Privacy Policy 

Copyright © 2021 ·Thyme theme by Restored 316

Copyright © 2021 · Thyme Theme by Restored 316