

Flirty Fall Skirt Tutorial
Disclosure: This post may contain affiliate links. As an Amazon Associate, I earn from qualifying purchases.
Learn how to sew a flirty fall skirt using your own measurements and simple rectangular fabric pieces! This easy drop waist skirt has a comfortable elastic waistband and a gathered lower tier.

💌 Save this article
Sew a Flirty Fall Skirt
I’ve always loved skirts.
To me, they are a perfect spring, summer, and fall transition piece. When temperatures are warm, you can pair a skirt with a T-shirt and sandals. As the weather cools down, add a sweater, boots, and even tights.
The project I’m sharing today is a super simple skirt with one gathered lower tier. The upper section sits closer to the body, with the gathers starting below the belly rather than right at the waistband. You get a little fullness and movement without all that gathered fabric around your waist. (And who needs extra bulk there?)
Why Make This Skirt?
-
Simple cutting: The fabric pieces are rectangles based on your measurements, so there’s no paper pattern to print or trace.
-
Comfortable fit: An elastic waistband makes the skirt easy to pull on, while the lower gathering keeps the waist area less bulky.
-
Easy to wear across seasons: Pair it with sandals when it’s warm, then switch to boots and a sweater for fall.
Suggested Fabrics
Cotton jersey is a good choice for this skirt. It’s soft, comfortable, and has enough drape to keep the gathered tier from looking too bulky. It’s what I used for the skirt shown here.
You could also use rayon jersey for a more fluid, swishy skirt, or a soft woven fabric, such as rayon challis or lightweight cotton lawn. If you choose a woven fabric, make sure the upper section and elastic waistband will pull comfortably over your hips.
Fabric tip: Soft fabrics with good drape fall closer to your body, while firmer fabrics give the gathered tier a fuller look. Avoid very stiff or heavy fabrics if you want a result similar to mine.
Materials Needed to Make the Flirty Fall Skirt
- Fabric: You’ll need about 1 to 1¼ yards, depending on your size and the fabric width. Longer skirts or larger measurements may need more. Calculate your fabric cuts before buying. I used cotton jersey so the skirt would drape closer to my body.
- ¾-inch-wide elastic, enough to fit around your chosen waistline
- Coordinating thread
- Tape measure and ruler
- Fabric marker or chalk
- Fabric scissors or a rotary cutter and mat
- Pins or clips
- Sewing machine and a needle suitable for your fabric
Pattern Notes
- This skirt is made from your measurements rather than a downloadable sewing pattern. You can adjust where the waistband sits, where the gathered tier begins, and the finished length.
- Use a ¼-inch seam allowance unless otherwise noted. The lower-tier measurement includes a ½-inch hem allowance.
- Prewash and dry your fabric as you plan to care for the finished skirt before measuring and cutting.
Good to Know: Choose the Right Needle for Knits
When sewing this skirt with cotton jersey, use a ballpoint needle. Its rounded tip slips between the knit loops rather than piercing them, helping prevent snags and fabric damage.
For knits with lots of stretch, especially those containing spandex, a stretch needle can help prevent skipped stitches.
Skirt Sewing Instructions
1 Take your measurements: Decide where you want the waistband to sit, where the gathered lower tier should begin, and where you want the skirt to end. Then take these three measurements:
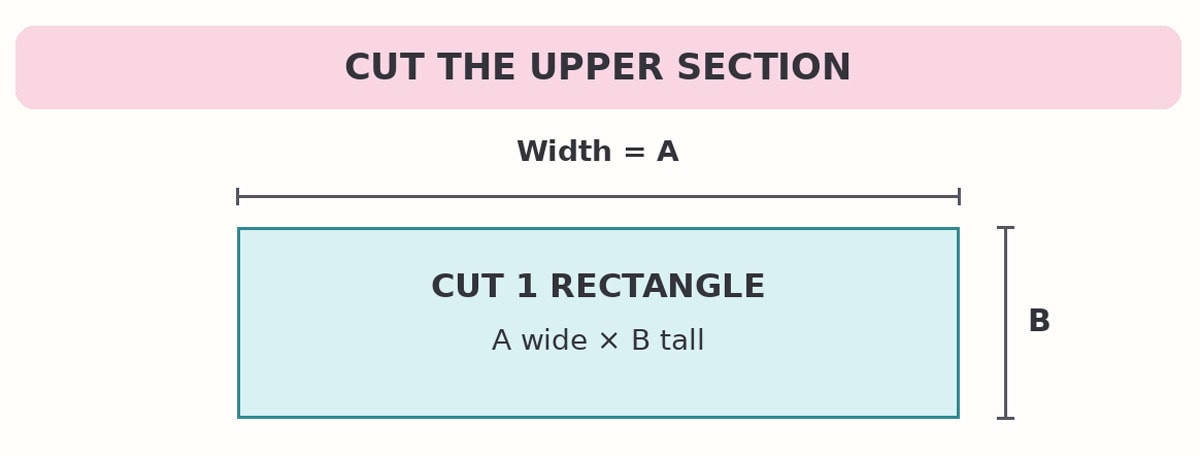
- Measurement A: Measure around the fullest part of your hips and add 2½ inches for ease and seam allowance. This is the cutting width of your upper section.
- Measurement B: Measure down from your chosen waistline to where you want the gathered tier to begin. Add 1¼ inches for the waistband fold and joining seam. This is the cutting height of your upper section.
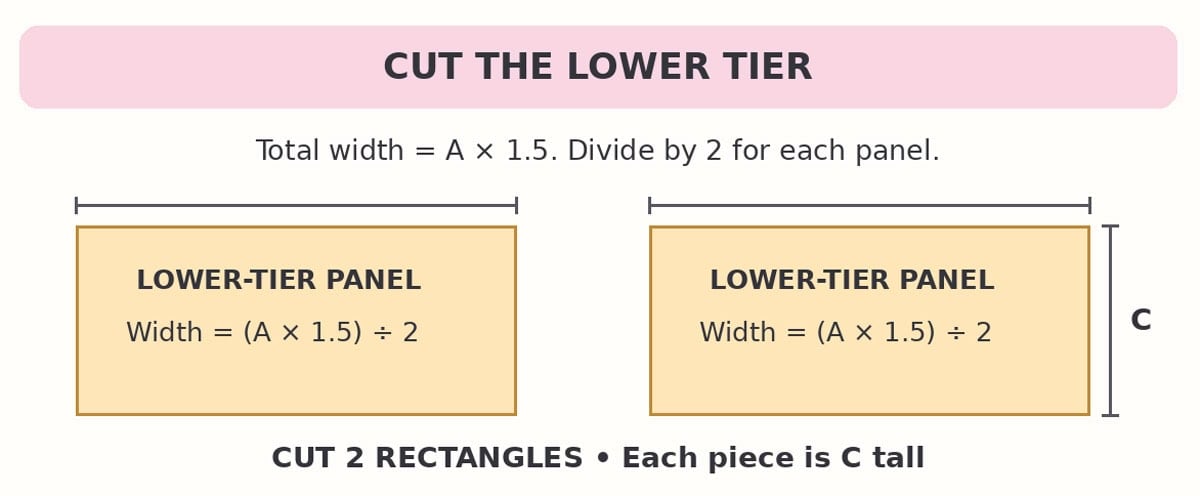
- Measurement C: Measure down from where the gathered tier will begin to your desired hemline. Add ¾ inch for the joining seam and a ½-inch hem. This is the cutting height of your lower tier.
Write down A, B, and C. The allowances are already included, so you don’t need to add them again when cutting.
Also measure around your chosen waistline and save that measurement for the elastic in Step 7.
2 Cut the upper section: Cut one rectangle measurement A wide by measurement B tall.
3 Cut the lower tier: The lower tier needs extra width so you can gather it to fit the upper section.
Multiply measurement A by 1.5 to find the total width needed. Then divide that number by two to find the width of each rectangle.
Cut two rectangles that width by measurement C tall.
Why divide by two? The full lower tier is often too wide to cut across the fabric in one piece. Cutting two smaller rectangles lets you fit the pieces onto your fabric, then sew them together to form the lower tier.
Cutting Example
If measurement A is 40 inches, cut the upper section 40 inches wide by B tall.
For the lower tier: 40 × 1.5 = 60 inches total width. Divide that by two and cut two rectangles, each 30 inches wide by C tall.
For knit fabric: Make sure the stretch runs across the width of every piece, around your body rather than up and down.
4 Sew the skirt sections: Fold the upper rectangle in half, right sides together, matching the short edges. Sew those edges together with a ¼-inch seam allowance to form a tube.
Place the two lower-tier rectangles right sides together. Sew both pairs of short edges with a ¼-inch seam allowance to form a second, wider tube. Leave the top and bottom edges open.
If your fabric frays, finish the seam allowances with a zigzag stitch or serger.

5 Gather the lower tier: Set your sewing machine to its longest stitch length. Sew a basting stitch around the top of the lower tier, ¼ inch from the edge. Leave thread tails so you can pull the gathers, and don’t backstitch.
You can add a second row of basting about ⅛ inch from the first. I’ve tried both ways, and the second row does help keep the gathers even, though I tend to skip it to save time.
Gently pull the bobbin thread, sliding the fabric along the thread and spreading the gathers evenly. Continue until the gathered opening matches the bottom opening of the upper section.

6 Join the tiers: Place the gathered lower tier and upper section right sides together, matching the gathered edge to the bottom edge of the upper section. Pin, adjusting the gathers so they’re distributed evenly all the way around.
Sew with a ¼-inch seam allowance. Keep the gathers flat as they pass under the presser foot so you don’t accidentally sew in a folded tuck.
Finish the seam allowances if your fabric frays. Remove any basting stitches that show on the outside.

7 Add the elastic and hem: Cut your elastic to your waist measurement minus 1½ inches. Check it around your waist before joining, since different elastics stretch differently, and adjust if needed.
Butt the elastic ends together without overlapping them. Join with a wide, short zigzag stitch to make a loop.

Finish the top edge of the skirt with a zigzag stitch or serger.

Divide the elastic into eight equal sections and mark them. Divide the top edge of the skirt into eight equal sections too.


On the wrong side of the skirt, match and pin the elastic to the fabric at those marks. Position the top of the elastic ¼ inch below the top edge of the fabric.

Attach the elastic with a wide zigzag stitch at your machine’s default stitch length. Lower the needle into the elastic and sew one stitch to anchor it. Then stretch the elastic between each pair of marks until it matches the fabric. Stretch the elastic, but don’t stretch the skirt fabric.

Fold the top edge inward so the elastic is enclosed, and pin in place. Stitch through the skirt fabric just below the lower edge of the enclosed elastic, without catching the elastic itself. Stretch the waistband enough to keep the fabric smooth as you sew.


Try on the skirt and check the length. Finish the bottom edge as needed, turn it up ½ inch, and stitch the hem using a stitch suitable for your fabric.

You are done!

💡Pro Tip:
For a professional-looking knit hem, try a knit twin needle. It creates two neat rows of stitching on the outside and a zigzag underneath that allows a little stretch. Test on a fabric scrap first to check the tension and make sure the hem stretches without breaking the thread.
Sewing Tips
- Test on scraps first. Check your needle, seam stitch, and hem stitch on an offcut, especially when sewing with knits.
- Keep the fabric relaxed. Stretching jersey as you feed it through the machine can leave you with wavy seams.
- Check the elastic fit before attaching it. It should feel comfortable at your chosen waistline and stretch enough to pull on over your hips.
- Try it on before hemming. It’s easier to shorten the skirt at this point than after you’ve sewn the hem.
Skirt Variations
- Change the length: Keep the same construction and adjust measurement C for a shorter skirt or a longer hemline. Check your fabric requirements before cutting.
- Use a contrasting lower tier: Choose coordinating fabrics with similar weight and drape for a different look.
- Change the print: A floral, stripe, or solid color can take this same skirt from summer into fall. For directional prints, check that all three rectangles face the same way before cutting.
Caring for Your Skirt
Follow the care instructions for your fabric and elastic. Use the same washing and drying method you used to prewash the fabric, provided it’s suitable for the elastic too.
Do I need a serger to make this skirt?
No. You can make this skirt with a regular sewing machine. Use a zigzag stitch to finish fraying edges, and use a stitch suitable for knits if you’re sewing with jersey.
Can I use woven fabric instead of jersey?
Yes, but the skirt will drape differently. Choose a woven fabric with enough softness for the gathered tier, and check that the upper section and elastic waistband can pull over your hips. A firmer fabric will give the lower tier a fuller shape.
More Posts You Might Like
- 15 Skirt Patterns to Sew
- Simple Skirt Tutorial with Options for 3 Different Looks
- Knit Ruffle Skirt Tutorial
- Maxi Dress to Maxi Skirt in 5 Minutes Flat
Made This Skirt?
Please leave a star ⭐️⭐️⭐️⭐️⭐️ rating and/or a review in the comments below. If you share a photo on Instagram, be sure to tag me and use #scatteredmompatterns! You can also share your skirt in my private Facebook sewing group.
Don't miss any more posts!

Stay connected by following along on Pinterest, Facebook, Instagram, and TikTok for more fun content, easy recipes, free sewing patterns, and creative inspiration.

I’m fairly new at sewing, I have made a couple skirts but they all seem to end up like Marilyn Monroe over the air vent with even the smallest gust of wind. Do you have any suggestions and how I can fix the skirts that I made and make ones and Future that won’t expose me for all to see.
I think the only thing to fix that would be to use a heavier weight fabric. Maybe others will weigh in.