Flat Front Skirt Tutorial (size 2 to 16)
Disclosure: This post may contain affiliate links. As an Amazon Associate, I earn from qualifying purchases.

Looking for a Flat Front Skirt Tutorial? This Free Flat Front Skirt Pattern is the perfect skirt for girls, and may be just what you need.
*Update: This skirt tutorial now goes up to size 16! I will be updating the title photo soon. 🙂


New pattern alert!! Remember my Flat Front Skirt from last week? I have the pattern and tutorial ready to share with you today!
I love how the skirt turned out; the fit is perfect!

Why You Need to Sew this Flat Front Skirt Pattern
- The skirt has a flat front, so it looks good with a tucked-in shirt.
- The elastic in the back makes for easy on/off (and easy construction.) I definitely prefer the ease of elastic-waist bottoms, and the look of the flat front really makes it look more structured.
- You dress the skirt up or down, depending on the fabric used. (Be sure to check out my Boho Maxi Skirt version- it’s adorable!)
This flat front skirt pattern does not have a printable PDF pattern. The skirt is made of rectangles, and I have provided a table with the cutting dimensions. (Find the table under step one.)

Recommended Fabrics for this Skirt
It’s a bit difficult to see in these photos, but the fabric is corduroy. ( All fabrics I used came from Joann’s, and the ribbon trim from Hobby Lobby.)
Just about any non-stretch fabric will work:
- Woven cotton blends
- corduroy
- linen
- gauze fabric

Ready to make one of these skirts for your little one?
Read on!
How to Sew a Flat Front Skirt
by Scattered Thoughts of a Crafty Mom, Size 2 to 16
Fabric Requirements for the Flat Front Skirt:
- Size 2, 3: 1 yard
- Size 4, 5, 6: 1 1/4 yard
- Size 7, 8, 10: 1 1/2 yard
- Size 12, 14, 16: 1 5/8 yard
(If you do the contrasting band, that takes about 13 inches inches of fabric, so deduct that from the amounts above.)
Supplies needed to Make the Skirt:
- Fabric
- 1/2 inch elastic (If you prefer wider elastic, use it. Just add a little extra height to the back waistband to compensate.)
- Safety pin
- Trim (optional)
- Basic sewing supplies
Important Pattern info:
- Seam allowances are 1/4 inch
Products used (or recommended) in this post:
- My favorite fabric shop for knits: Fabric.com, Funkalicious Fabrics and Girl Charlee.
- My favorite online retailers for quilting cotton and other apparel fabric: Fabric.com and Etsy
- My Sewing Machine: SINGER 9960 Quantum Stylist, my coverstitch: Janome Cover Pro 1000cpx
- My Serger: Brother 1034D 3 or 4 Thread Serger or you can just use Pinking Shears
- All purpose/universal 90/14 needle
- Rotary Cutter
- I love my large ruler and large cutting mat, but you may prefer to start off with a smaller Cutting set
- Dritz Dual Purpose Marking Pen and Fray Check
- Wonder clips (I didn’t use these in the post, but they are just awesome!
- Cordless iron
Step 1: Cut your fabric pieces.
Cut out your fabric pieces and elastic based on this measurement and cutting chart (click to see it larger.)
This is the chart for sizes 12 to 16. (I will combine the two charts into one when I have more time.)

You will have 1 front waistband, 1 back waistband, 2 main skirt pieces and 2 skirt border pieces.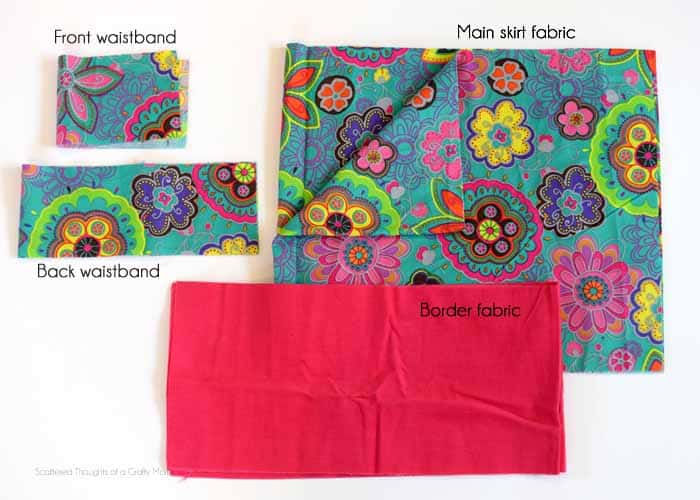
Step 2: Put together the waistband.
Fold the front waistband in half, and press.
Fold the top of the back waistband over 1/4 inch and press. Fold over another 7/8, and press again. Sew along the bottom of the folded casing, about 1/8 from the edge.
Attach elastic to a safety pin and pull through the casing until the end of the elastic is just inside the end of the casing. Pin in place.
Sew back and forth 1/2 inch from the edge a couple of times to secure elastic in place.
Line up the raw edge of the front waistband piece with the raw edge of the back waistband piece, right sides together (the edge where the elastic is attached.) Sew together and finish this seam with pinking sheers, zig zag on a sewing machine or serger.
Stretch out the waistband, the safety pin should still be attached to the elastic and will be in the middle of the casing somewhere. (Leave it in the casing, we’ll finish pulling it through later.)
Step 3. Assembling the main part of the skirt.
Line up the 2 skirt pieces and 2 border pieces, right sides together and sew. Finish this seam with your favorite seam finishing method.
Fold the border piece in half (folded height = 3.25) and press.
Line up the bottom of the main skirt piece with the raw edges of the border piece (as shown) and sew. Finish this seam with your favorite method and press the finished seam up.
Change the stitch length on your machine to the highest setting and sew a basting/gathering stitch along the top edge of the main skirt piece, 1/4 inch from edge.
Pull on the bobbin thread until the skirt is gathered to the same width as the waistband.
Tip: Since the back waistband of the skirt has elastic, the back of the skirt will have more gathers and be more full. To help even out the fabric distribution, you can line up the side seam of the skirt and waist band, then distribute the gathers evenly from this point:
(Switch your stitch length back!) Right sides together, line up the gathered top of the skirt with the bottom of the waistband and pin together.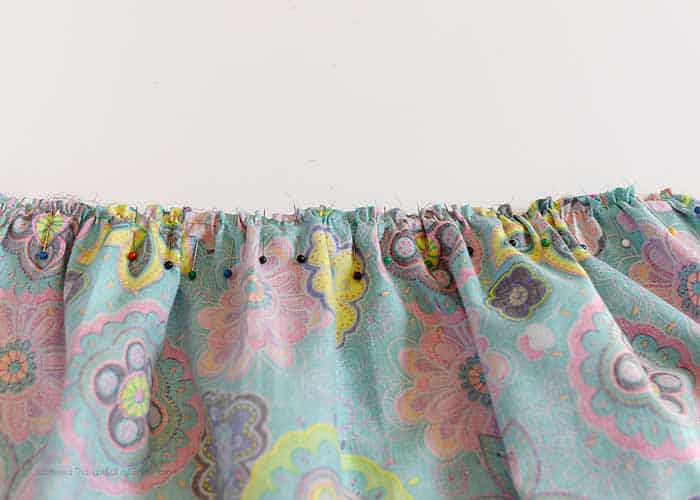
Sew right below the gathering stitch. Remove all pins finish this seam and press.
Finish pulling the elastic through the casing and pin in place.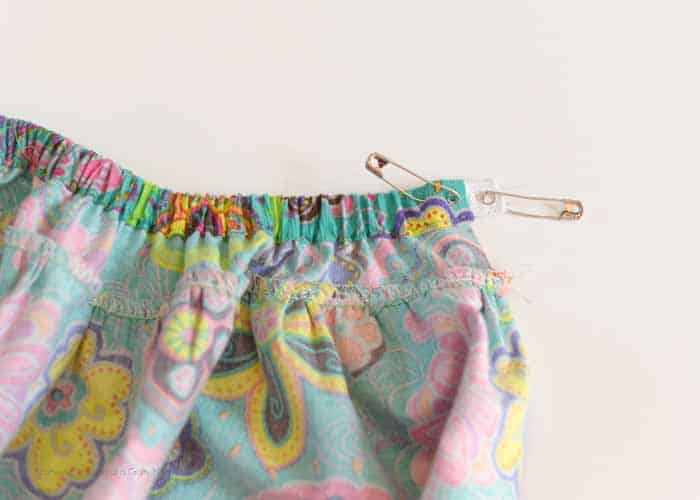
If the child is handy, have her try on the skirt and make any elastic adjustments.
Sew back and forth 1/2 inch from the edge a couple of times to secure elastic in place.
Line up the edges of the skirt and sew together. Finish this seam and press.
Add trim, if desired. I added ribbon by sewing along both sides. When I got to the end of the ribbon, I folded the edge under and stitched it down.)
That’s it, you are done. Doesn’t it look great? Now, have your little one try it on and come back and share the pictures on my facebook page. Nothing makes me happier than to see what you’ve made!
Like this post? Don’t forget to pin it!
If you end up making one of these skirts, dont forget to come back and share a picture of your finished skirt on my facebook wall or tag me on Instagram (@scatteredmom) and use #scatteredmompatterns
Don't miss any more posts!


Love your tutorial. Such an easy pattern and instructions are the easiest to follow. Thank you
I don’t see anywhere to click zoo attach a photo.
Thank you! Most people share their photos on instagram or facebook via my page or by messenger.
bonjour j aimerais faire cette petite jupe mais je n arrive pas à traduire les mesures en français pourriez vous m aider merci d avance à bientot
Je suis désolé, je ne sais pas comment faire ça!
Okay I’ll play along where is the pattern?
It’s not a printable pattern, but a set of cutting numbers/instrutions. Is that what you are looking for? If so, at the bottom of the post/page 1, it says: “Ready to make one of these skirts for your little one? Head over to PAGE 2 for the cutting and sewing instructions.” So, follow the link to page 2 for the instructions.
Good luck,
Jamie
Used this last night to make the cutest skirt for my girls, it was my first time using a basting stitch and gathering fabric but it turned out so darn cute! love it. Thank you for sharing.
I made two of these skirts yesterday for my two daughters, sizes 6 and 10. I made them for my older daughter’s upcoming birthday party, which has a “Wild at Heart Zoo” theme. So the skirts are kind of wild too (purple leopard print and tie-dye pattern border)! They turned out super cute and the girls love them! And I must admit I feel rather pleased with my efforts! I will post some photos once I have taken some either before or at the party.
The only thing I did differently was I sewed on the trim before I pulled the elastic and sewed the sides together. That way, the ends of the trim were tucked neatly into that side seam and this worked very well. Since I was using jumbo rickrack, I was concerned about it being bulky and untidy when I tried to turn over the end if I applied the trim after the skirt was finished.
The pattern was just what I was looking for! Thanks so much for the tutorial!
Glad the pattern worked for you!
Love the skirt and the tutorial. I am looking to make a solid red skirt for my DD for a school performance. Do you think it will look ok if I skip the bottom border and just hem the skirt up? I too hope to find a light-weight corduroy. Will be my first time using corduroy, what kind of needle do you use? Thank you!
I’m sure it will be great as you describe. I used a universal sewing needle. Probably a 90/14.
dit is een super leuk rokje bedankt voor het patroon
een hele leuke rok bedankt voor het patroon heb hem opgeslagen !
If you do 2 different fabrics (like in the tutorial) how much fabric do you need of each for a size 2? Is it a yard of the main one and 1/4 yard of the border? Or something like that?
The amount will vary based on the width of the fabric. Check out this little chart and add up the heights needed to determine the yardage needed. http://4.bp.blogspot.com/-v_qIOY__Obk/VDdTPvUQq0I/AAAAAAAAb8Y/MOvEf99vWT8/s1600/Flat-front-skirt-measuremen.JPG
You need about half a yard for the border fabric no matter what size you are sewing.
Good luck,
Jamie
Lindo, adorei.
Adorei, lindo!!!!!!!!!!!!!!!!!!!
Just finished this in a Barbie print for my daughter's birthday party. Thanks Jamie!
I instagrammed pics #scatteredmompatterns
Gorgeous skirt! Thanks for making this tutorial.
I linked to it from my blog.
Thank you!
Hi, I love the skirt but can't find the link to the pattern. Can you advise please? Jan
Hi, there is no link, just cut the dimensions for your size from the chart. (Listed under step 1: cut your pieces.)
~Jamie
Beautiful skirt! Just what I was looking for since all-elastic waists are too bulky for granddaughter. Can you possibly advise on measurement requirements for size 12 skirt? Thank you. LOVE IT!! Marms
Thank you! I can definitely do that once I get back into my office, maybe tomorrow. I would need to consult my charts. I do think needs to be done for size 12 is to use half inch instead of quarter inch elastic.
Jamie
Thanks, Jamie. Have you had a chance to figure out the size 12 requirements?
I love this skirt!!! Were you able to figure out the requirements for a size 12 skirt? My daughters love to wear skirts, and I had something like this in mind for them. Also, do you have a suggestion for something like this for a size 6/8 womens? My oldest is almost 13, so she is in smaller womens sizes. Thanks.
Love this!! Were you able to find your adjustments for a size 12? Also, do you have suggestions for a size 6 petite women size? My oldest is in womens sizes, and they both love skirts.
I can't wait to try this, Jamie!
This is so adorable! Love the colors and pattern. Thanks so much for sharing at Inspire Me Wednesday. Featuring you in next week's issue.
Lovely skirt, I love the cloth you used and the model is adorable 🙂 thanks for sharing the pattern and tute!
Pretty, pretty!! I've got a Craft Gossip post scheduled for this afternoon that links to your tutorial:
http://sewing.craftgossip.com/tutorial-little-girls-flat-front-gathered-skirt/2014/10/12/
–Anne
Your tutorial is so awesome. Very clear and easy to follow I am going to go to Joann's today and buy some fabric to make a few of these for my daughter. Thank you!
Hi Jamie, Is the fabric you used for the skirt woven or knit?
I’ve only made this skirt with wovens. The fabric in these photos is a lightweight corduroy.
If you are looking for a skirt pattern to use with knits, these are good:
https://www.scatteredthoughtsofacraftymom.com/roller-skate-circle-skirt-pattern/
https://www.scatteredthoughtsofacraftymom.com/ruffle-skirt-instructions/
https://www.scatteredthoughtsofacraftymom.com/how-to-sew-a-circle-skirt/