Girls Cropped Ruffled Cardigan (pattern and tutorial)
Disclosure: This post may contain affiliate links. As an Amazon Associate, I earn from qualifying purchases.
This Girls Cropped Ruffle Cardi ( Bolero Jacket ) is the perfect dress topper for spring and summer. Use the bolero tutorial and free pattern to make your own Cropped Cardigan!

💌 Save this article
Cropped Ruffle Cardigan Tutorial:
Spring is definitely here, which for us means cool mornings and very warm afternoons. For school, my daughter typically wears shorts and skirts with short sleeve tops, topped with a light sweater or cardigan for the morning. She’s in need of a few extra cardigans since we’re down a few from the first of the school year. (I still haven’t figured out where all the sweaters and sweatshirts go, they seem to just disappear. Kinda’ like socks, lol.)
I still had a good amount of the pink interlock fabric I used on the Romantic Cardigan I made last year, and it never hurts to have to many pink cardis….


This little Cropped Ruffle Cardi turned out so cute! I used my Twirly T-Shirt Dress pattern to make it. She is wearing a size 6 right now and I thought I would need to up-size so the cardigan would fit over her clothes, but the 7 was definitely too big. The original pattern was a loose fit, so if you use my twirly t-shirt dress pattern to make this cropped cardi, don’t size up.

I planned on pairing the cardi with capris for these photos, but this pink tulle pettiskirt came in the mail and once she put it on there was no taking it off… It’s a wee bit on the short side, so if she wears it out, it will need leggings under it.

Don’t you just love the ruffles?
Adorable!

Are you ready to make a cropped cardi? It’s a very quick project.
How to make a girls Cropped Cardi
Materials needed:
- up to 3/4 yard of a 56 to 60 inch wide fabric I recommend a mid to heavy weight cotton or cotton blend with good stretch and recovery (interlock or french terry, maybe a thinner sweatshirt fleece)
- Twirly t-dress pattern link (sz 4 to 8) (although any t-shirt pattern will work. My basic t-pattern is found here. Sz 3 to 14.)
- ball point needle
- flexible measuring tape
- basic sewing supplies
Tips for sewing with knits:
- Use a ball point needle (I like to use these color coded ones so I can tell the difference in the ball point needles and regular needles.)
- Use a walking foot if you have one.
- Lengthen your stitch length by one or two settings.
- When sewing in the direction of the fabric stretch, use a zig zag or stretch stitch. (a double stretch needle works great on hems.)
Instructions:
Step 1: Print and assemble pattern
Step 2: Cut out pattern pieces:
Cut out 1 back piece on the fold.
Fold the fabric in half and cut 2 front pieces NOT on the fold. When you open the 2 fabrics, you should have 2 separate pieces. (a right side and a left side.)

Trim 1/2 inch from the center of the right and left front pieces:

Using something round, (a coffee cup or the neck cut out from the pattern) cut the top and bottom of the 2 front pieces into a curved shape. (as shown below.)


Cut out two sleeves on the fold. If you want the sleeves to be slightly less puffy and more evenly distributed, move the gathering dot over an inch and a quarter as shown below.

Step 3: Assembling the cardigan.
Rather than making you click back to the t-shirt dress instructions, I’m just pasting the next few steps from that tutorial, so pardon the change in fabric…
Line up the front and back bodice pieces, right sides together. Sew along the shoulder seams, 1/4 inch from edge.

Mark the center top of the sleeve. Sew a basting stitch from pattern mark to pattern mark, 1/4 inch from edge. Don’t back-stitch.

Loosely gather the top of the sleeve. Leave the threads loose so you can adjust gathers when pinning.

Spread the bodice out flat, right side up. Then, right sides together, line up the center of the sleeve with the shoulder seam and pin the top of the sleeve to the armhole (armscye- I feel funny using the term armscye, I always use “arm hole” when talking to myself…)
You may need to loosen or tighten your gathers to make the sleeve the same length as the armscye.
Sew the sleeve to the bodice.

Looks like this when you flip it over. Repeat for the other sleeve.

Line up the side seams of the bodice and sleeve and sew along the edge. (for both sides.) You can remove the gathering stitch from the shoulder seam if it is showing.

To hem the sleeve edge, (I recommend using a double needle and walking foot) fold the edge over 1/2 inch, press using spray starch and sew.

You could also add sleeve binding like I did with my anywhere dress, leave the edge raw or add a ruffle.
Step 4: Adding the ruffle:
With a flexible tape measure, measure around the raw edges of the cardigan. (highlighted in pink.)

Multiply this measurement by 1.6 or 1.85, then add 1 inch for seam allowance. (I used 1.6, so if you want a slightly “rufflier” edge, use 1.85) This number is the needed width for the ruffle strip.
Cut a ruffle strip, 1 3/8 inch by your calculated width. (You will probably need to sew 2 pieces together to get the width needed.)
Change your sewing machine setting to the longest stitch length and sew a gathering stitch along the edge of the ruffle strip, 1/4 inch from the edge.
Gather the ruffle strip until it is the same width as your original measurement from above, plus one inch.
Starting at the back and right sides together, start pinning the ruffle strip to the edge of the cardigan. (Don’t forget, I have that seam down the middle because I had unnecessarily cut out the next size up.)
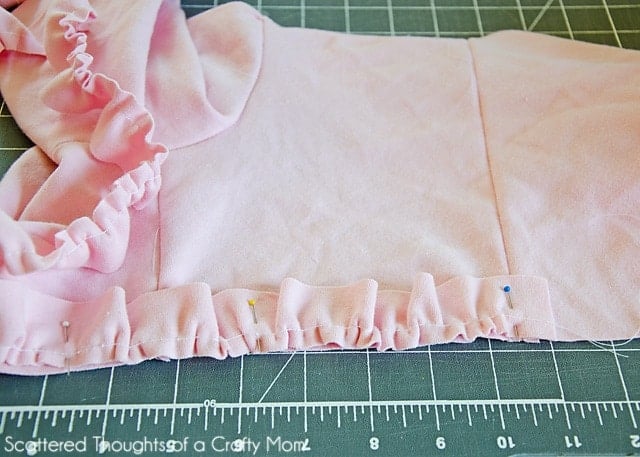
Keep pinning until you are back to where you started.

At this point, you could pin the two edges together and sew them, or just fold them over, pin them down and sew it in place. Just make sure you are folding the edges in the correct direction and the extra fabric does not show when you flip the ruffle into place:


Sew along the edge of the ruffle and cardigan, 1/4 inch from the edge. (Use your walking foot if you have one.) When sewing with knits, you should remove the pins before they get to the presser foot. This will help keep the fabric from stretching out too much.

Flip the ruffle over and press. Make sure the seam allowances pointed in toward the seam.
Top stitch along the edge of the ruffle seam. (The dashed line in the picture below.) Before top stitching, you might want to do a test run with some scrap fabric. (Make a small ruffle strip and attach it to a fabric scrap.) You will want to play with and perfect the needed stitch length. My fabric was so thick with the seam allowance and layers that I loosened the tension just a bit and increased my stitch length almost to the gathering stitch length.

After top stitching, you’re done!
Cute right? We could use one in every color!
Like this project? Dont forget to pin it!
If you make one be sure to share your project on my face book page or tag me on Instagram!
Don't miss any more posts!


How could I do this without a ruffled band?
Without a ruffled band, I would probably use this dritz wash away wonder tape: https://amzn.to/2HPLnLd to go around the entire edge, fold it over and hem. good luck!
Just perfect for just about anything! Thank You for the tutorial. I am going to give it a try.
Thank you! I sewed one today. It's perfect. http://theinspiredwren.blogspot.com/2014/04/designing-for-easter.html
Oh.My.Goodness! The entire outfit is adorable! and I love how the cardi coordinates!
~Jamie
I love the cardigan sooo much Jamie!!! Great job!!!
Thanks Christine!
Lovely! Cardis are just so multi-purpose…and now I'm thinking how I could fit sewing this into the schedule before Easter. : ) Thanks for sharing the pattern!
I hope you do!
Gorgeous!! And just in time for Easter dresses. I've got a Craft Gossip post scheduled for later this morning that links to your tutorial:
http://sewing.craftgossip.com/tutorial-girls-cropped-ruffled-cardigan/2014/04/02/
–Anne
Thanks, Anne!
This is adorable! Thanks for sharing the pattern. My dd is a girly-girl, and she would love to have a few of these.
Very nice. Thanks for the instructions. I need to make one of these.
So cute! I may have to try making this for my little sister – she would love wearing it!
Love this! Thank you for your generosity!
Thanks for stopping by!