Free T-shirt Pattern for Girls (sz 3 to 14)
Disclosure: This post may contain affiliate links. As an Amazon Associate, I earn from qualifying purchases.
Looking for a free, easy girl’s top, you can print at home and sew for your lil missy? I’m excited to share my latest pattern with you today, a free T-Shirt Pattern for girls in sizes 3 to 14!

Free Girl’s T-Shirt Pattern, size 3 to 14
I’ve been working on this free t-shirt pattern for several months. I tested so many variations and fits, including shirt width, length, armhole depth, and gathered sleeves/not gathered sleeves, but I’ve finally settled on what I think is just right for a girl.

Girl’s T-Shirt Pattern Information:
This Basic T-shirt Pattern Includes:
- a long-sleeve version
- 3/4 length sleeve cut lines
- short sleeve cut lines
The free t-shirt Pattern is not too slim, but also not too wide. It has a slightly longer length that will hopefully keep their little bellies covered when they raise their hands.
This girl’s t-shirt pattern is a perfect blank slate; it’s just waiting for your creative customization.
**update**
- I released a flutter sleeve version of this top as a separate pattern here: Flutter Sleeve T-Shirt Pattern.
- Want a dress version of this t-shirt pattern? Check out my Perfect T-Shirt Dress Pattern..
(Not a follower? Be sure to sign up for my weekly newsletter here– I send it out every few weeks, and it includes my latest posts, free patterns, yummy recipes, and sometimes links to great sales and giveaways.)

Off the subject, but we’ve been baby-chicken-sitting for some friends. These little chicks are just too cute! I have a hard time keeping their names straight. The two in these photos are Teeny and Fluffy, and we have two more named Buck and Brownie. We’ll be so sad to send them back to their forever home.


Where Do I Get the Pattern?
- Navigate to the free t-shirt pattern page in my store.
- Enter your name, email and check out. (It’s free.)
- If you enter your email address correctly, you will be emailed a link to the file for your records. You will also be redirected to a thank you page that links to the PDF pattern for you to save.
- Save the pattern to your PC, and open the PDF document in Adobe Acrobat. (sometimes the pattern will auto-open; other times, you will need to search your files for the pattern – it depends on your device settings.) Don’t print from Google’s online version of Adobe or any other knock-off Adobe reader app. (It will sometimes cause the pattern to print too small or cause other issues.)
To Make a T-Shirt with this Free T-Shirt Pattern, You Need:
- Pattern
- Up to 3/4 yard stretch knit fabric
- Ribbed binding (usually has 50 to 70% stretch) or other stretchy knit for the neckline (you don’t want to use anything with less than 30% stretch-see notes under pattern tips and tricks)
- Ballpoint/jersey needle
- spray starch/iron
- basic sewing supplies
T-Shirt Pattern Fit Information
| Size | Height | Weight | Finished length | Finished Chest |
|---|---|---|---|---|
| 3 | 38.5 | 32 | 16 | 23.125 |
| 4 | 41.5 | 36 | 16.85 | 23.75 |
| 5 | 44.5 | 42 | 17.75 | 24.375 |
| 6 | 46.5 | 48 | 18.25 | 25.75 |
| 7 | 51 | 60 | 19 | 27.25 |
| 8 | 53 | 66 | 19.75 | 28.5 |
| 10 | 55 | 74 | 20.75 | 29.5 |
| 12 | 57.5 | 84 | 21.125 | 30.75 |
| 14 | 60 | 96 | 23.75 | 32.375 |
Tips for Sewing with Knits:
- Use a ballpoint/stretch needle
- Sew seams with either a serger, stretch stitch, narrow zig zag or a straight stitch with a longer stitch length and a slightly loosened tension. (Make a couple of practice stitches on your fabric to see what works best.) I also like to use this “lightning bolt” stretch stitch on seams that need strength but a little give. (For my project I used a combination of straight stitch and serger for seams and zig zag on the hems.)
- Use spray starch when pressing hems. Sew hems with a zig zag, twin ball point needle, narrow zig zag with a long stitch length or a straight stitch with a long stitch length and a slightly loosened tension or leave raw. (also helps to use a walking foot.)
- If you find your fabric keeps getting pulled inside the needle plate, place a small piece of tissue underneath the fabric so the feed dogs have something to grip.
Products used and recommended:
- My Sewing Machine: SINGER 9960 Quantum Stylist, my coverstitch: Janome Cover Pro 1000cpx
- My Serger: Brother 1034D 3 or 4 Thread Serger or you can just use Pinking Shears
- Rotary Cutter
- I love my large ruler and large cutting mat, but you may prefer to start of with a smaller Cutting set
- Dritz Dual Purpose Marking Pen and Fray Check
- Ball Point needles
- Singer walking foot or universal walking foot
Ready to Sew this T-shirt?
If you haven’t already done so, grab the pattern here.
Be sure to read the pattern info, binding tips and tips for sewing with knits for best results!
T-shirt Binding tips:
- The pattern for the neck binding is designed for a ribbed knit with 50 to 75% stretch and good recovery (Fabric Fairy has a lot of good quality ribbed knit choices.)
- If using a binding fabric with less stretch, you have two choices:
- 1st choice: The “in the round method” Measure the neckline and cut a fabric strip 15% less than the measurement (multiply the neck measurement by .85) and follow the instructions in step 4. (Tip: I always do the finger stretch test before attempting to sew the binding on.)
- 2nd choice: The “flat” method– Sew only one shoulder closed, fold the binding in half, and attach the binding from one end of the neckline to the other. Trim excess binding and sew the other shoulder closed. (The only downside to this method is that the seam will be slightly bulkier on the side.) (Similar to what is done in this tutorial.)
Pattern info:
- The seam allowance is included and is 3/8 inch with a 1/2 inch bottom and sleeve hem.
Sewing instructions for the Girl’s T-Shirt Pattern
Step 1: Print & Assemble pattern; cut out pattern pieces.
- Save the free t-shirt pattern to your desktop, open in the free adobe reader program.
- Set to print actual size and print pattern.
- Cut out each block around the outer gray edge and align the gray boxes, edge to edge (don’t overlap) matching up colored circles.
- Tape pattern together and cut out size needed. (You can print the bodice twice- one for the front and one for the back or print once and use a tracing wheel and paper.)
Step 2: Cut pattern pieces from fabric.
1. Fold the fabric so the stretch is running side to side. Line pattern up along fold of fabric.

2. Cut out a front and back bodice, 2 sleeves, and neck binding.
3. If you are using ribbed binding or fabric with 50% stretch cut out neck binding from the pattern. (If using a fabric with less than 50% stretch, you’ll want to measure the neckline and cut a strip that is about 15% shorter than the neckline- or just use these measurements: 10= 14.625, 8= 13.75, 7= 13.375, 6=13, 5=12.75, 4=12.375, 3=11.875)
Step 3: Assemble the T-shirt.
1. Right sides together, line up front and back bodice of the t-shirt pattern. Sew together at shoulders, using a 3/8 inch seam allowance. (Don’t forget- if you decide to use the “flat method” (see binding tips above) only sew one shoulder closed.)

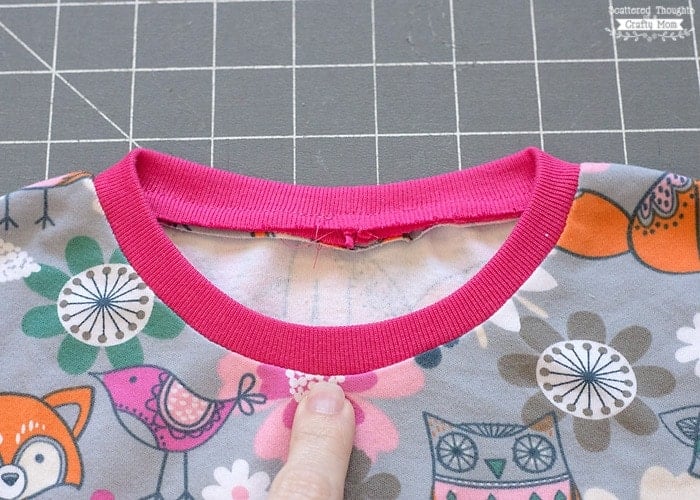
Step 4: Attaching Neck Binding to the Free T-shirt Pattern.
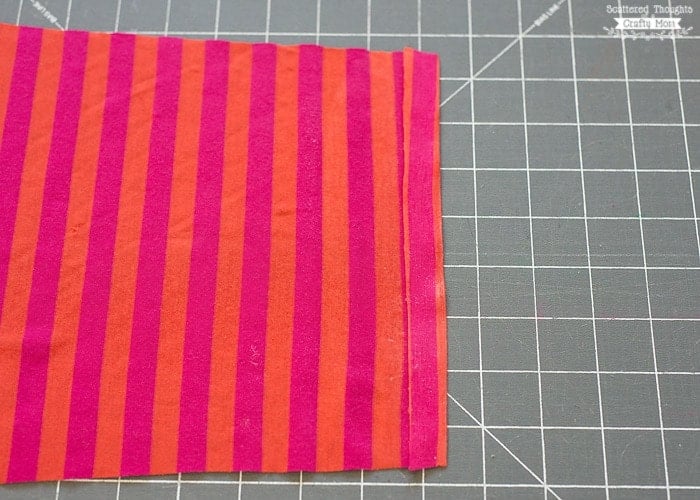
1. Fold binding in half (as shown) press.

2. Unfold binding, sew with a 3/8 inch seam allowance and trim excess seam. (This is the “In the round” method”.)

3. Refold binding and divide into 4 equal sections. Mark t-shirt neckline into 4 equal sections. (Please note: I adjusted the depth of the back neckline, so your side pins my be closer to the shoulder seams.)

4. Line up the quarter marks as shown:

5. Attach the binding to the neckline with a 3/8 inch seam allowance. Stretch the binding fabric as you sew. Take care to not let the neckline fabric stretch. (Go slow and know this my take practice.)

6. For a more finished look, you can topstitch along the edge of the neckline of your t-shirt.
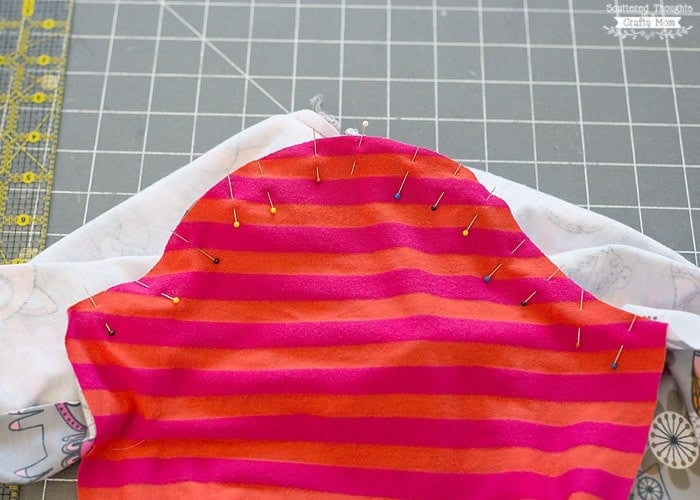
Step 5: Attaching Sleeves to the Shirt.
1. Fold the edge of the sleeve over 1/2 inch and sew with a zig zag or other stretch stitch. (Using spray starch will help stabilize the hem for easier sewing.)
2. Repeat for other sleeve.
3. Right sides together, line up the top of the sleeve with the shoulder seam. Sew using a 3/8 inch seam allowance.
4. Repeat with the other sleeve.
Step 6: Sew Side Seams and Hem of the T-shirt Pattern.
1. Sew along the sleeve and down the side of the shirt. Repeat on other side.

2. Hem bottom of the t-shirt, by folding up 1/2 inch and sew with a zig-zag or other stretch stitch.
That’s it you’re done- now go take some pictures!
Did you Make this Pattern?
Please leave a star ⭐️⭐️⭐️⭐️⭐️ rating and/or a review in the comments section below. If you share an image on Instagram, be sure to tag me and use #scatteredmompatterns! You can also share an image to my private Facebook sewing group!
Looking for More Free Patterns to Sew?


Don't miss any more posts!

Follow along on:
Feedly, Bloglovin', your favorite feed reader, or signing up via email and have new posts delivered to your email box each week!Free T-shirt Pattern for Girls

Learn How to sew a girl's t-shirt with this free t-shirt pattern. The pdf pattern is available in sizes 3 to 14.
Materials
- Pattern
- Up to 3/4 yard stretch knit fabric
- Ribbed binding (usually has 50 to 70% stretch) or other stretchy knit for the neckline (you don't want to use anything with less than 30% stretch-see notes under pattern tips and tricks)
- Ballpoint/jersey needle
- spray starch/iron
Tools
- Sewing Machine
- Basic sewing supplies
Instructions
Step 1: Print and Assemble pattern, cut out pattern pieces.
- Save the free t-shirt pattern to your desktop, open in adobe. Set to print actual size and print pattern. Cut out each block around the outer gray edge and align the gray boxes, edge to edge (don’t overlap) matching up colored circles. Tape pattern together and cut out size needed. (You can print the bodice twice- one for the front and one for the back or print once and use a tracing wheel and paper.)
Step 2: Cut pattern pieces from fabric.
- Fold fabric so the stretch is running side to side. Line pattern up along fold of fabric.
- Cut out a front and back bodice, 2 sleeves and neck binding.
- If you are using ribbed binding or fabric with 50% stretch cut out neck binding from pattern. (Otherwise, you'll want to measure the neckline and cut a strip that is about 15 % shorter than the neckline- or just use these measurements: 10= 14.625, 8= 13.75, 7= 13.375, 6=13, 5=12.75, 4=12.375, 3=11.875)
Step 3: Assemble the T-shirt.
- Right sides together, line up front and back bodice of the t-shirt pattern. Sew together at shoulders, using a 3/8 inch seam allowance. (Don't forget- if you decide to use the "flat method" (see binding tips above) only sew one shoulder closed.)
Step 4: Attaching Neck Binding to the Free T-shirt Pattern.
- Fold neck binding in half, press.
- ("In the round" method") Unfold binding, sew with a 3/8 inch seam allowance and trim excess seam.
- Refold binding and divide into 4 equal sections. Mark t-shirt neckline into 4 equal sections.
- Line up the quarter marks.
- Attach the binding to the neckline with a 3/8 inch seam allowance. Stretch the binding fabric as you sew. Take care to not let the neckline fabric stretch. (Go slow and know this my take practice.)
- For a more finished look, you can topstitch along the edge of the neckline of your t-shirt.
Step 5: Attaching Sleeves to the Shirt.
- Fold the edge of the sleeve over 1/2 inch and sew with a zig zag or other stretch stitch. (Using spray starch will help stabilize the hem for easier sewing.)
- Repeat for other sleeve.
- Right sides together, line up top of sleeve with shoulder seam. Sew using a 3/8 inch seam allowance.
- Repeat with other sleeve.
Step 6: Sew Side Seams and Hem of the T-shirt Pattern.
- Sew along sleeve and down side of shirt. Repeat on other side.
- Hem bottom of the t-shirt, by folding up 1/2 inch and sew with a zig-zag or other stretch stitch.
- That's it you're done- now go take some pictures!

This doesn’t even come close to fitting over my daughter’s head and I’m so frustrated I spent so much time making it.
the recommended fabric for this pattern is a knit fabric with 50 to 70% stretch. Any less than that, I could see you might have an issue.
Thank you so much! I used it today for my daughter’s Book Week costume! Worked perfectly – even upcycled a woman’s shirt to make it! Double win! 🙂
I LOVE,LOVE, LOVE the flutter sleeve. Thank you so much!!!!!
If you are going to do the arms a different pattern what are the length needs in that case?
Can’t wait to try the pattern.