Girl’s A-line Knit Play Shorts Pattern (size 2 to 12)
Disclosure: This post may contain affiliate links. As an Amazon Associate, I earn from qualifying purchases.
I’ve got a brand new free sewing pattern for you today! This girl’s A-line Knit Play Short Pattern is designed for knit fabrics and is perfect for summer. The free shorts pattern comes in girls’ sizes 2 to 12.

💌 Save this article
A-line Knit Play Shorts Pattern
Shorts are one of my favorite things to sew! They look like they might be difficult to sew, but shorts are actually incredibly simple! Just a few seams in this free short pattern, plus a hem and that is basically it.
These knit play shorts are actually even easier to sew than standard elastic waist shorts, due to the yoga waistband. No casing, no threading elastic, just a couple of straight stitches. You can whip out a couple of pairs in less than 30 minutes.
Girl’s Knit Play Shorts Pattern Details
- A-line knit shorts with a double-fold yoga waistband.
- Designed for knit fabrics.
- The knit shorts have a snug fit through the waist and hip and then slightly flare out to an a-line-shaped bottom hem. (The fit is based on my free legging pattern through the waist and hip, so if you have sewn that pattern, you will be familiar with the fit. The difference is instead of being form-fitting through the leg (like a bicycle short) the legs of this shorts pattern flare out into a bit of an a-line shape.)


Skill level
Advanced beginner/intermediate. This is a simple, very basic shorts pattern. No elastic, buttons, or zippers, but I do consider an advanced beginner/intermediate due to working with knits.
Recommended fabric
Almost any type of stretch knit fabric with 25 to 50% stretch will work for these shorts. (I do recommend a fabric with a bit of lycra.) You will want to use a cotton/lycra knit with about 75% stretch for the waistband.
How to determine the % stretch in knit fabrics
Knowing the stretch of the fabric is important when sewing with knits, especially in this shorts pattern as you need the correct amount of stretch for the waistband.
Have you ever made leggings with fabric that didn’t have enough stretch? If so, then you know that not enough stretch will affect the fit. (like not being able to get the waistband over your thighs, lol.)
And fabric with too much stretch in something like a yoga waistband could make the waistband too loose to stay up. (This can be fixed by reducing the width of the waistband.)
Determining the percent of stretch in a knit fabric is actually fairly easy.
You’ll need:
- 10-inch ruler
- 4-inch square of the fabric
How to measure the stretch of fabric:
Start with a 4-inch square of fabric. Fold the fabric in half and line the folded edge up on your ruler.
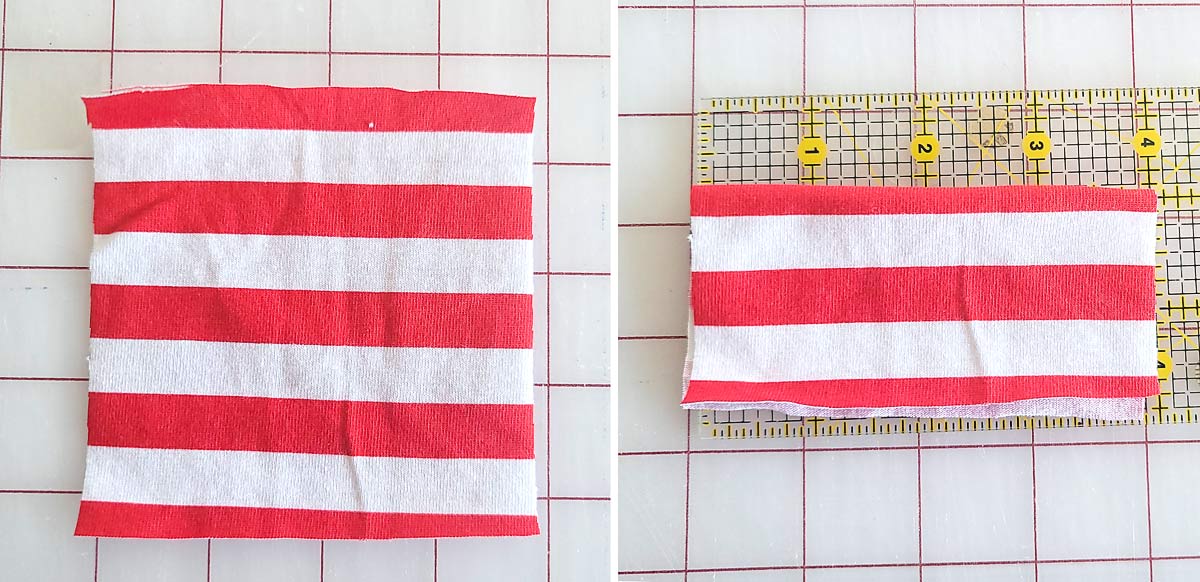
Hold the left side of the fabric against the ruler (as shown) and stretch it out.
- If it stretches to 6 inches, that is 50% stretch.
- If it stretches to 7 inches, that is 75% stretch.
- If it stretches to 8 inches, that is 100% stretch.

Tips For Sewing With Knits
- New to sewing with knits? Grab an old cotton tee and just try sewing a few stitches!
- When sewing with knits, always use a ballpoint needle. A ballpoint needle has a rounded tip and allows the needle to move in between the thread fibers instead of piercing the thread fibers. (Which will cause holes in the fabric.)
- When sewing seams that need to stretch, be sure to use either 1. a narrow zigzag stitch, (set at a medium stitch length or many newer machines have additional stretch stitches you can use. Refer to your manual to find out which ones your machine does.) 2. a serger or coverstitch machine.
- It helps to loosen the needle thread tension just a tiny bit. (Experiment on scraps til you find what works best on your fabric.)
- For seams that don’t need to stretch (like side seams) a regular straight stitch is fine. To keep the fabric from stretching when you sew, you can try a slightly longer stitch length and loosening the needle thread tension just a tiny bit. ALWAYS do a few practice stitches on the fabric you will be using and then make any adjustments needed.
- If you are working on a fabric that keeps curling, use fabric starch and your iron to flatten out the fabric. This technique is helpful on all knits as the starch makes it less stretchy and moves through the machine smoother.
- Remember to try a slightly longer stitch length and to loosen the needle thread tension just a tiny bit!
- If your fabric is getting sucked into the machine or is still stretching, you can place a piece of thin tissue paper between the fabric and bottom feed dogs. After you are done sewing, you can gently tear the tissue paper away.
- For hemming knits, you have a few choices: 1. Leave the edge raw. This looks fine on casual garments. 2. Add a bound edge. (You can see examples of how adding a bound hem works here and here.) 3. Use a walking foot and hem the edge with either a zig-zag or other stretch stitch or using a twin needle. (The walking foot helps feed the material through the machine with less stretching.) Or 4. another great option is Dritz Washaway Wonder Tape. (Dritz Wash Away Wonder Tape is a double-sided transparent tape that disappears after the first washing. You can easily stitch through it without gumming your needle. The wonder tape holds your seams and hems in place for easy sewing, plus it stabilizes the seam so the fabric will not stretch out as you sew. Then it completely disappears when washed.)
More Sewing Projects For Girls
- Pillowcase Dress
- Perfect T-shirt Dress
- Basic Leggings Pattern
- Peplum Top Pattern
- Flat Front Skirt Pattern
- Apron Top Sewing Pattern
Pin this project for later
Where do I get the Shorts pattern?
The link for the shorts pattern page in my shop is under materials needed. Click the link, add the pattern to your cart and check out. (takes about 15 seconds for the process.) A copy of the pattern will be emailed to you.
Knit Play shorts Fit Chart

Pattern notes
- A serger is recommended for this these shorts. If you don’t have a serger, make sure to use a stretch stitch.
- 1/2 inch seam and hem allowance included in the pattern.
- If you have a slender child, you may want to customize the fit of the waistband. Use this formula for a perfect fit: Measure your child’s waist. Subtract 3 from your measurement and divide the number by 2. This will be the width of the two waistband pieces. cut the height as follows:
- 2 & 3: 8 inches
- 4 & 5: 8.25 inches
- 6 & 7: 8.5 inches
- 8: 8.75 inches
- 10/12: 9 inches
Materials needed
- Fabric 3/4 yard for sizes 2 to 4, 1 yard for 5 to 12
- Pattern
- coordinating thread
- Ballpoint needle
- Scissors/rotary cutter/cutting mat
- Basic sewing supplies
Knit play Shorts Sewing Instructions
Step 1: Print And Assemble The Pattern.
Print the knit shorts pattern, cut out the size needed, and tape it together. (Make sure you are using the free adobe reader on a computer to print. Select actual size and auto/landscape portrait.)

I recommend doing a test print
To do a test print, print only page one and check that the one-inch square is printed at one inch. Once you have confirmed your printer settings you can print the entire pattern. You can also print only the size needed. Make sure the side menu panel is open, click the icon that looks like a stack of papers, then toggle the “eyeballs” on/off for the pattern size you want to print.

Step 2: Cut Fabric/Pattern Pieces For The Knit Shorts
Cut 2 of the shorts pattern pieces, one in reverse (or mirrored). To cut one of the pieces “in reverse”, I like to fold the right sides together, and then cut the two pieces at once. When cutting shorts, you will almost always need to cut one of the pieces in reverse so you will have a right leg and a left leg.

Cut 2 of the waistband pattern pieces. (Remember- the stretch needs to go side to side.)

Step 3: Hem the shorts.
Fold up the bottom 1/2 inch, press, and hem using your preferred hemming method. (Optionally you could fold the fabric up 1/4 inch press, fold up another 1/4 inch, press again, and then hem.)


Tip: even using a coverstitch machine, my hems came out a bit wonky. I applied a bit of steam and they shrunk up/smoothed out almost perfectly!
Step 4: Assemble The knit shorts
Line up the two shorts pattern pieces and sew along the curves. (As shown below, 1/2 inch seam allowance.)

Next, refold the shorts so the crotch seam lines up, and sew them together.

Flip the shorts right sides out, trim the treads and give all the seams a little press with the iron.
Step 5: Sew and Attach the Waistband
Line up the two waistband pieces right sides together and sew along the sides with a 1/2 inch seam allowance. (As shown below.)

Flip the waistband right side out and fold it in half, so it looks like this: (sorry for the fabric switch, somehow I lost the original photo.)


Line up the raw edges of the waistband with the raw edges of the shorts, matching up the seams. Pin in place and sew all three layers together, with a 1/2 inch seam allowance, slightly stretch in the waistband as you sew. (If needed.)

That’s it, you are done. Now go take some cute photos and enjoy your play shorts!

Share Your Finished Play Shorts In My Facebook Group!
Made this pattern/project?
Please leave a star ⭐️⭐️⭐️⭐️⭐️ rating and/or a review in the comments section below. If you share an image on Instagram, be sure to tag me and use #scatteredmompatterns! You can also share an image to my private Facebook sewing group!
Don't miss any more posts!

Follow along on:
Feedly, Bloglovin', your favorite feed reader, or signing up via email and have new posts delivered to your email box each week!Girl's Knit Shorts Sewing Instructions

Materials
- Fabric 3/4 yard for sizes 2 to 4, 1 yard for 5 to 12
- Pattern
- coordinating thread
- Ballpoint needle
- Scissors/rotary cutter/cutting mat
- Basic sewing supplies
Instructions
Step 1: Print And Assemble The Pattern.
- Print your pattern, cut out the size needed, and tape it together. (Make sure you are using the free adobe reader on a computer to print. Select actual size and auto/landscape portrait.)
I recommend doing a test print
- To do a test print, print only page one and check that the one-inch square is printed at one inch. Once you have confirmed your printer settings you can print the entire pattern. You can also print only the size needed. Make sure the side menu panel is open, click the icon that looks like a stack of papers, then toggle the “eyeballs” on/off for the pattern size you want to print.
Step 2: Cut Fabric/Pattern Pieces For The Knit Shorts
- Cut 2 of the shorts pattern pieces, one in reverse (or mirrored). To cut one of the pieces "in reverse", I like to fold the right sides together, and then cut the two pieces at once. When cutting shorts, you will almost always need to cut one of the pieces in reverse so you will have a right leg and a left leg.
- Cut 2 of the waistband pattern pieces. (Remember- the stretch needs to go side to side.)
Step 3: Hem the shorts.
- Fold up the bottom 1/2 inch, press, and hem using your preferred hemming method. (Optionally you could fold the fabric up 1/4 inch press, fold up another 1/4 inch, press again, and then hem.)
- Tip: even using a coverstitch machine, my hems came out a bit wonky. I applied a bit of steam and they shrunk up/smoothed out almost perfectly!
Step 4: Assemble The shorts
- Line up the two shorts pieces and sew along the curves. (As shown below, 1/2 inch seam allowance.)
- Next, refold the shorts so the crotch seam lines up, and sew them together.
- Flip the shorts right sides out, trim the treads and give all the seams a little press with the iron.
Step 5: Sew and Attach the Waistband - Line up the two waistband pieces right sides together and sew along the sides with a 1/2 inch seam allowance. (As shown below.)
- Flip the waistband right side out and fold it in half. (see image in the post)
- Line up the raw edges of the waistband with the raw edges of the shorts, matching up the seams. Pin in place and sew all three layers together, with a 1/2 inch seam allowance, slightly stretch in the waistband as you sew. (If needed.)
That's it, you are done. Now go take some cute photos and enjoy your play shorts!

)
The pattern for the yoga shorts seems to be missing part of the front for the larger size.
It is all there. If you printed the entire pattern, you should have 9 pages. There is also a photo of what the entire pattern looks like under step 1.
Hey Jamie,
Thank you for sharing this amazing free pattern! Such a simple and approachable project for the summer. Keep up the amazing work!
Can these be made with a shorter waistband that does not fold over? Do you think they would stay up when worn if I made the band 2/3 of the pattern waistband?
Yes, it would work. You could even make it as is and not folded over. Which we do sometimes.