Hand Painted Ombre Chevron Border Fabric Skirt
Disclosure: This post may contain affiliate links. As an Amazon Associate, I earn from qualifying purchases.
Today I am sharing how I made this sweet Ombre Chevron Border Fabric using Shape Tape. (This post was brought to you by FrogTape Brand Painter’s Tape, but all opinions, photos, and the tutorial are 100% mine.)
![]()
💌 Save this article
I found this little yellow cardigan when I was out shopping the other day and added it to my basket on a whim, the color was just too pretty to resist. I love yellow for spring. The color is so bright and pretty; I want to use it everywhere!
![]()
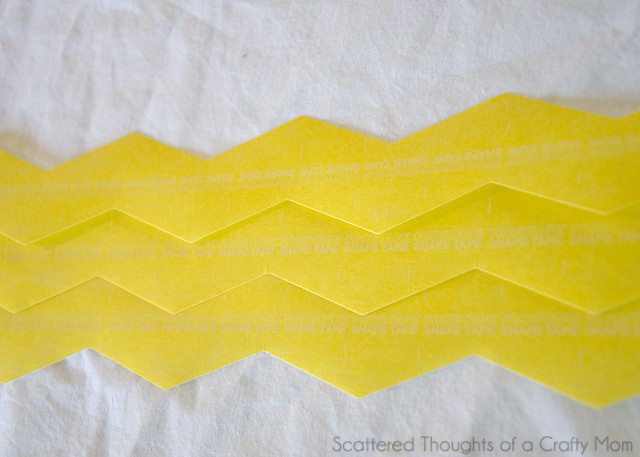
I used the chevron Shape Tape to make the chevron pattern, and I hand-mixed yellow and white fabric paint to get the three shades of yellow. My Cupcake Skirt pattern is the pattern I used to sew the skirt. (It’s a free pattern on my blog and comes in sizes 18 mo to 8 yrs. Here is the link if you would like to use it too, but almost any skirt pattern will work: Cupcake Skirt Tutorial and pattern.)
Have you seen the Shape Tape™ from FrogTape®? It’s a pre-cut painter’s tape in a repeating pattern and comes in scallops, chevron, and wave shapes. I used fabric paint and regular tape to create a chevron a couple of years ago; the pillow came out looking great, but creating chevrons by hand was undoubtedly more time-consuming than using pre-cut chevron painter’s tape.
Would you like to try creating an ombre chevron pattern on fabric for your next sewing project? (or just a regular ol’ chevron.) Here’s how I did it:
Materials needed:
- Fabric
- FrogTape® Shape Tape™
- Fabric paint (I used the Tulip brand soft mate)
- plastic or cardboard to protect your surface
- Ruler
- Disappearing fabric chalk or fabric maker
Instructions:
Step 1: Wash, dry, and iron fabric.
Step 2: Cover your work area with plastic or cardboard and lay out the fabric.
Step 3: Determine the placement of your chevrons. To do this, I tore off the length of shape tape needed and just played with the tape until I was happy with the placement.
Step 4: To keep your chevron straight across the fabric, use a ruler and mark the placement of the first tape.

Step 5: Remove the backing from the top of the shape tape and apply it to the fabric. Once you get the tape where you want it, remove backing from the bottom of the tape.

Step 6: Use a flat edge to press along the edge of the tape to lock it in place.

Step 7: Mix your 1st color and paint on fabric using a foam brush.

Step 8: Once the paint is dry from the 1st chevron color, apply the tape the same way as above and paint the second color.

Step 9. Repeat steps 5 through 8 until you have used all your colors.
Step 10. Remove the tape and follow the directions of the fabric paint on how to set/dry/wash your fabric

So cute and perfect for spring, don’t you think? Like this project? Don’t forget to pin it!
I’m currently redoing my craft room, so my next project with the Chevron Tape is for a trio of chevron canvases as artwork for my walls. What would you use the Shape Tape™ to create?
Don't miss any more posts!

Stay connected by following along on Pinterest, Facebook, Instagram, and TikTok for more fun content, easy recipes, free sewing patterns, and creative inspiration.

So perfect for spring! Great project!
Beautiful!
So pretty!!!
LOVE LOVE LOVE this!! How adorable!! I am totally with you on yellow. This looks totally do-able, even for me lol.
Adorable….thanks for sharing
How did I not know that there was such a thing as Shape Tape! What an awesome tool!
It really is neat stuff!
Very cute. I've never seen it done this way. Pinned it!
Thanks for sharing!
How pretty! The skirt looks beautiful, love the bright cheery yellow!
Beautiful!
I love it!!! The chevron border is so pretty!! I've got a Craft Gossip post scheduled for later today that links to your tutorial.
–Anne
Thanks, Anne!
Gorgeous skirt and great idea!
This is so cute! I always want to play with fabrics and DIY textiles, but never seem to get around to it. I didn't know this tape existed! I pinned this post to my textiles board- all my "I want to do it someday" fabric design projects live there:)