How to Sew a Peasant Dress – Free Peasant Dress Pattern (sz 12 mo to 14y)
Disclosure: This post may contain affiliate links. As an Amazon Associate, I earn from qualifying purchases.


Learn how to sew a Peasant Dress with this free girl’s peasant dress pattern. This free printable pdf dress pattern and tutorial is available in size 12 months to a girl’s size 14 with both long and short sleeve options.

💌 Save this article
Why Sew a Peasant Dress?
Peasant Dresses truly are one of the simplest dresses to sew. No buttons, zippers or labor-intensive fabric gathering is needed.
One of the reasons a basic peasant dress pattern is so great, (other than the fact it is so easy to make) is there are just SO MANY different ways to change up the look of this easy-to-sew dress.
- Various lengths – this dress looks great above the knee, below the knee, tunic length or as a top.
- So many different fabric choices you can make.
- Many sleeve options (long, short, 3/4 flutter, flounce)
- And of course hem choices (ruffles, tiers, contrasting fabric bands or scallops.) You can even shorten it to make a top.
- So many ways to embellish this dress: with a split neck, bell sleeves, ribbon, ric-rac, pockets, shirring, aprons, a separate bodice w/ sash for a little extra pizzazz, lol!
I have sewn at least 20 variations of this peasant dress pattern over the years. (different sleeve options, hems, lengths, etc…) For a few new ideas, you can check them all out in my Peasant Dress Variations tab.
Why a Peasant Dress is a Great Project for Beginners
This peasant dress pattern is perfect for beginners. Whether you are picking up sewing again after a several year hiatus (as I did – nothing more motivating to get you back to sewing than a sweet little daughter or granddaughter to sew for!) or are just starting out. (In which case, welcome to the club!)
You’ll enjoy sewing this super simple pattern AND you master a few basic sewing skills at the same time.
The most difficult part of this pattern (other than cutting it out and taping it together) is trying not to sew the sleeve on backward or maybe sewing the casing for the elastic band in the sleeve (and that is only because it’s small.)
This style of a dress is very forgiving, if you make a mistake, just remove the stitches and re-sew it.
A Peasant Dress is a Style of Dress that grows with Her
A peasant dress is fairly boxy in shape. The elasticized neckline and sleeves bring the dress in and give it shape.
Because this style of dress is loose, after sewing, it starts as a dress, but as your little one grows, she can continue to wear it as a tunic or top. (Another great “grow with her” dress is a pillowcase dress and (of course) I have a free pillowcase dress pattern available as well.)

This printable PDF Peasant Dress Pattern is free. The file includes the full dress and 2 sleeve shapes (short and long.)
I have updated the pattern over the years and the peasant dress pattern is currently available in 7 different sizes: 12 to 18 months, 2t/3t, 4/6, 7/8, 9/10, 12, and 14.
(Note: On the last pattern update (May ’18) I updated the pattern to include the full dress instead of just the bodice. I personally prefer the original bodice-only version because it uses half the amount of paper. If you prefer that version too, I did keep a copy of the original pattern available. (You’ll find the link to that version in my private Facebook group. It’s also a great place to show off your creations.)

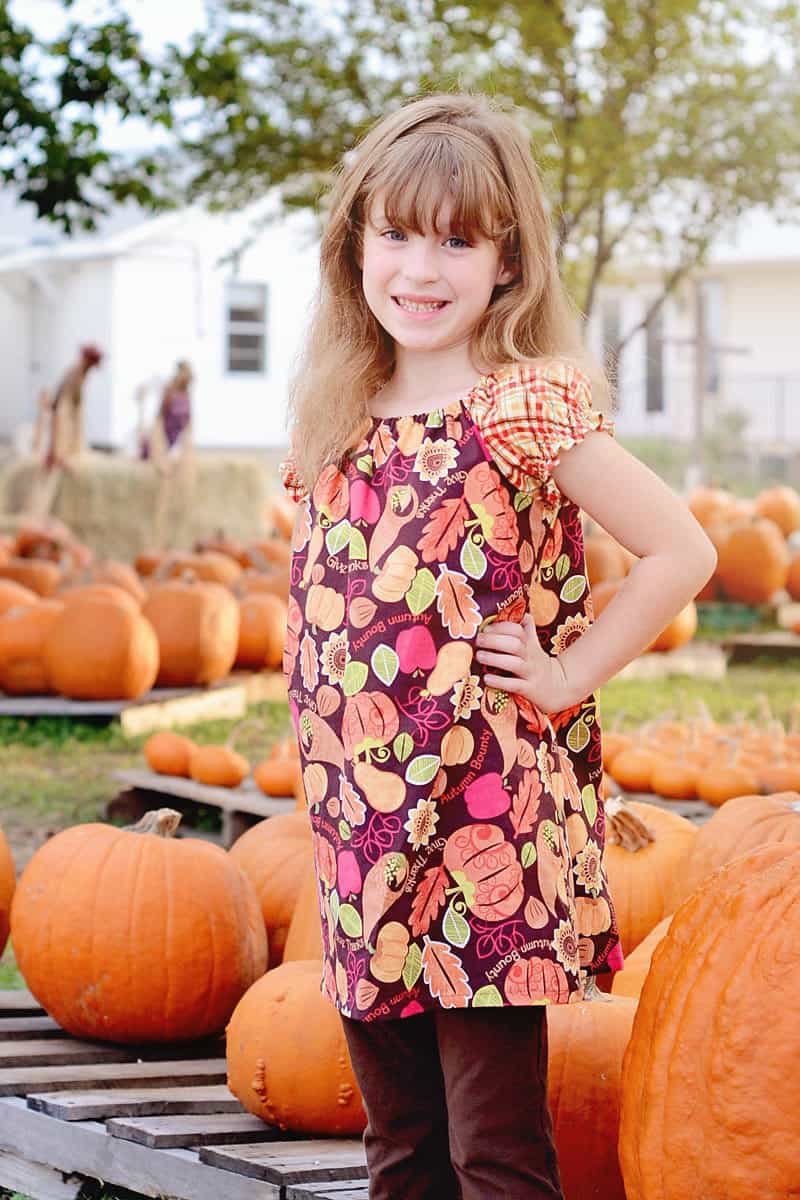
For the peasant dress version I’m showcasing today, I opted to keep the dress simple and let the two fabrics make the statement for our fall pumpkin photos.
I am loving tunic length right now. The length is perfect for school as it allows my missy to wear leggings and still adhere to the dress code.
Peasant Dress Pattern Fabric Amount Suggestions
When it comes to fabric used in my sewing projects, I am very conservative. I’ll fold and refold, move fabric pieces around to use as little fabric as possible. The fabric estimates listed below are what I used for each size.
If you make a mistake or don’t cut properly, you might not have enough fabric. So cut wisely and feel free to add 1/2 yard to my suggestions below.
- 12 mo to 3t: Will easily fit on 1 yard of 40-inch wide fabric
- 4 to 6: With creative fabric wrangling on fabric with no directional fabric nap, you can just barely fit a size 6 with short sleeves on one yard of fabric. If your fabric will only go in one direction, you will need 1 3/8 yard.
- 7 to 12: you can fit these sizes + the long sleeve on 1 3/4 yard
- 14: 2 yards of fabric
- When I say “creative fabric wrangling” that means you will fold the fabric to use the least amount possible for the 1st cut, then refold for the 2nd, 3rd and 4th cut.
Fit Chart

*Note: This peasant dress pattern goes up to size 14.
Materials Needed to Sew a Peasant Dress
- Pattern (When printing, be sure to save the pattern to your pc, open in adobe reader choose auto/landscape and print at actual size.)
- 1 to 2+ yards of fabric
- 1/4 inch Elastic (I have some elastic cutting estimates at the bottom, but if possible, you should fit the dress on the child.)
- iron
- basic sewing supplies (such as Pinking shears, fabric marker or fabric chalk, scissors, ruler )
Elastic cutting guide for the peasant dress pattern
Neck Elastic:
- 12 to 18 months: 15 to 16 inches
- 2t/3t: 17 to 20 inches
- 4/6: 19 to 20 inches
- 7: 20 to 21 inches
- 8: 21 to 22
- 10: 22 to 23
- 12: 23 to 23.5
- 14: 23.5 to 24
Arm Elastic (if you chose to add arm elastic):
- 12 to 18 months: 7 to 7.5 inches
- 2t/3t: 8 inches
- 4/6: 8.75 inches
- 7: 9 to 9.5 inches
- 8: 9 to 9.5 inches
- 10: 9.75 to 10
- 12: 10.25 to 10.5
- 14: 10.5 to 11
Sewing Products and Tools Used and Recommended for this Project
- My favorite shops for fabric are Fabric.com, girl charlie and Stylish Fabrics. (My fave for knits is Funkalicious Fabrics.)
- My Sewing Machine: SINGER 9960 Quantum Stylist 600-Stitch Machine with Extension Table, Bonus Accessories and Hard Cover
- My Serger: Brother 1034D 3 or 4 Thread Serger
- Pinking Shears
- Rotary Cutter
- I love my large ruler and large cutting mat, but you may prefer to start off with a smaller Cutting set
- Dritz Dual Purpose Marking Pen
- Fray Check
- Wonder clips (I didn’t use these in the post, but they are just awesome!
Fabric Layout Guide

Pattern tips and tricks: Important, please read!
- *** Important pattern printing tip*** When printing the patterns, do not print directly from Google docs. Save the pattern to your computer and open it in your adobe acrobat reader, choose actual size auto portrait landscape and print. (If you use any program other than the adobe reader, there is no guarantee the pages will print at the appropriate size.)
- Peasant dresses/tops are designed to be roomy, if you prefer a slimmer fit, move the bodice pattern over from the fold by about 1/2 inch. (I frequently do this.)
- The short sleeves are so cute if you shirr or add elastic to the bottom. (Unless it’s a nightgown, then I usually leave the elastic out of the sleeves…)
- This Free Peasant Dress Pattern includes a 1/4 inch seam allowance unless otherwise noted in the instructions.
- Pattern note: If you choose to sew the long sleeve version, the sleeves sew up just like short sleeves and you can finish the edges with elastic, a regular quarter-inch hem (where you fold 1/4 inch, press, fold another 1/4 inch, press and sew.) or with the quarter-inch hem and shirring. It’s cute in all ways.
- The long sleeve pattern comes in a regular (fuller) sleeve style and a narrow sleeve for knits. (I only recommend the narrower version when you are using stretch/knit fabric.)
Update: the latest version of the adobe reader allows you to print different layers. Each pattern size is on its own layer, so you are able to save ink and print only the size you need. (Click the icon that looks like a stack of papers to see the layers and click the eyeball to turn off the ones you don’t want.)

Have fun making your dresses and as always, if you sew something from one of my tutorials or patterns I would love to see it! Be sure to come back and share a photo on my facebook page or tag me on Instagram @scatteredmom, with #scatteredmompatterns!
FYI: I update my patterns yearly with new sizes! To be notified about new patterns, tutorials pattern updates and fun family recipes, be sure to sign up for my weekly newsletter. =>> Here.
Ready to Learn How to Sew a Peasant Dress?
Visit my Shop and add the free pattern to your cart and check out. Then come back here for the sewing instructions.
Where Do I get the Pattern?
- To get the pattern, don’t forget, you must navigate to the peasant dress pattern page in my shop.
- Enter your name and email and check out (it’s free.)
- The pattern will be emailed to you.
- Click the Pattern link and the pattern automatically saves to your computer.
- Open The free Adobe reader and then open the pattern file. (Don’t print from directly from google’s online version of adobe reader. It will sometimes cause the pattern to print to small or it just won’t open.)
Pattern Info:
- All measurements are in inches.
- Seam allowance is 1/4 inch with a 1/2 inch bottom.
Peasant Dress Sewing Instructions
(printable instructions, with no photos, can be found at the bottom of page)
Step 1: Print your pattern pieces and cut them out and tape them together.
Full pattern looks like this:

Assembly in progress:

Tip: There are two necklines on the dress pattern piece. To make it easier, you can print the bodice pages twice, then cut out the back neckline on one and the front neckline on the second. (or just trace it on another sheet of paper.)

Step 2: Cut pattern pieces from fabric:
Line dress and sleeve pattern pieces up on the fold of the fabric.

Cut one front dress piece, one back dress piece, and two sleeves. (Using either the short sleeve or long sleeve pattern.)
If using the long sleeve pattern, there is an optional narrow sleeve for use on a stretch knits only.

You will have: 1 Front piece, 1 back piece and 2 sleeves.
Step 3: Assemble the dress.
Right sides together, line up the sleeve edges with the armhole edges of the dress front. Sew along this seam (marked in blue) using the 1/4 inch seam allowance and finish the edge with a serger, zig zag stitch or Pinking Shears.

Grab the back dress piece and line up the other sleeve edges and sew the arm/sleeve edges the same way.

When you are done with this step the pieces will connect like below. (No laughing at my drawing skills…)

Next, line up the front and back pieces and sew down the sleeve edge all the way to the bottom of the dress, do both sides and finish the seam edge with your preferred method.
Step 4: Create the Elastic Casing.

To create the neck casing, fold the edge of the neckline in 1/4 inch and press. Fold the neckline over another half inch and press again. Use pins if needed, but be careful not to melt your pinheads when pressing!

Stitch along the edge of the casing, a scant 1/8 inch from the folded edge. Backstitch at the beginning and end and leave a 1.5 inch opening in the casing to insert the elastic.
Cut your elastic according to this guide. (Keep in mind you may want to cinch up your neck line more or less depending on how the dress is fitting:)
- 12 to 18 months: 15 to 16 inches
- 2t/3t: 17 to 20 inches
- 4/6: 19 to 20 inches
- 7: 20 to 21 inches
- 8: 21 to 22
- 10: 22 to 23
- 12: 23 to 23.5
- 14: 23.5 to 24
Attach a safety pin to the edge of the elastic and thread the elastic through the casing. Have your model try on your dress if possible and make any needed adjustments.

Sew the elastic ends together (Be careful not to twist them) using a wide zigzag stitch and trim any excess elastic. Finish sewing the elastic casing closed.
Step 5: Hemming the Dress.
Fold the bottom edge over 1/2 inch, press, fold over another 1/2 inch press again and sew along the folded edge.

Step 6: Sleeve Finishing Options:
To finish the sleeves of your dress, you have a couple of options: Shirring the Sleeve edge, creating a casing and adding elastic or just hemming.
Here are some examples of the different sleeve options and the instructions to do them:
1. Shirring the sleeve edge:

Fold the sleeve edge over 1/4 inch, press, fold another 1/4 inch press again and sew along the folded edge. With elastic thread on your bobbin, add 3 to 4 rows of shirring, 1/4 inch apart. For a more detailed shirring tutorial, see my shirred sundress tutorial.
2. Adding a casing:

The arm casings are created just like the neck casing. Elastic cutting guide lengths for the arms:
- 12 to 18 months: 7 to 7.5 inches
- 2t/3t: 8 inches
- 4/6: 8.75 inches
- 7: 9 to 9.5 inches
- 8: 9 to 9.5 inches
- 10: 9.75 to 10
- 12: 10.25 to 10.5
- 14: 10.5 to 11
3. Hemming the sleeves:

You can also hem the sleeve w/out adding elastic as I did with this nightgown. This is the easiest option and is still very cute. Just fold the sleeve edge over 1/4 inch, press, fold over another 1/4 inch press again and sew.

That’s it! Your peasant dress is done! Go have your little one try it on and pose for a few pictures to share!
Don't miss any more posts!

Follow along on:
Feedly, Bloglovin', your favorite feed reader, or signing up via email and have new posts delivered to your email box each week!How to Sew a Peasant Dress

Learn to sew a peasant dress with this free girl's peasant dress pattern. Peasant Dresses truly are one of the simplest dresses to sew. No buttons, zippers or labor intensive fabric gathering is needed.
Materials
- Pattern (When printing, be sure to save the pattern to your pc, open in adobe reader choose auto/landscape and print at actual size.)
- 1 to 2+ yards of fabric
- 1/4 inch Elastic (I have some elastic cutting estimates at the bottom, but if possible, you should fit the dress on the child.)
- iron
- basic sewing supplies (Ex: Pinking shears, fabric marker, pins, scissors, ruler )
Tools
- Sewing machine
- Basic Sewing supplies
Instructions
Step 1: Print your pattern pieces and cut them out and tape them together.
- Tip: There are two necklines on the dress pattern piece. To make it easier, you can print the bodice twice (page 1 and 2) then cut out the back neckline on one and the front neckline on the second.
Step 2: Cut pattern pieces from fabric:
- Line dress and sleeve pattern pieces up on the fold of the fabric.
- Cut one front dress piece, one back dress piece, and two sleeves. (Using either the short sleeve or long sleeve pattern.)
- Tip: If using the long sleeve pattern, there is an optional narrow sleeve for use on a stretch knits only.
- You will have: 1 Front piece, 1 back piece and 2 sleeves.
Step 3: Assemble the dress.
- Right sides together, line up the sleeve edges with the armhole edges of the dress front. Sew along this seam (marked in blue) using the 1/4 inch seam allowance and finish the edge with a serger, zig zag stitch or Pinking Shears.
- Grab the back dress piece and line up the other sleeve edges and sew the arm/sleeve edges the same way.
- When you are done with this step the pieces will connect like below. (No laughing at my drawing skills…)
- Next, line up the front and back pieces and sew down the sleeve edge all the way to the bottom of the dress, do both sides and finish the seam edge with your preferred method.
Step 4: Create the Elastic Casing.
- To create the neck casing, fold the edge of the neckline in 1/4 inch and press. Fold the neckline over another half inch and press again. Use pins if needed, but be careful not to melt your pinheads when pressing!
- Stitch along the edge of the casing, a scant 1/8 inch from the folded edge. Backstitch at the beginning and end and leave a 1.5 inch opening in the casing to insert the elastic.
- Cut your elastic according to this guide. (Keep in mind you may want to cinch up your neck line more or less depending on how the dress is fitting:)
- 12 to 18 months: 15 to 16 inches
- 2t/3t: 17 to 20 inches
- 4/6: 19 to 20 inches
- 7: 20 to 21 inches
- 8: 21 to 22
- 10: 22 to 23
- 12: 23 to 23.5
- 14: 23.5 to 24
- Attach a safety pin to the edge of the elastic and thread the elastic through the casing. Have your model try on your dress if possible and make any needed adjustments.
- Sew the elastic ends together (Be careful not to twist them) using a wide zigzag stitch and trim any excess elastic. Finish sewing the elastic casing closed.
Step 5: Hemming the Dress.
- Fold the bottom edge over 1/2 inch, press, fold over another 1/2 inch press again and sew along the folded edge.
Step 6: Sleeve Finishing Options:
- To finish the sleeves of your dress, you have a couple of options: Shirring the Sleeve edge, creating a casing and adding elastic or just hemming.
- Here are some examples of the different sleeve options and the instructions to do them:
1. Shirring the sleeve edge:
- Fold the sleeve edge over 1/4 inch, press, fold another 1/4 inch press again and sew along the folded edge. With elastic thread on your bobbin, add 3 to 4 rows of shirring, 1/4 inch apart. For a more detailed shirring tutorial, see my shirred sundress tutorial.
2. Adding a casing:
- The arm casings are created just like the neck casing. Elastic cutting guide lengths for the arms:
- 12 to 18 months: 7 to 7.5 inches
- 2t/3t: 8 inches
- 4/6: 8.75 inches
- 7: 9 to 9.5 inches
- 8: 9 to 9.5 inches
- 10: 9.75 to 10
- 12: 10.25 to 10.5
- 14: 10.5 to 11
3. Hemming the sleeves:
- You can also hem the sleeve w/out adding elastic as I did with this nightgown. This is the easiest option and is still very cute. Just fold the sleeve edge over 1/4 inch, press, fold over another 1/4 inch press again, and sew.
That’s it!
- Your peasant dress is done! Go have your little one try it on and pose for a few pictures to share!

Thanks for this pattern! I have a one year old granddaughter I have not met yet, since she is in the UK and I am in Spain. I have just made 2 of these from fabric remnants I had hanging around and they look really cute!
I do have a great tip for anyone using your patterns. The pages can be best trimmed if you have a paper guillotine, nice and quick.
The other tip comes from me being a user of cutting machines (papercrafting). For those not familiar, we use sticky mats to hold our card while the machines cut – it’s just a sheet of plastic with a temporary hold adhesive on it. Now, the great thing is that if you have a low tack mat, you can place a sheet of A4 on it and it acts as another pair of hands while you align the next one! Makes it so much easier.
Good tip, If I don’t have a guillotine style cutter I use this one I got from Creative Memories 15 or so years ago it looks like this: https://amzn.to/3epqmIi
The Peasant dress is my very favorite for making nightgowns for my 4 youngest granddaughters. I am not a fast sewer, but these sew up fast and are so cute and comfy. Thank you so much !
Can’t wait for the pattern
Thank you for providing this brilliant pattern and tutorial. I have made one for my Granddaughter ready for the summer. She loves it and her sister would like one too.
I am going to attempt the other patterns as you have made them so easy.
Thank you so much
Mandie
Good luck!
I’ve been following you for about three years. I love your patterns and enthusiasm! I have one suggestion, and that is to please number the pages so it is easier to put the pattern together? Thanks so much for all the great ideas.
Not a bad idea, I have started to do that on everthing I’m creating going forward.. Not sure how timely I’ll be on adding to older patterns though.
I made this dress for my little girl twice, the second time around I added shirring around the armholes and waistline. She absolutely loves it and feels like a ‘princess’ when she wears it. First time I tried my go at shirring and with a bit of trial and error I finally worked it out. Hardest part was printing out the pattern and sticking them all together. Loved the way the dress came out and I will definitely be sewing some more dresses you have on your site. Thanks for your free patterns which are great for beginners.
I definitely agree about printing and taping! I have a few on the site that I call paper saving – where you just print the bodice and either draw min the skirt or cut the skirt based on measurements I give.
Oops, sorry, just changed some formatting and it caused the links to not be highlighted. Look under materials needed and the word “pattern” Is a link to the pattern download page. (should be highlighted teal now.)
What is the finished width at the bottom of the dress. I need it to be at least 42″ around after seaming.
I made this last as a Halloween costume for my youngest daughter. I lengthened the tunic and used long sleeves. I added belt made from tulle, with tulle strips hanging down, and a waist length cape attached at the shoulders. She loves her ‘Elsa’ costume.
I’m going to pull out some flannel and make her a few nightgowns this weekend.
Love this pattern. Have made several for Operation Christmas Child Shoeboxes. I am in Australia and sent one to NZ last year for my cousin’s 3yr old granddaughter. Used 4-6 size and she is wearing now. Just made her 2 more as she didn’t want to take it off. So quick and easy to make. Thank you
I made two of these dresses for the Little African Dresses. They have their own pattern, but I just wanted something different. Their pattern are all ties on the shoulder. I would like more simple dress pattern that I could make for them.
First ever dress I’ve made. Amazing instructions. Turned out fantastic. I’m so happy. I made the 18 month size and it fits my 11 month old great and even works as a shirt for my almost 3 year old.
Thanks for the help!
please make it in size 16!
What type material is recommended for this dress? Woven or knit?
You can use what ever type of fabric you like. I have made it with both knits and quilting cotton.
I did this pattern I cut the pattern for a 12 month and 4/5/6 pattern. Then sewed them up it was super fast and easy. I love how they came out I actually sewed them for nightgowns, after having trouble finding a pattern I liked for night gowns I found this.
The best part is, after they get too small, you can add new/longer elastic to the neckline and they will last another year or two!
Thank you so much for this wonderful pattern. I have a 4 year old granddaughter, who takes size 7/8 clothes and your size 7 pattern fits her perfectly. I’ve made 4 versions of this top so far (both long and short sleeved) and will be making many more. With the pandemic here in the UK and short time working in effect, money is tight for our families and I have a stash of fabric that your patterns are helping me transform into clothes for my granddaughters to help get us all through the difficult months ahead. Not to mention the positive effect this is having on my mental health too! Bless you for your generosity. I can’t thank you enough. I’m going to try the simple pants next.
Question: With elastic being hard to find, how would I adjust this pattern to maybe have a string/tie set up?
And this peasant dress is the second pattern I am saving the pattern again and I appreciate you so much for making it fun and easy to sew again!!!!!
Hi, some sort of string tie would definitely work. I once created a split neck and added bias tape. You could use the same idea for the string tie maybe: https://www.scatteredthoughtsofacraftymom.com/how-to-make-split-neck-peasant-dress/
Thanks so much for the pattern and the tutorial. So easy to follow. Made for my 2 granddaughters.
Sorry!!… All clear and quite done!!
hello Jamie, i’ve just finished to cut the patter (1 year size) and I’m wondering what is the piece on page two for?
… please help me!
thank you in advance!!
Hi, this pattern has 3 pieces. 1. Bodice/dress 2. long sleeve 3. short sleeve. See the full pattern in this photo: full pattern
Hey thanks for the lovely pattern my daughter is 11 but taller for age could hardly find any patterns in her size .i had a question regarding the regular sleeves. What would be the dimensions for the normal sleeves without the strech