Roller Skate Circle Skirt Pattern for girls (sz 3 to 10)
Disclosure: This post may contain affiliate links. As an Amazon Associate, I earn from qualifying purchases.

Today, I’m sharing this adorable and free printable circle skirt pattern for girls in sizes 3 to 10!
**Update ** (Don’t miss the just posted pattern hack! See it here –>> Fat Quarter Circle skirt. )

Roller Skate Circle Skirt Pattern
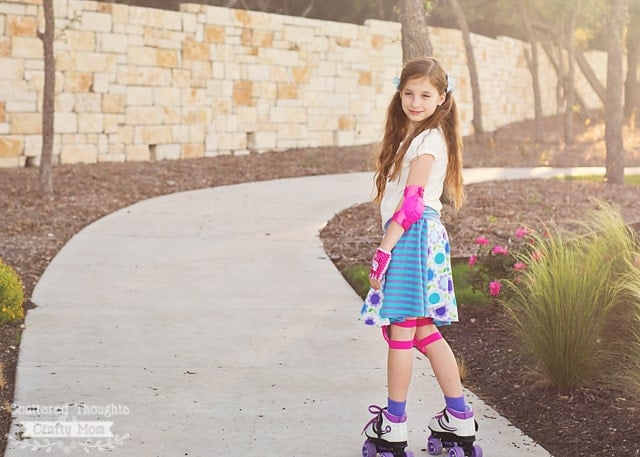
My little missy has been saving her pennies for a pair of roller skates for a few months. She had a little photo shoot this past weekend and I told her after the shoot, we would go shopping for skates and I would pay the difference between what she had and the cost of the skates. (Mostly because I didn’t want her ending up with the cheapest pair…)
OH MY GOODNESS! She’s been in roller skate heaven for the past week! Roller skating is all she wants to do. She looked so cute in her little Hello Kitty protective gear and skates, that I was completely inspired to sew her a new little roller skate outfit! (In her new favorite colors of course!)

Simple Panel circle Skirt Pattern
You will love how easy this skirt is to make!
What makes this style of skirt one of my favorite skirt patterns to make is that the bottom/skirt part is a modified circle skirt, and the waistband/top is a separate yoga-style waistband.
I personally enjoy wearing yoga-style waistbands due to the comfort factor and I think they are even easier to sew than an elastic waistband.
What I mean when I say “modified circle skirt” is that it is a circle skirt made with panels. So not only do you use less fabric, but your options for fabric combinations are endless!

Fabric Suggestions for this Free Circle Skirt Pattern
There are 2 parts to this skirt. The yoga-style waistband and the paneled circle skirt.
The waistband needs to be some sort of cotton/rayon/spandex blend knit fabric that has good stretch and recovery. The exact fabric I used for the waistband in this version is no longer in stock, but this is it in another colorway if you want to check out the fabric description.
(Update – Since writing this post, I did do a pattern-hack version with all quilting cotton fabric. See how I added an elastic waistband instead of yoga-style here.)
For the bottom circle skirt, you can use either woven cotton or knit fabric. You could also choose to use one single fabric and cut the pattern in one piece (as I did in this circle skirt. Just tape together more of the pattern pieces) or sew it together in panels for the look I made.
By sewing the panels together though, you are actually able to get away with using less fabric.


Fit Chart for the Roller Skate Skirt Pattern

Supplies Needed to Make this Skirt:
- Pattern
- Sewing Instructions
- 1/3 yard of rib knit or cotton/rayon/spandex knit with good stretch and recovery for the waistband.(or any stretch fabric that has about a 50% stretch and good recovery)
- The amount of fabric needed for the bottom skirt will vary based on size and fabric width. You could fit the size 10 skirt on 1 yard, if the fabric is 60 inches wide or greater, but anything less wide and you would need close to 1 2/3 to 2 yards
- ballpoint/stretch needle
- iron/spray starch
- basic sewing supplies
Ready to Sew this Skirt?
Pattern tips and additional info:
- Download the pattern and save it to your PC, open the pdf document in adobe acrobat. Don’t print from google’s online version of adobe. (It will sometimes cause the pattern to print too small.)
- Seam allowance is 1/4 inch with a 1/2 inch bottom hem.
- Yoga style waistband is designed for stretch knit fabric. I recommend a rib-knit or interlock knit (or any stretch fabric that has about a 50% stretch and good recovery.)
- Use a ballpoint/stretch needle
- Use spray starch when folding the bottom hem of knit fabric. (The starch stiffens the fabric and helps so much!)
- Sew seams with either a serger, double-needle, stretch stitch, narrow zig zag with a long stitch length or a straight stitch with a long stitch length and a slightly loosened tension. (Make a couple of practice stitches on your fabric to see what works best.) I also like to use this “lightning bolt” stretch stitch on seams that need strength but a little give. (I used it when attaching the skirt to the waistband).

Supplies Needed:
- Pattern
- 1/3 yard of rib knit or cotton/rayon/spandex knit with good stretch and recovery for the waistband.(or any stretch fabric that has about a 50% stretch and good recovery)
- Amount of fabric needed for the bottom skirt will vary based on size and fabric width. You could fit the size 10 skirt on 1 yard, if the fabric is 60 inches wide or greater, but anything less wide and you would need close to 1 2/3 to 2 yards
- ballpoint/stretch needle
- iron/spray starch
- basic sewing supplies
Sewing Instructions:
Step 1. Print pattern, and assemble according to directions.
Print pattern, and assemble according to directions. (Image below is just for reference- print pattern from link above.) 
Step 2: Cut out pattern pieces:
Line the pattern pieces up on the fold of the fabric and cut out 1 waistband and 4 skirt panels (on the fold.)
Step 3: Skirt Assembly.
Waistband: right sides together, sew along the edge with a 1/4 inch seam allowance.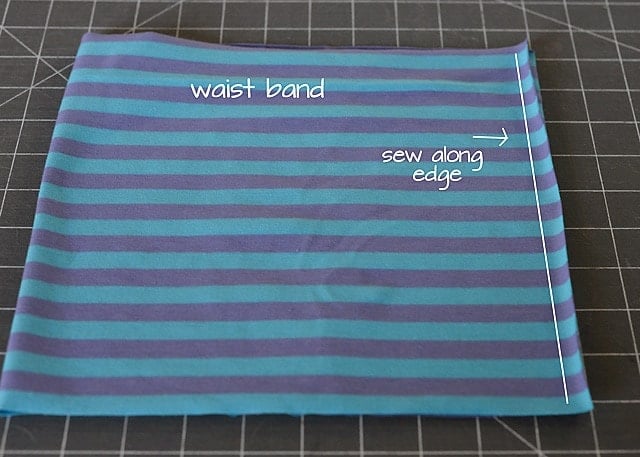
Skirt: Line up edges of skirt panels, right sides together and sew. (1/4 inch seam allowance) Keep going until all 4 skirt panels are sewn together.
Fold the waistband in half, wrong sides together, lining up the raw edges. (The waistband is now 4.75 inches tall.)
Divide waistband into 4 equal sections, marking with pins.
Line up the pins of the waistband with the 4 seams of the skirt. Pin together. (The skirt is several inches wider than the waistband to accommodate the pulling the skirt over the hips and to give it extra “swing”)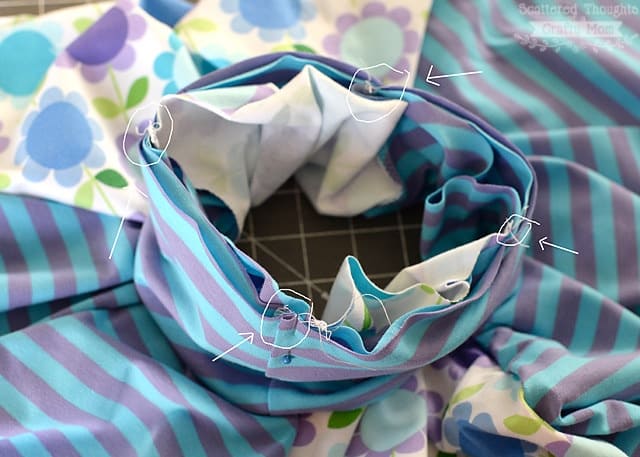
Line up the waistband seam under your presser foot (skirt should be on the bottom.) Sew a couple of stitches to lock the fabric in place on the machine and gently stretch the waistband until it is the same width as the skirt fabric. (Be careful to not stretch the skirt fabric.) Sew from pin to pin, keeping the waistband evenly stretched as you sew.
Here is the finished waistband close-up: you can see how the skirt gathers up when the waistband recovers to its usual shape. (Sorry for the poor quality picture, I’ll get another in the daylight and add it very soon.)
Hem the skirt. If working with knit fabric, you could leave the edge raw or fold it up 1/2 inch and hem with a zig zag or double needle. (Don’t forget to use spray starch if hemming!)
If you are hemming woven cotton, hemming in a circle can be tricky. My favorite method is to use single fold bias tape to make a smooth edge.
That’s it, you’re done!

Time for some roller skating!
Or maybe just a break…

If you make one of these skirts, be sure to tag me on instagram or share a picture to my facebook page!
Like this project? Don’t forget to pin it!
Don't miss any more posts!

Follow along on:
Feedly, Bloglovin', your favorite feed reader, or signing up via email and have new posts delivered to your email box each week!

Thanks for this pattern and the hack with the fat quarter, made two skirts for my little skater. She loves them as they really twirl!!
How can I make this in just one piece of fabric, without the panels?
by printing multiple panels, taping them together and cutting it out in one piece.
Dear Jamie,
Thank you so much helping me out sewing my first two dresses for my two girls.
KindRegards
Myriam
The Netherlands
What is the second row of numbers in the size chart for?
Oops, that's height. I must have cut off the far left column when cropping the photo. I'll get that fixed!
~Jamie
I got one of these sewn up yesterday and it was such an awesome pattern. Went together so well and was a really quick sew. You can see some pics here: http://ateliertracyk.blogspot.ca/2015/05/i-cant-believe-it-has-been-year-since-i.html if you are curious. Thank you so very much for both the pattern and the tutorial. I also sewed up a Swing Tank Top to go with it 🙂 Happy me and happy child, all thanks to your patterns.
Hey, I want one! I might try to enlarge this pattern to make a similar skirt for myself…love it! Thanks!
This looks so cute! I'm always so amazed by your talent. Pinned and tweeted. Please join us on Monday at 7 pm and party with us! It is so super fun to see what you have been working on! Lou Lou Girls
Cool pattern, thanks for sharing! My little miss has a really long torso but is slim on top, so shirts get outgrown in length before the bodice stops fitting. I think I will add a circle skirt to the bottom of these shirts to make play dresses!