Simple Halter Dress Tutorial
Disclosure: This post may contain affiliate links. As an Amazon Associate, I earn from qualifying purchases.
I love being able to reuse my existing sewing patterns to make new and different dresses, tops and bottoms. That’s exactly what I did to make this little halter dress. I used the pattern I created for my sweet spring sundress, gave it the tiniest of tweaks and came up with a new dress!

💌 Save this article

I know I say this about almost everything I make :), but oh my goodness, I LOVE THIS DRESS! This fabric is one of my favorites that I bought a couple of years ago and have been saving. In fact, it pained me just a little to cut into it since the fabric line is almost impossible to find anymore.
The good thing is, I know I made the dress in a way that she will be able to wear it for at least 2 years as a dress and probably even longer as a top. (All I’ll have to do is loosen the elastic in the back.)

(The fabric is from Tanya Whelan. I also have a yard of the sky blue and darker pink/red rose print, pink and blue damask print and cream w/ pink dots.)
The dress is perfect for a tea party with the neighbors cat (on your new picnic quilt…)

But maybe don’t catch frogs in it…

Items needed to make this Simple Halter Dress:
- 1 yard of fabric for the main pieces
- 1/4 yard for the straps and accent piece (of course you could mix it up and use a bunch of different fabrics)
- Coordinating thread
- +/- 10 inch piece of 3/4 inch elastic
- paper to draw your pattern (if needed) or use my bodice pattern (Click the link for the pattern. it comes in 3/4, 5/6 and 7/8)
- scissors, ruler, iron, fabric marker- (basic sewing supplies)
*** Important pattern printing tip*** When printing the patterns, do not print directly from Google docs. Download the pattern to your computer and open it in your adobe acrobat reader. Choose actual size and the landscape option. (I just printed a pattern directly off Google docs and notice it printed slightly smaller.)
Instructions:
Step 1: Creating, measuring and cutting your pattern pieces and fabric.
Print or create your front bodice piece. (Or follow the directions below to make your own – click the images to make them bigger.)


Cut out the bodice pattern and then cut two from your fabric. One is the bodice front and the other is the bodice lining. If you are using my pattern, cut 2 bodice pieces on fold.
To determine the fabric measurements for the skirt, hold up the bodice piece to your child and measure down how far you want the skirt to go. Subtract the length of the ruffle and add half an inch for seam allowances.
Add 1 inch to the height of the ruffle measurement for seam allowances and the hem.
Halter strap: cut one piece of fabric 3 inches wide by the width of the fabric, selvage to selvage. Cut off the selvages and then cut the long piece in half. You should have 2 pieces 3 inches wide by about 20 inches long.
For the skirt: cut the fabric to your length measurement by the width of the fabric. Be sure and remove the selvages.
For the ruffle: cut 2 strips the width of the fabric by your ruffle measurement.
My size 4/6 dress, the skirt was 15.5 inches long by the width of the fabric and my ruffle strips were 4.75 by the width of the fabric.
Here is what you should have:

Step 2: Halter ties.Fold the halter tie pieces, right sides together, fold in half longways and sew along the top and side 1/4 inch from the edge. Flip the tube right sides out and iron flat. (Do this for both ties.) You don’t have to worry about hemming the other end of the tie.
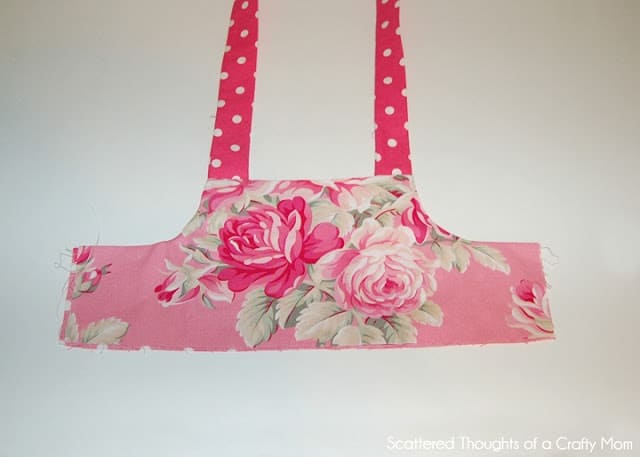
Step 3: Bodice Assembly. Lay out the front bodice piece right side up. Line up the raw edges of the halter tie with the raw edges of the bodice piece 3/8 inches from the edge as shown.

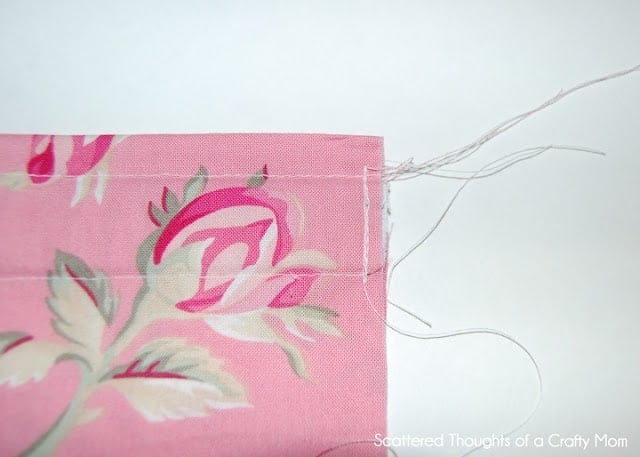
Sew the straps to the bodice piece, a smidge less than 1/4 inch from the edge. Back stitch a couple of times so the straps are secure

Lay the bodice lining piece on top, so the right sides are together. pin in place and sew along the armholes and top as indicated.

Flip the bodice right sides out and iron the top and armhole seams flat.
 |
| So pretty, I love seeing these pattern pieces come together… |
Step 4: Creating the casing. Grab your back bodice piece and fold it in half longways and iron flat. Mark 3/8 inch from the top and draw a line side to side. Make another mark 1 inch down from the 1st mark and draw a 2nd line.

To create the casing for the elastic, sew a straight stitch down these 2 lines.


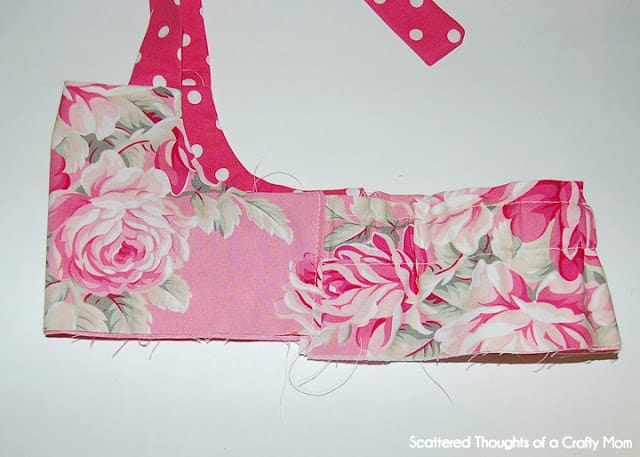
Step 5: Attaching the front bodice to the back. Grab the front bodice piece and open it up. Iron both side edges over, 1/4 inch.

Line up the top edge of the back bodice with the top seam of the front bodice and “sandwich” them together.

Pin and sew right along the edge of the front bodice piece.

To determine how long your elastic piece needs to be, you can try the bodice piece on your daughter and mark where to cut the elastic.. (You can also just guess-timate based on her chest measurement. I tried mine on my daughter, but the dress was still was drooping in the back more than I liked and ended up having to open the seam back up and take out a little more elastic…)

Once you have the elastic fitting the way you like, stitch down the elastic the same way as the first side and “sandwich” the edge in between the front bodice piece and liner and stitch in place. Trim the bodice if needed to even up the bottom edges.
Step 6: Sewing, gathering and attaching the skirt.
Grab the skirt piece and with right sides together, stitch up the side seam. Finish this seam with pinking shears, serger or zigzag stitch on your sewing machine and iron it flat.
To gather the skirt top, change the stitch setting on your machine to the longest stitch length and run a straight stitch along the top of the skirt 1/4 inch from the top. Leave the threads loose and don’t back stitch. Pull on the top thread and slide the fabric down the thread to gather the skirt. Keep pulling and gathering until the top of the skirt opening is the same width of the bottom of the bodice. Spread your gathers as evenly as possible.

(Sorry to change fabric on you, I forgot to take pictures of this step so I am using the photos from my last tutorial…)
With right sides together, line up the raw edges of the top of the skirt and the bottom of the bodice and pin securely. (The more pins the better IMO.)


Place the pinned edge in your sewing machine and sew right over the gathering stitch. If you choose to sew over your pins, go slowly and be careful, I have broken a few needles this way.

You will want to finish this seam with pinking shears, serger or zigzag stitch on your sewing machine.Once you have attached the skirt to the bodice and finished the seam, flip the dress right side out and iron the seam so the finished edge is pointing up. Top stitch around the entire bodice. This top stitch should catch the finished seam you just ironed and help the dress fall prettier and look more finished.

Now, if you aren’t going to add a ruffle, you would just fold the bottom edge over 1/4 inch, press and fold over another 1/4 inch. Press again and sew along the hem and you would be done.
Step 7: Adding and hemming the bottom ruffle.
Grab your two ruffle strips and right sides together, sew one of the short edges together so you have one long strip. Then hem the bottom of the ruffle by folding the bottom edge over 1/4 inch, press and fold over another 1/4 inch. Press again and sew along the hem.

Line up the other side edges, right sides together and sew them together so you have one big circle of fabric. Run a gathering stitch along the top of the ruffle strip the same way you did along the top of the skirt. Pull on the top thread until the strip has ruffled up to the same width as the bottom of the skirt. You will attach this ruffle the exact same way as you attached the skirt to the bodice.
Finish this seam edge and press the seam so the finished edge is pointing up. Top stitch along this seam.

Just for fun, I opted to add a strip of coordinating fabric along the bottom of the front bodice. I created a strip with the same width and the same method as the halter tie and just stitched along the bottom edge of the bodice.


And as an extra measure, I like to add a little loop of fabric to the back of her halter tops and dresses to help support the fabric over her shoulders…

Ta da, you are done! Don’t you love it? Now have your little darling try on the dress and go take some pictures!

Like this tutorial? Don’t forget to pin it!
Don't miss any more posts!

Follow along on:
Feedly, Bloglovin', your favorite feed reader, or signing up via email and have new posts delivered to your email box each week!

Absolutely love this! The fabric is to die for, too! Glad I came across your blog, via Sew Much Ado's WDIW link up today. Take care! 🙂
So cute and we love the fabric you have chosen!! Thanks for being a part of our "Strut Your Stuff Saturday." Hope to see you again real soon!! -The Sisters
What an amazing dress! I'm pinning for future reference. Love the name too, that's what I was thinking of naming me next little girl!
I so love the fabric, and love the dress. Loving the picture with the frog in the glass, so adorable! Great tutorial, so wish our babies weren't grown! Thanks for sharing you white creative inspiration at Sunday's Best!
Well I have to make this and I have to get this fabric since my sweet little is named "Ava Rose" 🙂
Love the dress and am planning on making it but I have one question. I don't understand what the loop on the back bodice is for. I can't see that the straps go through it. Thanks. Laurie
Sorry to confuse you, I didn't permanently attach the loop until after I took these pictures so I don't have a photo of the loop in use on this dress. I do add this little loop to all her halter dresses,makes a huge difference on how the dresses fit. You can see how I have it tied in this older post: http://scatteredthoughtsofasahm.blogspot.com/2011/04/knit-halter-dress.html
Good luck!
~Jamie
Another great tutorial! Super cute dress and I love, love, love the fabric!! Pinning this!
This is so pretty!! The picture with the frog just makes it FABULOUS! I just featured this on my FB page: http://www.facebook.com/ishouldbemoppingthefloor.
Thanks so much for linking up! Have a great week!
{HUGS},
kristi
This dress is precious!
We'd love to see this at our Beautify it Monday link party open now!
-Four Sisters
Bringingbeauty.blogspot.com
Waoo. So beautiful..& the girl is so smart :)you are perfect in sharing tutorials 🙂
I've just found you blog – Hello !
lots to read here, I'll be catching up soon.
I love craft work especially when things are made from recycled stuff.
What a beautiful child, you must be very proud, mine are all grown up now so I make bits and pieces for the home.
kind regards
I just love this dress and your photos too! Sew darn cute!
This is an absolutely amazing little dress and the fabric you used to make it is gorgeous. And thanks so much for such an in-depth tutorial!
Such a cute dress…and a fantastic tutorial!! I would love for you to link it up at Fantabulous Friday#10 going on now. By linking up, you are entering to win free ad space for the month of May as well! I hope to see you there!
Well, the dress is smashing, I may just have to fire up my sewing machine……and the model is precious.
It's beautiful! I love the wide ribbon tie. It's my favorite kind of halter, I think.
Beautiful!! I totally get what you mean about making that first cut on fabric you love…so worth it, though! =)
So very pretty! I definitely want to try making this with my daughter!
ÇOK GÜZEL OLMUŞ ..TÜRKİYE DEN SEVGİLER ..
That really is gorgeous fabric, I love what you did with it!