How to Sew an Elastic Waist Skirt (free pattern 12 mo to 16)
Disclosure: This post may contain affiliate links. As an Amazon Associate, I earn from qualifying purchases.


A simple elastic waist skirt is a perfect beginner-friendly sewing project. Follow these easy step-by-step instructions (with photos!)and in about 20 to 30 minutes, you will have a darling girl’s skirt with an elastic waist. The tutorial includes a cut chart for sizes 12 months to 16Y. (Plus tips for adult sizes too!)

Easy Elastic Waist Skirt Pattern:
Sewing little girl projects are my very favorite things to sew. From peasant dresses, pillowcase dresses, headbands, blankies, and other various outfits; if it’s quick, cute and full of girly colors – I love it!
When it comes to this elastic waist skirt project, I actually already have a very similar tutorial posted on my blog. The original tutorial was instructions to make a simple skirt with 3 different options. (The options are adding a contrasting band, a ruffled bottom, or a tie around the waist.)
That post was created in 2012!
I’ve edited and updated the post many times over the years but didn’t feel like it focused enough on just the basic construction of an easy elastic waist skirt. Plus the tutorial instructed you to calculate your own measurements. Over the years I’ve found many people using my tutorials don’t have a little one in-house to measure (like grandma’s or aunts.)
So I wanted to include a girls skirt pattern and tutorial with brighter, easier to follow images and included a fabric cutting chart for all sizes. Then, if you are ready to “upgrade your skirt, be sure to visit the tutorial with the 3 skirt options.

Why this Easy Elastic Waist Skirt is a Perfect Beginner Project:
A simple no-frills elastic waist skirt is a perfect sewing project for beginners. This project is great because it is basically one pattern piece and all the required sewing is easy straight lines. An elastic waist skirt is one of those instant gratification type projects that can be completed in 20 to 30 minutes even by the most inexperienced sewist. (As long as they already know how to thread their machine, that is, lol.) 
Can I Make this Skirt in Adult Sizes?
Of course! grab a measuring tape, you want the skirt fabric width to be about 2 X’s your waist measurement. The skirt length will be your waist to knee measurement plus 2 inches.
What Fabric Works Best for this Easy Skirt Project?
The good news is this project is so versatile, almost any fabric works. Quilting cotton, linen, lightweight corduroy, knits, even a slippery polyester or silk. If you are a beginner sewist, I do recommend starting with a cotton fabric that will hold a press.
Cute Ideas to Dress up this Easy Skirt Pattern
You could add a banded bottom or ruffle (see this post to learn how to do that.) Add Ribbon, Ric Rac trims or even a pocket. (I actually really like that pink ribbon!) 
Products Used and Recommended in this Girls Skirt Pattern:
- My favorite shops for fabric are Fabric.com, girl charlie, Etsy and Bluprint. (My fave for knits is Funkalicious Fabrics.)
- My Sewing Machine: SINGER 9960 Quantum Stylist 600-Stitch Machine with Extension Table, Bonus Accessories and Hard Cover
- My Serger: Brother 1034D 3 or 4 Thread Serger
- Pinking Shears
- Rotary Cutter
- I love my large ruler and large cutting mat, but you may prefer to start with a smaller Cutting set
- Dritz Dual Purpose Marking Pen
- Fray Check
- Wonder clips (I didn’t use these in the post, but they are just awesome!
How to Sew an Elastic Waist Skirt:
Are you ready to give this Elastic Waist Skirt a try? This easy skirt pattern is designed to sit at the natural waist and fall to mid knee on the smaller sizes and top of the knee for larger sizes. You can always use your own measurement for a custom fit. The “pattern” Is not in a printable PDF form as it is just a single rectangle of fabric. (2 rectangles for larger sizes.) Scroll down to step one where you will find the fabric and elastic cut chart for each size. Elastic Skirt Fit Chart:  Finished Skirt Measurements:
Supplies Needed to Sew a Simple Elastic Skirt
- Fabric (1/2 yard for 12 mo to 6) (1-1/4 yard for 7 to 12) (1-1/2 for 14 to 16)
- 3/4 inch elastic
- ruler
- scissors
- iron
- Basic Sewing supplies

Step 1: Cut Fabric and Elastic
Skirt Size Fabric Cutting Chart: Skirt Elastic Cut Chart:
Sewing instructions:
Seam allowances are included and are 1/4 inch unless otherwise stated. Cut skirt panel(s) to specified length and width.  One thing to note, on sizes 6 and under, the skirt width will be less than 42 inches, so you will be able to just use one piece of fabric. (So just one side seam.) The larger sizes need a wider skirt, so you will be cutting 2 fabric pieces and sewing them together. (the skirt will have 2 side seams.) If sewing a larger size skirt, line up the 2 skirt panels, right side together and sew ONE SIDE SEAM ONLY. Finish this seam with your preferred method Cut a piece of elastic to specified length for size.
Step 2: Hem the skirt
Fold the bottom hem over .25 inches and press. Fold over another .5 inches, press again. Pin hem in place if needed. 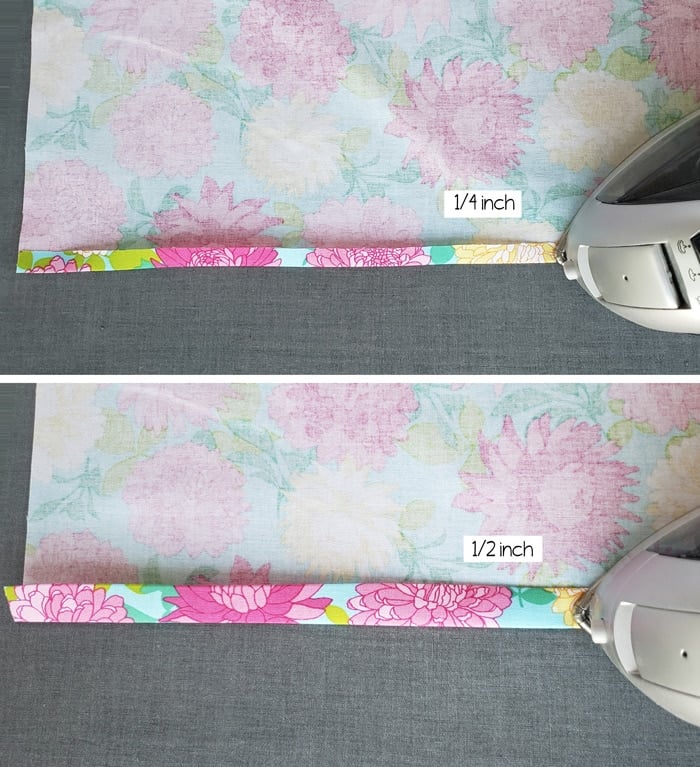 Sew along the edge of the skirt. (right along with that 1st quarter inch fold.)
Step 3: Sew the Side Seam of the Skirt.
Fold the skirt panel in half, right sides together, lining up the raw side seams, making sure the hem is even. Sew together using a .25 inch seam allowance. You will need to finish this seam with your preferred finishing method (pinking shears, zig-zag stitch or serger. I have a serger, so that is what I used.) 
Step 4: Create the Casing for the Elastic.
Fold the top edge over .25 inches and press. Fold the seam over again, 1 inch. Press and pin in place.  Sew along the folded edge, leaving a 2 inch opening to thread the elastic through.

Step 5: Add Elastic and Close Opening
Use a bodkin or safety pin to thread the elastic through the casing. (take care that the other end does not slip into the casing.)  Pull both ends of the elastic out several inches. Make sure your elastic is not twisted and then overlap the elastic edges by 1/2 inch and sew together with a zig zag stitch. (I recommend going back and forth over the elastic a few times.)
 Sew the opening closed.
  Give all the seams a final press, adjust the gathers around the elastic so they are even, and you are done!
  Now go take some pictures and come back to share. You can share an image to my Facebook group here or tag me on Instagram using the #scatteredmompatterns.
Don't miss any more posts!


Is this pattern suitable for knit fabrics as well?
yes
I’ve scrolled and scrolled but I cannot find the link to your elastic waist skirt for kids. Could you steer me in the right direction?
This one does not have a printable pattern, only measurements.