Scrap Buster Alert: Easy Quilted Fabric Coaster Tutorial
Disclosure: This post may contain affiliate links. As an Amazon Associate, I earn from qualifying purchases.
Looking for a quick and easy scrap-busting project that is actually useful? Then you need to make these adorable Fabric Coasters! If you love easy quilting projects, you will really enjoy whipping out these DIY coasters with this easy fabric coaster tutorial.

💌 Save this article
DIY Coasters
I’ve been cleaning and organizing my craft room for what seems like months now. Actually, it has been months. You should have seen what it has looked like since our move. It was bad, lol. Somehow, my craft room became the “dumping ground” for the entire house.
The good news is that I’ve made a ton of progress. There are no moving boxes in my room (I will admit to a couple in the closet), and I’ve done quite a bit of decluttering/destashing and rehoming unused items.
My next goal is to hang some shelves and a pegboard system from Ikea and work on organizing the 2 closets I still have stuff in. I might even let go of some of my older craft and scrapbooking supplies I have been holding on to through 3 moves. (It’s just so hard to let things go. I can’t help but worry – what if I end up needing them or what if my lil missy decides she wants to scrapbook? Then I’ll have to re-buy what I got rid of!)
A nice bonus of decluttering is finding UFO’s, (unfinished objects) misplaced supplies and fun scraps. (And we all know fun scraps are perfect for making cute projects like these DIY Coasters.)
Has anybody been a reader long enough to remember when I made this quilted Halloween table runner? I’m willing to gamble that the answer is no as I made the table runner in 2011.
One of my “finds” from organizing my craft room was a basket full of fat quarters and scraps. I had quite a bit of fabric leftover from that Halloween Fat Quarter set plus a whole stash of random fat quarters I’d picked out to make another chevron quit.
As I sat down with my coffee at my new desk, (love that it has a pull-out keyboard tray and goes with all my other Ikea furniture.) I looked down and saw this:

Yes, a coffee stain on my brand-new desk!
That did it, I knew exactly what I needed to make with those fabric scraps.
FABRIC COASTERS!

DIY Fabric Coasters
Fabric coasters are a fantastic project. They are useful and really only take a few minutes to complete. I love coasters and have made a few over the years, like these tile coasters leftover from a kitchen project and these quilted mug rugs from pre-quilted fabric.
The DIY Fabric Coasters in today’s post, at the most, take about 25 minutes per coaster. To speed up the process, you could use solid fabric instead of piecing your own, which would take the time per coaster down to 5 to 7 minutes.
Easy Fabric Coaster Tutorial
The best part about this little quilted fabric coaster tutorial is that it is super simple to make with whatever scraps you have on hand. There’s no binding, so these coasters finish up in a flash.
Since you can use whatever scraps you have on hand, they are cute and colorful or simple and modern—whichever way you decide to go!
Want more scrap-busting projects? I have an entire scrap-busting category here.

Which Presser Foot is Best for this DIY Fabric Coaster Project?
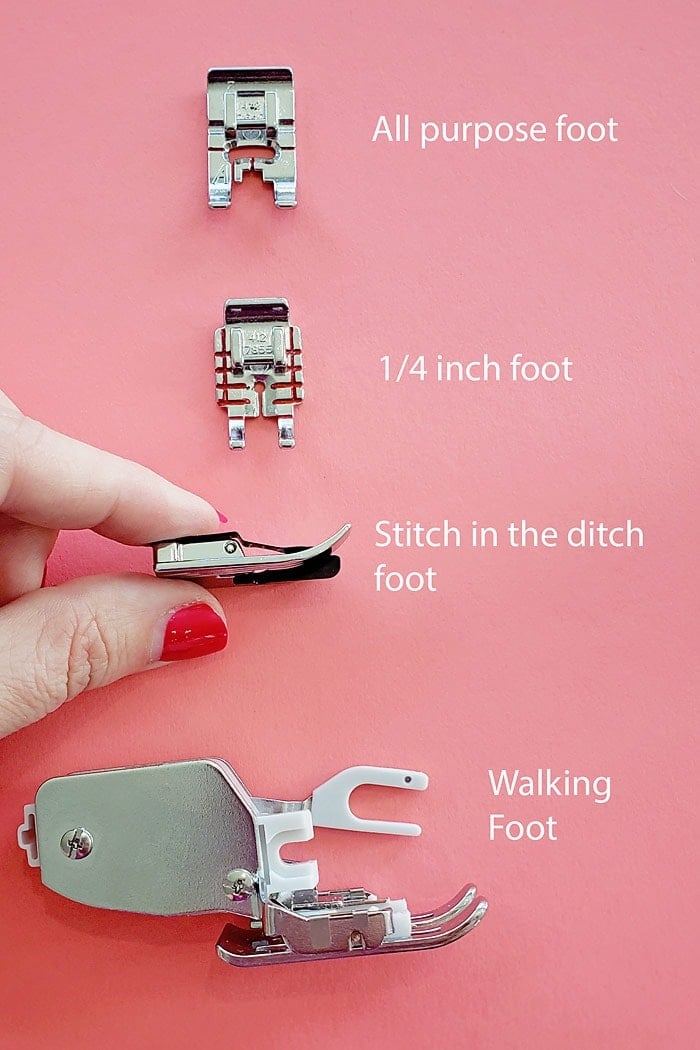
I wouldn’t say there is on foot that is perfect for this project, as you can do everything with your all-purpose foot, but I tried a few out on this project, and these were my favorites:

The quarter-inch foot is wonderful for making sure your seams stay a consistent quarter-inch and I loved the stitch-in-the-ditch foot for the quilting. I also tried the walking foot for the quilting, but this is such a small project, I didn’t feel the walking foot was needed and I loved how the stitch-in-the-ditch foot kept my stitching so straight!
How do I Make my Fabric Coasters a Perfect Circle
I have provided a circle template for this quilted fabric coaster project. (You will find the access link in the materials needed list – it’s the same file I used for my wine bottle gift bag pattern.)

Cut the template out and use it to cut out the fabric pieces (I prefer my rotary cutter for this.) When sewing, take your time, use your quarter inch foot to keep your stitches aligned with the circle edge. Also when ironing the project before topstitching, you can use your fingernail (or another flat object) to correct any pointy edges.
And as any sewing project, you will get better the more you make.
Recommended Sewing Supplies for this Fabric Coaster Project:
- 1/4 inch presser foot
- Stitch in the ditch foot
- Rotary Cutter and mat
- Ruler (here is a great set for quilting)
- Pins
- Fray Check
- Iron
Materials needed to make a set of easy quilted coasters:
Makes 1 DIY coaster:
- Fabric scraps (7 strips – 1.25 by 6 inches and 1 fabric piece at least 5 inches square)
- Quilt batting
- Basic Sewing supplies
- Circle template
How to Make a Quilted Coaster – Sewing Instructions
Step 1. Piecing your fabric scraps.
Save and print the circle template.
Choose your fabric scraps and press them with your iron. This will help when cutting and lining the fabrics.

Grab 2 strips and line them up, right sides together. (RST = right side together.) Use pins if needed.

Sew a seam right along the edge using a .25 inch seam allowance.

Grab a 3rd strip and repeat the above step.

Once you have sewn all the strips together, press the seams flat.

Step 2. Assembling the coaster.
Using the circle template, cut a circle from the pieced fabric, quilt batting, and the backing fabric.

Line up the batting and pieced fabric as shown below. Pin the two pieces together.

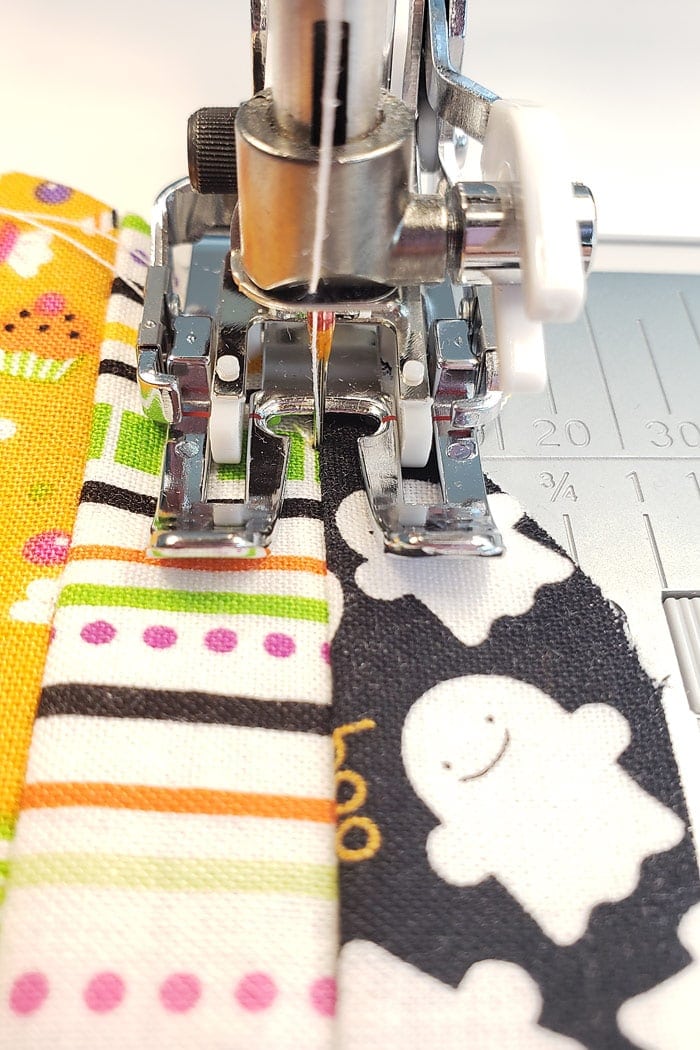
Quilt the 2 fabric coaster pieces together by sewing right along the seams of your fabric scraps. (This is called stitching in the ditch.) I used my walking foot on the 1st coaster but switched it my stitch in the ditch foot for the last 3. The stitch in the ditch foot (looks like this) made a huge difference in the ease of keeping a straight stitch!
Keep going until all seams are stitched.

Next, line the coaster backing fabric up with the quilted piece, RST.
Sew along the edge a 1/4 inch from the edge. Leave a 1.5 to 2-inch opening. Be sure to backstitch at the beginning and end to secure your stitches.

Flip the fabric coaster right side out through the opening you left.

Tuck the excess seam allowance in, you may have to work the fabric a bit to get the seam into a rounded shape.

Give the seem a good press and topstitch around the edge of the DIY Fabric Coaster about 1/8 inch from the edge.

Cut your strings and give them a dab with your fray check (optional.)

You are done, so cute!

DIY Fabric Coaster Variations
If you wanted to get fancy, there are a couple of variations on these quilted Fabric Coasters you could do.
- Instead of scraps, you could use solid fabric that matches your decor.
- Instead of stitching in the ditch, you could practice your free-motion quilting.
- Add fun trim or embellishments:

To add trim, just sandwich the trim in between the backing and quilting layer. I basted the trim in place and then just removed the basting stitch where it showed.
If you end up making some of these, be sure to share your finished project over on my facebook page or tag me on Instagram using #scatteredmompatterns.
Pin the Coaster Tutorial Here:

Don't miss any more posts!

Follow along on:
Feedly, Bloglovin', your favorite feed reader, or signing up via email and have new posts delivered to your email box each week!Print the DIY Fabric Coaster Tutorial here:
Easy Quilted Fabric Coaster Tutorial

Materials
- Fabric scraps (7 strips - 1.25 by 6 inches and 1 fabric piece at least 5 inches square)
- Quilt batting
- Basic Sewing supplies
- Circle template
Tools
- 1/4 inch presser foot
- Stitch in the ditch foot
- Rotary Cutting set
- Ruler
- Pins
- Fray Check
- Iron
Instructions
Step 1. Piecing your fabric scraps.
- Save and print circle template.
- Chose your fabric scraps and give them press with your iron. This will help when cutting and lining the fabrics up.
- Grab 2 strips and line them up, right sides together. (RST = right side together.) Use pins if needed.
- Sew a seam right along the edge using a .25 inch seam allowance.
- Grab a 3rd strip and repeat the above step.
- Once you have sewn all the strips together, press the seams flat.
Step 2. Assembling the coaster.
- Using the circle template, cut a circle from the pieced fabric, quilt batting and the backing fabric.
- Line up the batting and pieced fabric as shown below. Pin the two pieces together.
- Quilt the 2 pieces together by sewing right along the fabric seams. This is called stitching in the ditch. I used my walking foot on the 1st coaster but switched it my stitch in the ditch foot for the last 3. The stitch in the ditch foot (looks like this) made a huge difference in the ease of keeping a straight stitch!
- Keep going until all seams are stitched.
- Next, line the coaster backing fabric up with the quilted piece, RST.
- Sew along the edge a scant 3/8 inch from the edge. Leave a 1.5 to 2 inch opening. Be sure to backstich at the beginning and end to secure your stitches.
- Flip the coaster right side out through the opening you left.
- Tuck the excess seam allowance in, you may have to work the fabric a bit to get the seam into a rounded shape.
- Give the seem a good press and topstitch around the edge of the coaster about 1/8 inch from the edge.
- Cut your strings and give them a dab with your fray check (optional.)
- You are done, so cute!


