Boy’s Bow Tie Tutorial
Disclosure: This post may contain affiliate links. As an Amazon Associate, I earn from qualifying purchases.

Super Easy Boy’s Bow Tie Tutorial. You can easily make 2 sizes, either with a machine or sewing by hand!

Easy Boy’s Bow Tie Pattern and Tutorial
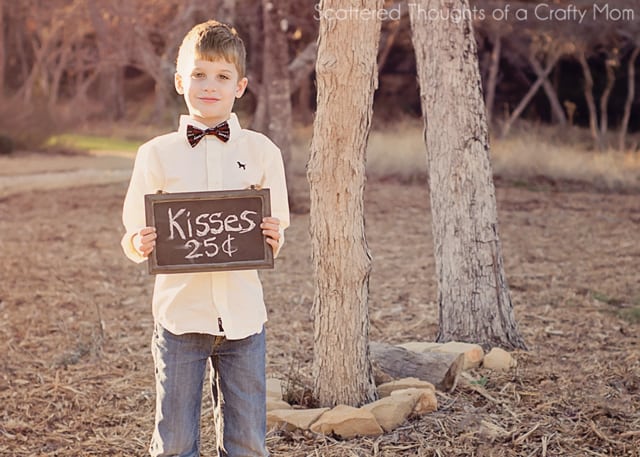
Last week, I made my daughter a knot dress for Valentine’s Day. I also wanted to make my son something to wear for his Valentine’s party. (He likes to dress in a “preppy” style- he’s only in 2nd grade, but he already knows what the little girls like!)
I asked him if he wanted to wear a bow tie to school on Valentine’s Day. I told him it would have Velcro on the back so it could be easily removed. He liked the idea, so I got to work…
The original version I made, was a little small in my opinion, so I remade it in a slightly larger version better suited for a 6 to 13 year old. (The smaller version is the one he wore in our Valentine’s day pictures, the main photo above is the larger version.)
I have included the measurements for both sizes for those who want to make a bow tie for a smaller child.
The great thing about this project is that it is simple enough to hand sew if you don’t have a sewing machine.
The instructions are exactly the same no matter how you make it, but a sewing machine will take this 40 minute project down to about 10 or
15 minutes…
Our Valentine’s Day Pictures really turned out cute!

If you are interested in making the knot dress in the pictures below, you can find the tutorial and a free printable pattern here: Knot Dress Tutorial.

How to Make an Easy Boy’s Bow Tie:
Materials:
- Scrap fabric (a fat quarter would be great)
- Ruler
- Scissors
- needle and thread (I also used a bit of glue, but glue is optional)
- Velcro
Instructions to sew the bow tie:
Step 1: Cut fabric for size needed according to list below:
Toddler size:
- Bow tie: 8.5 inches wide by 5.5 inches tall
- Center loop: 2 inches wide by 2.75 inches tall
- Neck band: 16 inches wide by 2 inches tall
Elementary age:
- Bow tie: 10.5 inches wide by 7.5 inches tall
- Center loop: 2 inches wide by 2.75 inches tall
- Neck Band: 18 inches wide by 2 inches tall
(Photo below includes cut dimensions for the larger size)

Step 2: Make the bow.
Fold the bow fabric in half, longways, right sides together and sew a seam along the edge:

Flip the fabric right side out, and move the seam to the middle, as shown. Use your fingers to “finger press” the sides flat.

Fold the bow fabric in half again, seam side out, and sew another seam along the edge:

Flip the bow fabric around again, so the seam is on the inside, and finger press the edges flat.

Find the middle of the bow fabric and scrunch it into a bow shape. Add a few stitches to the middle to hold the bow’s shape in place.

Step 3: Make the center loop.
Grab the loop fabric, fold in half longways, right sides together and sew a seam along the edge.

Flip the loop fabric right side out, moving the seam to the center and finger press the edges flat.
Fold in half again, seam side out, and sew along the edge. Flip the loop right side out, so the seam is on the inside.
Slip the bow through the loop, so the loop covers the center stitches.

Step 4: Make the strap.
Grab the neck tie strap, fold in half longways, right sides together and sew the seams marked in red below:

Flip the strap right side out and press flat with an iron.

Step 5: Put the bow tie all together.
Use a safety pin and thread the strap through the loop on the back of the bow. (It should be snug.)

Cut a your Velcro into about 3/4 to 1 inch pieces. You will want the scratchy side of the Velcro to face out.
Attach the scratchy Velcro piece to the strap on the side with the finished edge. You can hand or machine sew the Velcro in place. (I got lazy and used hot glue, it adheres very well if you don’t let it cool too much before attaching it to the fabric.)

Hold the bow tie in place and mark where to put the second piece of Velcro.

Fold the unfinished edge in where you marked it and sew along the edge to close the opening.

Attach the second piece of Velcro and you are done! Isn’t it cute?


Don't miss any more posts!


Yes, I agree. That would totally be helpful. the seam allowance is one quarter of an inch all the way around. I'll add it to the tutorial when I get home later today.
The one thing that would be helpful in this tuturorial is the size of the seam allowance. I ended up doing 1/2" for the long edge of the bow and a 1/4" for everything else.
I was also wondering about the seam allowance, how big is it?
Are both measurements given for boys or is the larger size for a man?
Great tutorial, thank you!
gorgeous and awesome! and so is the bow… 🙂 (is it early Prince William)?
Thanks for the tutorial. I've just finished 12 bow ties for Christmas gifts for the boys in my daughter's class!
Thanks! Great tutorial! Just made a bow tie for my 5 year old, and his favorite stuffie (by request.) I have a feeling everyone in our household is going to be extremely well dressed thanks to you.
So adorable! 🙂 I'm featuring YOU today over on my blog. Thanks for linking up to {wow me} wednesday. 🙂
Ginger
http://www.gingersnapcrafts.com/2013/02/10-ideas-tutorials-for-boys-featured.html
Hi Jamie,
Your boy looks adorable. Very cute bowtie.
I featured it here:
http://sewprettysewfree.blogspot.com/2013/02/bow-tie-tutorial.html
Thanks for linking up to Create & Inspire. Tonight we're featuring YOU! We hope you'll stop by! http://bit.ly/WWIAQH
xo,
Kimberly
So cute!! Thank you for sharing at Sharing Saturday!
Love this! Sharing it on my FB page!
Thanks for linking to Take-A-Look Tuesday over at Sugar Bee Crafts – you were featured today!
–Mandy, http://www.SugarBeeCrafts.com
visiting from Southern Lovely, love this tutorial! While I have no sons, I might have to try this for my yorkie 🙂
Yay, I love this and will bookmark it now! Now following!
Marium@DecorateVintage
When my son (3) saw your picture on the link up party he said, I need one of those. Thanks for writing a great tutorial so I can make him one. Bow ties are prefect for boy of all ages!
With Love,
~Scary, from The Shaffer Sisters
So cute! I've tried my hand at making bow ties before for a Halloween costume, but you've inspired me to make some for regular church use… My 14 month-old hates regular ties and tries to pull them off… Maybe he won't notice a bow tie as much. Thanks!
This is adorable What a great tutorial, and what adorable kids! And great pictures too! All in all: you are one amazingly talented lady! I will be back to visit your blog more often!
hugs x
Crystelle
http://www.crystelleboutique.com
Oh the cuteness. I want to make one for my nephew – he's almost 4. This would be so adorable on him. Thanks for sharing how to make it!! I'm excited to try out the tutorial.
Thank you, thank you, thank you. My 4 year old is obsessed with wearing a bow tie…can't wait to make these. Visiting from tatertots and jello
This is a great tutorial! I pinned it. My son loves bow ties and so does my nephew my sister will love this as well. Thanks!