Cherry and Cream Cheese Heart Pastry
Disclosure: This post may contain affiliate links. As an Amazon Associate, I earn from qualifying purchases.
Cherries and cream cheese are one of my favorite dessert combinations. Combine the two with pie crust and a heart-shaped cookie cutter, and you get a sweet little Cherry and Cream Cheese Heart Pastry.
It is perfect as a Valentine’s Day Treat for someone you love!

💌 Save this article
Cherry and Cream Cheese Heart Pastry
This dessert recipe is so yummy! It reminds me of a cherry danish but without all the fuss.
I created the individual Cherry Pastries using a store-bought pie crust, making it so much easier to cut shapes and perfect for a Valentine’s Day Dessert.
These were fairly easy to put together, I think you will love them too!
Ingredients + tips
For the Pastry
- 1 to 2 pkgs refrigerated pie crust | Depending on how many you want to make, you could always make your own pie crust.
- 1 pkg. cream cheese | 8 oz package, softened to room temp for easier blending.
- Powdered sugar
- One egg
- Vanilla extract | Almond extract works too.
- Cherry pie filling | A cherry jam works well too. (or even a homemade strawberry jam)
For the Glaze
- Powdered sugar
- Milk
Tools needed
- Large heart cookie cutter
- Small heart cookie cutter | Optional to do the heart cutout on top of the pastry.
- Parchment paper
- Rolling pin
How to make the Cherry and Cream Cheese Heart Pastries
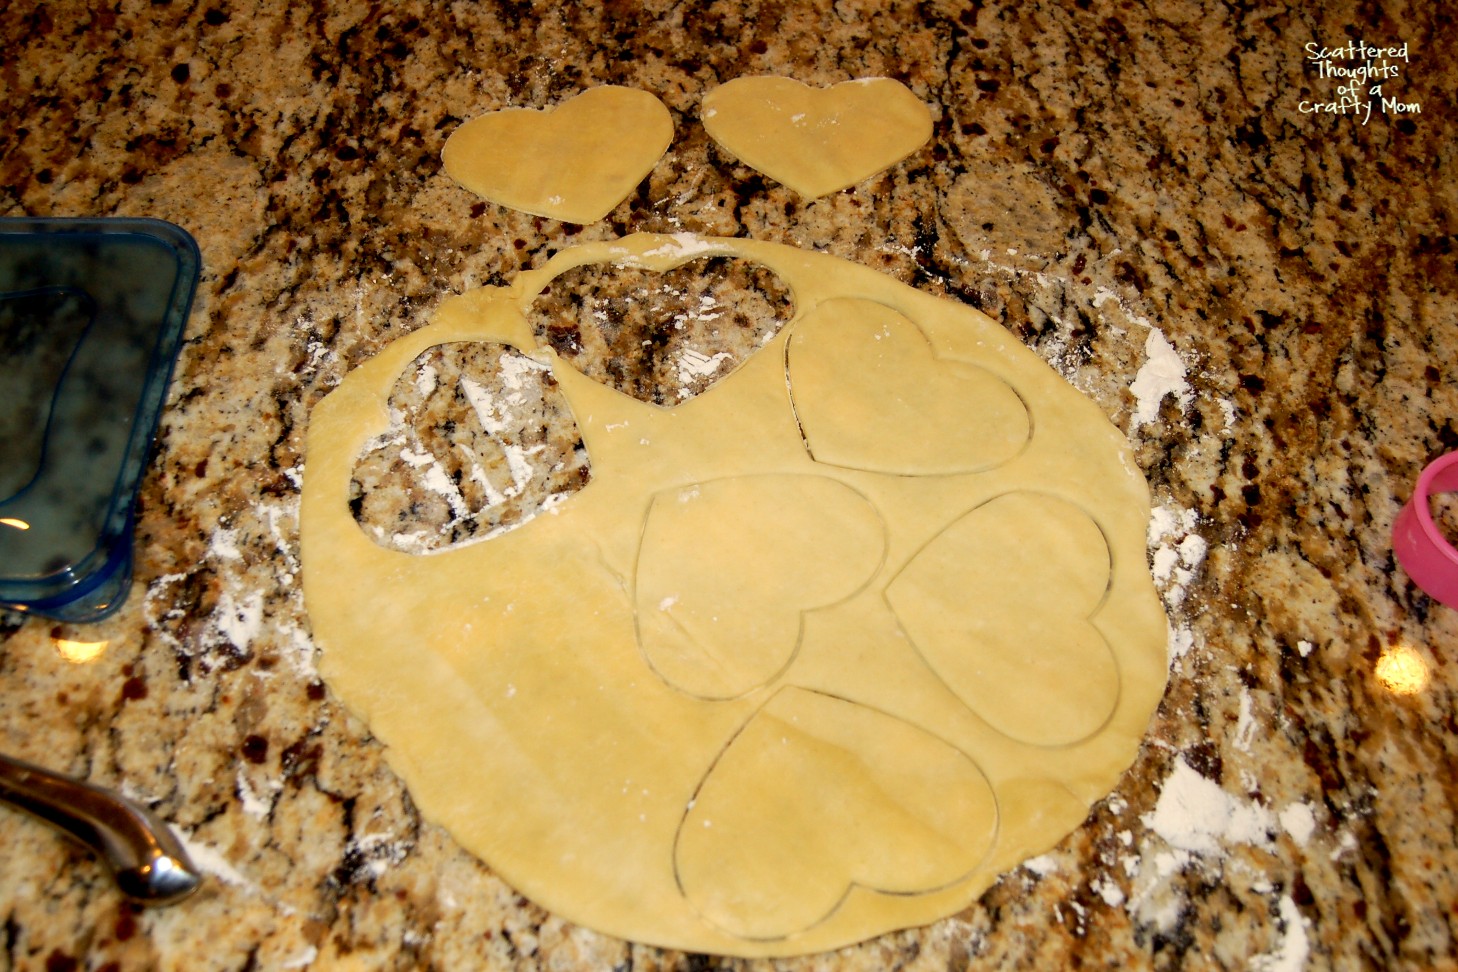
1 Prep: Cover the cookie sheet with parchment paper and preheat the oven to 400 degrees. Roll out two sheets of pie crust and cut out large hearts with the cookie cutter.
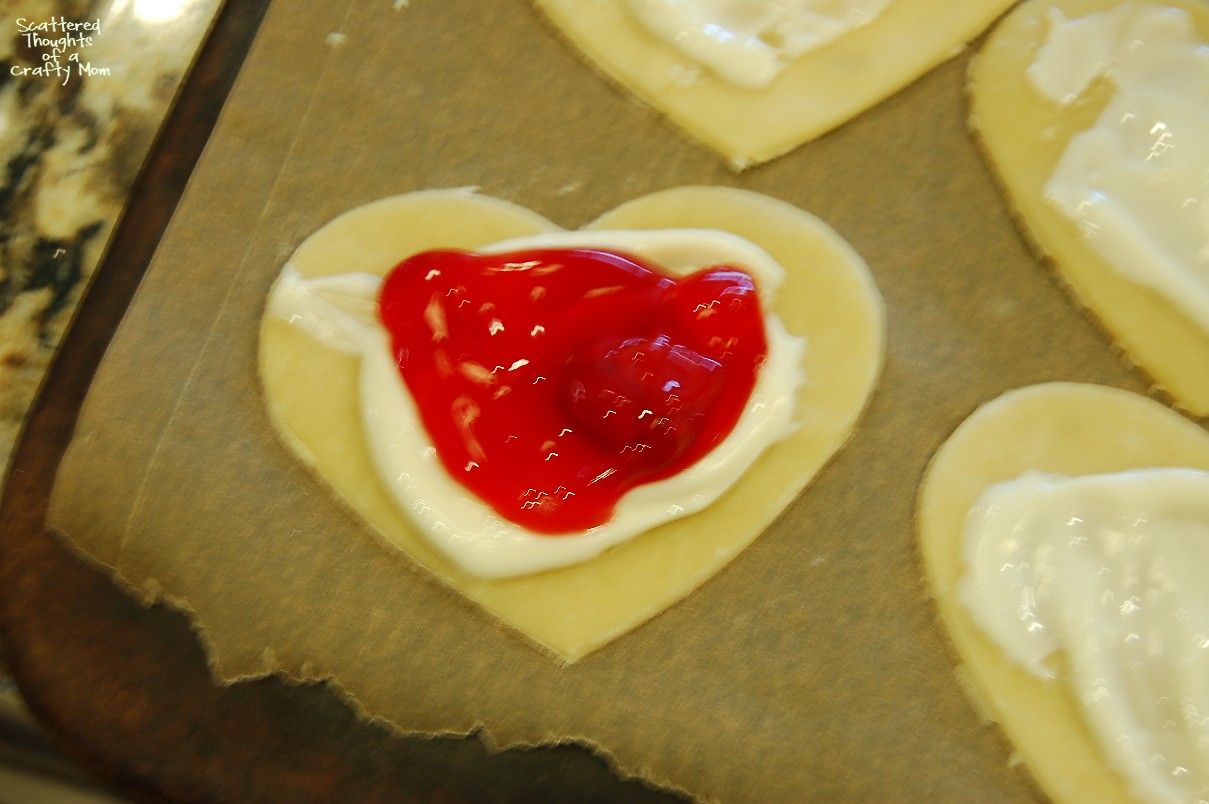
2 Make the Filling: In a large bowl, combine cream cheese, 1/4 cup of sugar, egg, and vanilla ad or almond extract ( I used both). Set aside half of the heart cutouts for the top layer. Spread the cream cheese mixture over the bottom layers of the pie crust hearts to 1/2 inch of the edge.

3 Add the pie filling: Next, top the cream cheese mixture with a tablespoon or two of the pie filling.
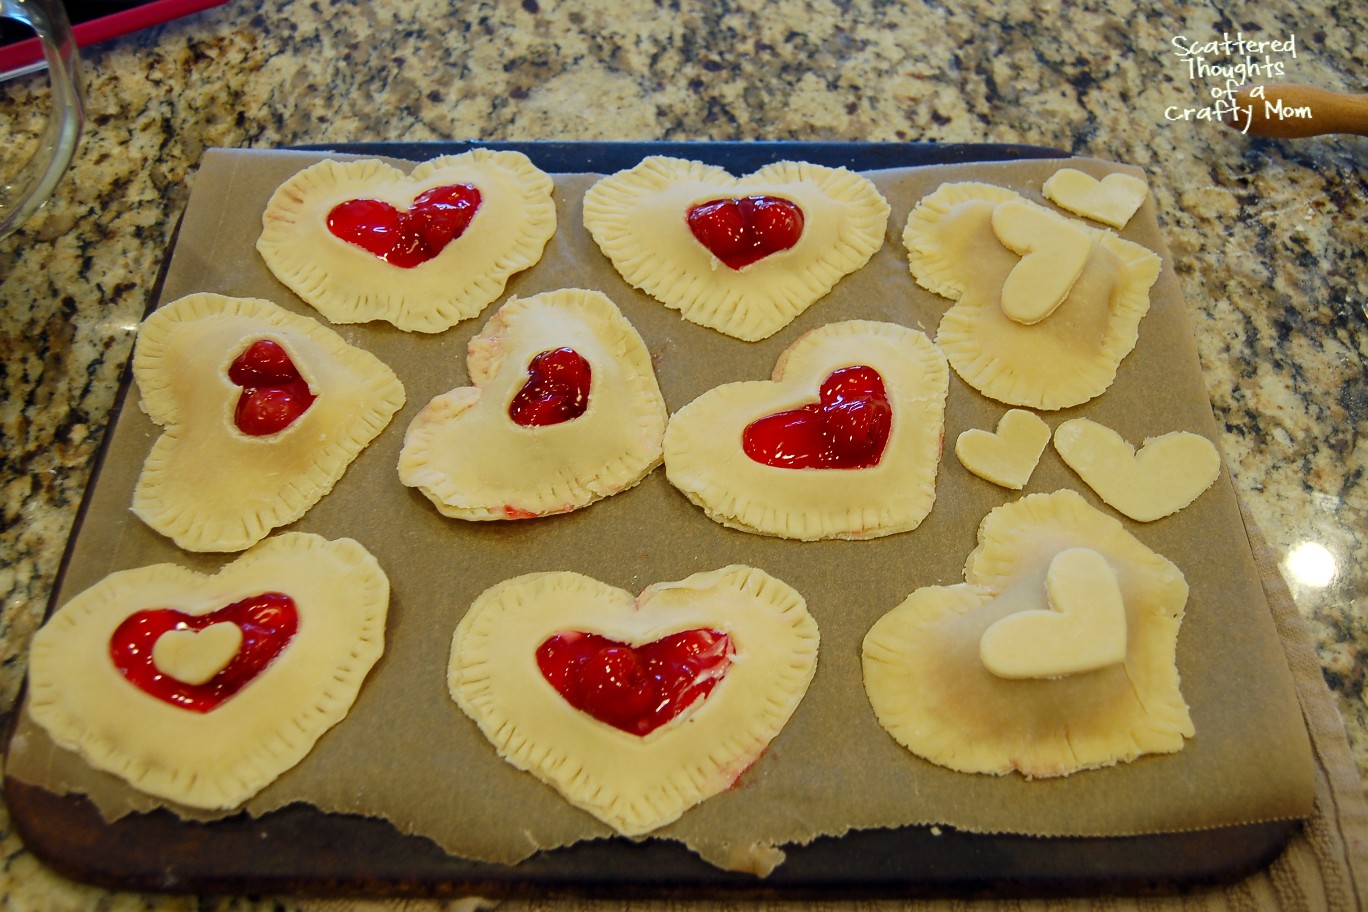
4 Add the pastry top: With a rolling pin, lightly roll out the rest of the pie crust hearts so they are slightly bigger than the bottom ones. (They need to be a bit larger to fit over the toppings.) If you have a smaller heart cookie cutter, you could cut out the middle so the cherries will show through.

Lay the top piece of pie crust over the bottom pie crust and filling so it looks like this:

Using your fingers, press the edges together. Go around the edges again with a fork for an extra strong seal.

5 Bake: Bake at 400 degrees for 20 to 25 minutes, or until the pie crust is golden brown. Let cool for about 20 minutes.
6 Make the glaze: While cooling, mix the glaze. Combine 1/2 cup of powdered sugar and 2 to 33 teaspoons of milk until smooth. If the glaze seems too thick, add a smidge more milk. If to thin, add a bit more powdered sugar. Drizzle the glaze over the heart pastries.
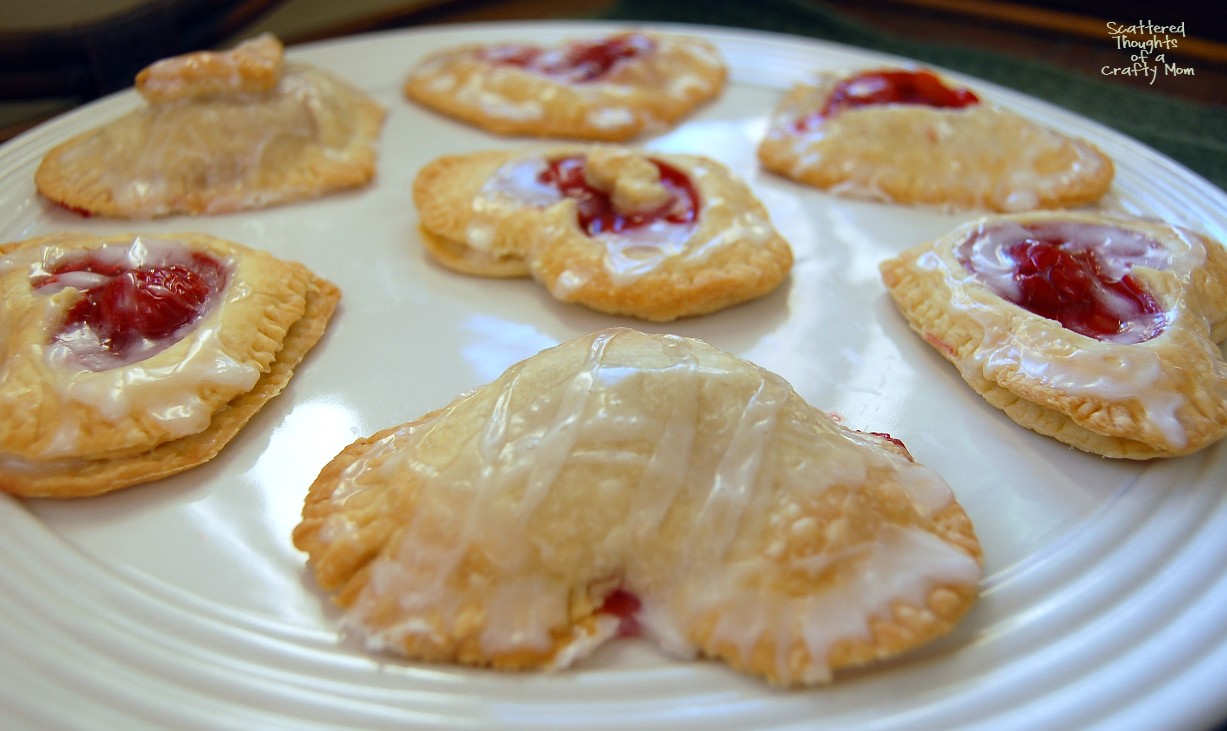
Enjoy!
Storage Suggestions:
These pastries are best eaten the day you make them, but you can place your leftovers in an airtight container in the refrigerator for 3-5 days. The pastry crust will most likely lose its crispness, but you can reheat them in the air fryer or oven to help re-crisp the pastry.
Variations
- No need to make a heart shape if you don’t have a cookie cutter. Squares or rectangles work great. (See my Homemade Blueberry Pop Tart Recipe – They are very similar.)
- Use puff pastry instead of pie crust.
- Use a different pie filling or jam.
- Sprinkle the top with toasted pecans or slivered almonds.

Did you make these cherry and Cream Cheese pastries?
Please leave a star ⭐️⭐️⭐️⭐️⭐️ rating and/or a review in the comments section below. If you share an image on Instagram or Facebook, be sure to tag me and use #scatteredmomrecipes!
Print
Cherry and Cream Cheese Heart Pastry
- Prep Time: 10 min
- Cook Time: 20 min
- Total Time: 30 minutes
- Category: desserts
- Method: oven
Description
Combine cherries, cream cheese with pie crust, and a heart-shaped cookie cutter, and you get a sweet little Cherry and Cream Cheese Heart Pastry.
Ingredients
For the pastry
- 1 to 2 pkgs refrigerated pie crust (depending on how many you want to make)
- 1 pkg. cream cheese softened
- 1/4 cup powdered sugar
- 1 egg
- 1/2 tsp. vanilla or almond extract
- 1 can cherry pie filling
Glaze
- ½ cup powdered sugar
- 2–3 tsp. milk
💌 Save this article
Instructions
- Cover the cookie sheet with a piece of parchment paper and preheat the oven to 400 degrees. Roll out two sheets of pie crust and cut out large hearts with the cookie cutter.
- In a large bowl, combine cream cheese, 1/4 cup sugar, egg, and vanilla or almond extract ( I used both). Set aside half of the heart cutouts for the top layer.
- Spread the cream cheese mixture over the bottom layers of the pie crust hearts to 1/2 inch of the edge.
- Next, top the cream cheese mixture with a tablespoon or two of the pie filling.
- With a rolling pin, lightly roll out the rest of the pie crust hearts, so they are slightly bigger than the bottom ones. (They need to be bigger to fit over the toppings.) If you have a smaller heart cookie cutter, you could cut out the middle so the cherries will show through.
- Lay the top piece of pie crust over the bottom pie crust layer and filling.
- Using your fingers, press the edges together. Go around the edges again with a fork for an extra strong seal.
- Bake at 400 degrees for 20 to 25 minutes or untill the pie crust has turned a pretty golden brown.
- Let cool for about 20 minutes.
- While cooling, mix the glaze. Combine 1/2 cup of powdered sugar and 2 tablespoons of milk until smooth. If the glaze seems to thick, add another tablespoon of milk.
- Drizzle the glaze over the heart pastries.
Don't miss any more posts!


Your recipe ingredient list for the glaze has 2-3 tsp. of milk and your instructions have 2 tablespoons. Just thought I would draw this to your attention.
Thank you for this charming recipe.
Ohhh! Those look super yummy! and so festive too. Thanks for sharing at Terrific Tuesdays.
Rachel
Mmmm, I want one now!! Lovely!
Ok! Deep breath…giving these a go tonight! So not great in the kitchen so wish me luck! *LOL*
Oh my…. I'm drooling 😉 Those look SO tasty! Thanks for sharing 🙂
These are ummmm…the cutest things on the planet like, ever. LOVE!
These came out so good! I looove these.
Great valentines cooking ! The hearts look adorable and yummy!
Oh how wonderful! Thank you for posting. I so want to make this for my family on Tuesday and you made it look…easy enough for this non-kitchen savvy mama to do so! Great tutorial!