The Boho-Maxi Dress Tutorial and Pattern
Disclosure: This post may contain affiliate links. As an Amazon Associate, I earn from qualifying purchases.
Summer’s almost here! Use this free Boho Maxi Dress Pattern and tutorial to make your daughter a maxi dress she will love.

💌 Save this article
Boho Maxi Dress for Girls
My little missy has been requesting a maxi dress for a while. Of course, she doesn’t call it a maxi dress, she just says she wants a dress “down to here” and points to her ankles.
I came across this gorgeous tie-dyed paisley cotton fabric a few weeks ago at Hancock Fabrics and knew it would make a perfect summer maxi dress. (So perfect, that I am thinking about picking up a few more yards and making myself one, lol.)
Update: Hancock Fabrics is now out of business, but Fabric.com has an incredible selection of batik fabric, here ==> Batik Fabric

The design of this maxi dress is very simple and you should be able to make it in just a few hours.

Boho Maxi Dress Details
The Boho Maxi Dress Pattern is a very simple design that consists of a lined bodice with halter neck straps and an open, elasticized back.
The skirt has one long tier and a shorter “ruffle tier”. I had originally intended to do a three-tiered skirt, but I’m glad I went with only 2 tiers for the final design. Saves a lot of time and makes for a much simpler construction.
PLEASE NOTE, the Girls Maxi Dress Pattern is currently only for the bodice only in sizes 3/4, 5/6 and 7/8 . You will need your own measurements to create a skirt in the appropriate length. The tutorial also includes instructions to create different sizes.
(Looking for more free patterns? Be sure to check out my free patterns and tutorials page here.)

Girl’s Love Maxi Dresses!
I finished the dress right before she got home from school and immediately had her try it on. I took her to see how she looked in my full-length mirror. Oh my, what a reaction! She was in love and immediately started blowing kisses to herself in the mirror.

The first thing my missy asked me, could she take the dress to Port Aransas this weekend? (Port Aransas is a barrier island off the coast of Texas and she has a planned trip there to visit her Nana, Papa, and cousins…)
She then asked if she could wear the dress to the beach, I told her I didn’t think it was a very good dress for the beach, it was so long, she would get it wet and sandy. She followed up with, “what if she took it off when she got there and folded it up nicely?” I said that would be ok.
(I’m not too worried though, I doubt Nana will let her wear the dress down to the beach… haha.)

Ready to make a version of this Boho Maxi Dress for your Little Miss?
Visit my Shop (here) and add the free maxi dress pattern to your cart and check out. Keep reading for sewing Instructions.
In this tutorial, I have included a pattern for the Maxi Dress Bodice in sizes 3/4, 5/6 and 7/8, but you will need to measure your child so you can adjust the length of the dress to what works for you… (If you need a different size dress, I will show you how easy it is to make your own bodice pattern for this maxi dress in step 1.)
Boho Maxi Dress Pattern Tips
When printing the pattern, first download the pattern to your pc, then open in adobe reader choose auto/landscape, and print at actual size.)
Seam allowances are included and are .25 inches unless otherwise specified.
The Boho Maxi Dress Tutorial:
Materials needed:
- 2 yards of fabric (sizes 8 and under) (If your fabric has a pattern repeat that can’t turn sideways, you will need an additional 3/4 yard of fabric)
- 12-inch piece of 3/4 inch elastic
- pattern (or a well-fitting tee to make your own) (Do not print directly from the google pdf reader. For the pattern to print properly, you must download it to your pc and print from adobe reader.)
- measuring tape, rulers, iron and other basic sewing supplies
Products used and recommended in this Girl’s Dress project:
- My favorite fabric shops are: Etsy, Funkalicious Fabrics, Fabric.com and Girl Charlee.
- My Sewing Machine: SINGER 9960 Quantum Stylist, my coverstitch: Janome Cover Pro 1000cpx
- My Serger: Brother 1034D 3 or 4 Thread Serger or you can just use Pinking Shears
- Rotary Cutter
- I love my large ruler and large cutting mat, but you may prefer to start of with a smaller Cutting set
- Dritz Dual Purpose Marking Pen and Fray Check
- Cordless Iron
- Interfacing
- Wonder clips (I didn’t use these in the post, but they are just awesome!
Pattern info: Seam allowances are 1/4 inch unless otherwise stated.
Step 1: Print (or create) the Bodice Pattern
Print the front/back bodice pattern and cut out the size needed.
*Size you need not available? (Follow the directions below to make your own – click the images to make them bigger.)

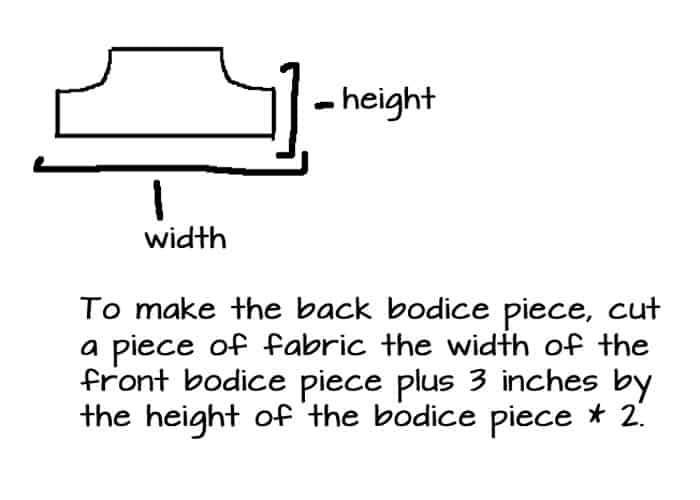
Lay your bodice pattern on the fold of your fabric and cut out the front bodice piece, bodice lining and back bodice piece.
Step 2: Get measurements and cut out the rest of the maxi dress pieces.
Hold the front bodice piece up to your child and measure from the bottom of the fabric to where you want the skirt to end.

(Our measurement was 28.)
The top tier should be approximately two times as tall at the bottom tier. Take your measurement and divide by 3. That number is your bottom tier and double it to get the top tier. (Technically this would make my tiers 18.6 and 9.3, but I just rounded the number to 19 and 9 – just make sure when they are added together it equals your original measurements.)
To accommodate seam allowances and hem, add 1/2 inch to the height of the top tier and 3/4 inch to the bottom tier.
Cut these pieces for the skirt:
Top tier: your height measurement (height) by 45 inches (width).
Bottom tier: your height measurement (height by 67 (width) inches.
If the pattern repeat on your fabric can be cut in any direction, you can cut the tiers in 1 piece. If not, you will need to cut the tiers in 2 pieces. (22.75 wide for the top tier and 33.75 for the bottom tier.) Tip: For sizes larger than a girls size 12, I recommend adding at least 10 inches to the width of each tier.
Straps: Cut two strips, 3 inches wide by 20 inches long.
You will have:

Step 3: Assembling the bodice.
Right sides together fold the strap piece in half and sew down the long side and one short side. Turn the strap right side out and press flat.

Layout the front bodice piece right side up. Measure over 3/8 inch from the arm edge and pin the straps in place as shown below.

Place the bodice lining on top, right side down, pinning in place. Sew along the top and as shown below.

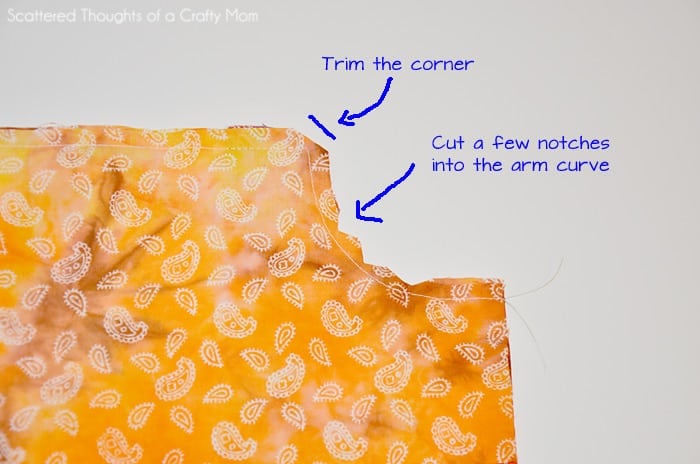
Trim the corner and clip a few notches in the arm curve on both sides.
Turn the bodice front right side out and press.

Reopen the bodice. Iron both side edges over, 1/4 inch.

To make the casing on the back bottom piece, fold the fabric in half right side facing out, and iron flat. Mark 3/8 inch from the top and draw a line side to side. Make another mark 1 inch down from the 1st mark and draw a 2nd line. Sew along these lines.

Use a safety pin and thread the elastic through the casing. Pin the elastic in place on both sides, but sew it in place on one side only.

Open the front bodice piece and fold over the side of the back bodice piece and sew along the edge. as shown below.

To determine how long the elastic piece needs to be, try the bodice piece on your daughter.
Adjust the elastic and casing so you have a snug fit around her chest. (You can also just guesstimate based on her chest measurement and subtract 3/4 inch.) Pin the other side of the bodice in place, trimming off any excess elastic. Sew along the edge where the two pieces meet up. (Like you did on the other side.)
Step 4: Attaching the skirt.
Fold the two skirt/tiers right sides together and sew along the sides. Finish these seams with pinking shears, zigzag on the sewing machine or serger.
Sew a basting stitch along the top edge of the top tier and gather it up so it is the same width as the bottom of the bodice. (Width of the bodice stretched out.) (If you would like to see a more in-depth description of gathering and attaching a skirt, visit my sweet spring sundress tutorial.)
Right sides together, pin the skirt/top tier to the bodice.

Sew along the pinned edge using a 1/4 inch seam allowance.

Gather the bottom tier until it is the same width as the top tier and right sides together, pin the top tier to the bottom tier and sew together.
Finish the edges of these seams with pinking shears, zigzag on the sewing machine or serger.
Press the seams of the tiers flat, with the finished edges facing up. You can choose to topstitch along the top and bottom tier if you want, though I skipped this step…
Before hemming the bottom, it would be a good idea to have your little one try the dress on again and confirm the length. (Make any adjustments as needed.) Hem the bottom edge by folding over 1/4 inch, press and fold over another 1/4 inch. Press again and sew along the edge.
You’re done! Now have your little princess try on the dress and take a few pictures… Be sure to come back and show off your creations on my facebook page or tag me on Instagram using the #scatteredmompatters.

Easy Girls Sewing Projects you might like:
Here are a few more tutorials you may enjoy (plus you can find a lot more tutorials and patterns in the dropdown menu bar at the top of the page.)
|
|
|
|
|


Don't miss any more posts!

Follow along on:
Feedly, Bloglovin', your favorite feed reader, or signing up via email and have new posts delivered to your email box each week!

Can you redo the “make it bigger” pictures? They won’t get bigger on click and they’re too fuzzy to read as they are too small. Looks like a great pattern, looking forward to making it….
Sorry about that, a setting had gotten changed a while back and I did not realize it affected these images. Should be good now.
Wow! The dress looks amazing! I’d like to make one for my daughter, but I need a bigger size. I know you’ve explained how to do it at step one, but the images are so small and I can’t click on them to make them bigger… So I can’t read what’s written on them. Is it possible to get the images in bigger size? It’s the first time I do this. I don’t have so much experience in sewing.
Thanks again. I can’t wait to make this dress!!!
Thank you so much for the wonderful pattern and tutorial! I hadn’t sewn anything in years and quarantine had me itching to make something. My daughter has been requesting a long dress and I used left over fabric from her nursery (she’s now 5). It turned out perfect and she loves it!!
Hey,I love this pattern.I am new to making this type dress though.The straps on top,,are those also fastened on the back or do you tie them in place every time she puts the dress on?
I tie them every time she wears the dress.
I loveeee this maxi! How adorable it is! Thank you for sharing! That pattern is absolutely beautiful! Gonna find a boho fabric to sew this dress for my kids.
And the photos are very gorgeous, Your little lady is so cute, “a dress “down to here”” aww <3
Thank you, thank you! This pattern is simply amazing! My daughter fell in love with the material, but the link provided isn’t working. Can you update the link by chance?
Again, thank you!
-Nikki
That fabric came from Hancock Fabrics, which is now out of business. You can find all sorts of beautiful batik prints here ==>> Batik Fabric on Etsy and Fabric.com