Flounced Ruffle Capri Legging Pattern (includes full-length legging, flounced capri, and shorts)
Disclosure: This post may contain affiliate links. As an Amazon Associate, I earn from qualifying purchases.
I have a new pattern for you today! It’s the Free Girl’s flounced ruffle capri legging pattern. (Are you Looking for the Basic Full Legging, capri, and shortie pattern? I moved it here.)

💌 Save this article
It’s only taken about a year since I promised it, but I’ve finally gotten around to updating my flounced capri pattern that I posted almost two years ago. (The original legging pattern was only in 2 sizes and had inner and outer side seams.)
Flounce Capri Pattern info
- This new version of the pattern comes in girl’s sizes 3 to 8
- Capri pattern has only one seam (inner side seam)
- The pattern has cut marks for shorts, full-length leggings, and capri-length
- The flounce option is only sized for the capri length.
- If you need a different size or want to add a flounce to the shorts or full-length version, be sure to check out the original tutorial. It details how to make a legging pattern and flounce pattern for any size.

Recommended Fabric for Leggings
- Fabric with 4-way stretch. 2-way stretch will not work, as you need the fabric to stretch in all directions for leggings.
- Fabric with a bit of lycra, spandex or elastane content. (helps with recovery) You really don’t want to use 100% cotton on any leggings (except maybe leggings for pajamas) because the knees will stretch out and not go back to the original shape until washing.
- Enough thickness to not be see-through.
- Brushed Poly Spandex Knit
- nylon spandex,
- cotton spandex
- bamboo jersey

The fabric I used for these leggings actually came from a maxi dress I found on the clearance rack at Ross for $5. I originally planned to upcycle it into a maxi dress for my missy, but decided it would be cuter as a pair of summer capris.
Can I just say how much I love flounced ruffles? (and pink)
Sadly, my missy has recently informed me that her new favorite colors are blue and purple, so I guess be prepared for more blue and purple and less pink… sniff, sniff. (See my flounced sleeve peasant dress here.)

The fit on the leggings is slightly looser than my basic legging pattern.
Pin this project for later.
Ready to Sew a Pair of Flounce Leggings?
Grab the pattern here.
Pattern info and tips:
- Use a 1/4-inch seam allowance unless otherwise stated. Download and save the pattern to your computer, open it with Adobe Reader, turn off all scaling, choose auto-rotate, and print. (I can’t guarantee printing accuracy unless you use their free Adobe reader.)
- Since you are sewing on a knit, if not using a serger, I recommend increasing the stitch length by a setting or two when using a straight stitch.
- Use a Ball-point needle and a skinny zig-zag or other stretch stitch on seams that need to stretch.
- The flounce is only sized to fit the capri length. If you want to add a flounce to the other sizes, it not very hard to make your own flounce pattern. Just refer to the original tutorial here, as it includes instructions on how to add a flounce to any size.
- Make sure your fabric has at least a 50% stretch. Otherwise, your child might not be able to pull them on. (ask me how I know that, lol)
- I added a 1/2 inch hem allowance for the full length legging and shorts. I suggest trying the shorts/leggings on before hemming. (you can leave your knits un-hemmed if you wish, you may need to trim the length… )
Products used and recommended in this post:
- My favorite fabric shop for knits: Funkalicious Fabrics, fabric.com and Girl Charlee.
- My Sewing Machine: SINGER 9960 Quantum Stylist, my coverstitch: Janome Cover Pro 1000cpx
- My Serger: Brother 1034D 3 or 4 Thread Serger or you can just use Pinking Shears
- Rotary Cutter
- I love my large ruler and large cutting mat, but you may prefer to start of with a smaller Cutting set
- Dritz Dual Purpose Marking Pen and Fray Check
- Ball Point needles
- Singer walking foot or universal walking foot
- Wonder clips (I didn’t use these in the post, but they are just awesome!
Fit Chart
- Size Height Weight (these are approximate)
- 3t: 36 inches 32
- 4: 39 inches 36
- 5: 42 inches 42
- 6: 47 inches 48
- 7: 51 inches 60
- 8: 53 inches 66
Free Girl’s Legging pattern & Flounced Ruffle Capri Tutorial
Materials needed
- Depending on size and length, you will need up to 1 yard of stretchy knit fabric
- pattern
- 1 inch or 3/4-inch elastic
- ball point/stretch needle
Step 1. Assembling pattern and cutting out pattern pieces.
Trim the pattern pieces around the gray boxes and line up the A, B, C, and D dots. Tape the pattern together and cut out the size needed. (I cut out the longest length needed and folded the pattern up to the capri length, so I can reuse the pattern later.)
*The legging length is based on standard generic child measurements. If your child is shorter or taller than average, I recommend comparing the pattern length to a pair of leggings/capri’s/shorts that you know is a good length.
If you are adding the flounce to the capri’s, cut out 4 flounce pieces w/ the flounce pattern. If you are not adding the flounce to the capri, trim 2 inches off the length for sizes 6, 7 and 8 and 1.5 from the 3, 4 or 5.
Fold the fabric in half, with the stretch running side to side, and cut out two pattern pieces.

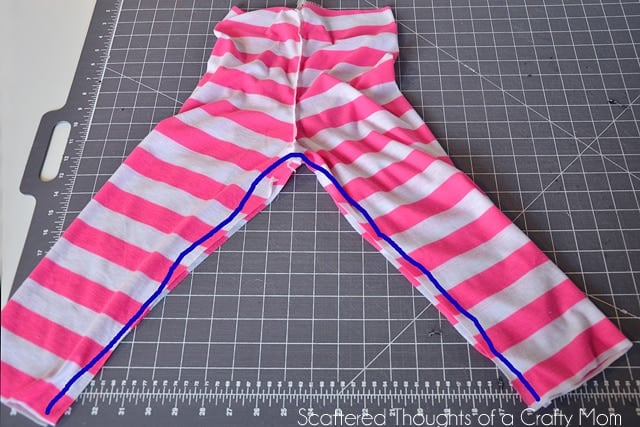
Step two: Sewing the leggings.
Line up the two fabric pieces, right sides together and sew (or serge) the front and back together as shown below, using a 1/4 inch seam allowance.

Flip the leggings around so the front and back seams and leg seams line up. Sew along the leg seams using a 3/8 seam allowance. (shown below, and yes, 3/8 is correct)
Step 3: Sew the Flounce
Line up two of the flounce pieces, right sides together, and sew them together using a 3/8-inch seam allowance. Repeat for the second flounce.

Step 4: Attach the Flounce
With the right sides together, line up the inner flounce edge with the bottom of the leggings and attach with a 3/8-inch seam allowance. Repeat on the other leg. If you have a stretch stitch on your machine, you may want to use it here. (I used the one that looks like a lightning bolt.)

Step 5: Add Elastic
Cut a piece of 1 inch elastic to your child’s waist measurement plus one inch. Overlap the edges of the elastic (1/2 inch on each side) and sew together with a tight zig-zag. Trim excess elastic.
If you don’t have a child to measure, you can use these standard measurements: 3: 20.5 4: 21 5: 21.5 6: 22 7: 22.5 8: 23

Divide the elastic circle and legging waistband into quarters and mark with a pin or fabric marker. Line up the marks and pin them together, lining the elastic about 3/8 inch below the edge of the fabric. (Sorry to switch fabrics on you. I didn’t like the original photos, and she wore her capris to school today.)

Attach the elastic to the legging using a long, wide zig-zag stitch. Sew from pin to pin, stretching the elastic to the width of the legging as you go.

Fold the elastic over and pin it in place. Using a zig-zag or stretch stitch, sew right along the edge of the elastic. (but not on the elastic.)

Trim any excess fabric and don’t forget to add a tag!

You are done!
Save this pattern by pinning here ==> 

Share Your Finished Play Shorts In My Facebook Group!
If you make these leggings, be sure to tag me on Instagram, using #scatteredmompatterns! You can also share an image to my private Facebook sewing group!
Don't miss any more posts!


%20Free!%20Comes%20in%20sizes%203%20to%208.)
Love this pattern!!! I followed your instructions exactly for the first pair I made, and then I did a little modification that I LOVE for the 2nd pair! I shortened the waist rise and added a soft semi yoga style waist band instead. That allowed me to color block and I love that kind of waist band! lol The flounces I also changed a bit the 2nd go around. I took the flounce pattern and made 2 flounces: one flounce, I took the outer edge out by 1/2 inch all the way around, the other flounce I brought it in by 1/2 inch. That left me with 2 flounces with about an inch difference in length and I love how it looks that way! I’m definitely going to make some shorts with this pattern too! Thank you again sooo much!!
Trying to work out the printing of this pattern. Don't have adobe reader so I'm using the PDF program I have. When I remove the formatting does the whole pattern fill the page or is it not quite to the edges? Thanks!
Hi, the pages are 7.5 by 10, so if you are printing on an 8.5 by 11 sheet of paper, the gray box will not fill the page.
Looks like this: page
Oh great! Thanks, that's what mine looked like. Just wanted to make sure. So excited to make these pants.
The stretch should run side to side.