Easy Mummy Ice Cream Treats
Disclosure: This post may contain affiliate links. As an Amazon Associate, I earn from qualifying purchases.
These Easy Mummy Ice Cream Treats are fun to make and are the perfect quick treat for Halloween! Thank you to Unilever Ice Cream for providing me with these delicious Klondike® Bars and sponsoring this post – the opinions and text are all mine.

We are friends with another family with two children almost the exact same age as ours. We have frequent sleepovers and playdates with all four kids at once because they get along so well.
A bonus of having nearby friends with similarly aged children is that we can send our both our kids to each other’s houses for a sleepover, giving us a kid-free night out and a peaceful morning.
Our friends had plans last weekend so we had a sleepover with everyone at our house. My daughter was soo excited and really wanted to go all out and make everything extra special since we are all about Halloween right now.
Our outdoor Halloween decor is already out, but I wasn’t up for any extreme celebrating. We compromised on a little DIY pumpkin decorating, (with stickers) a few kid-friendly Halloween Games, take-out pizza for dinner and these Easy Mummy Ice Cream Treats for dessert.

One of our favorite go-to, easy desserts are Klondike® Bars – we almost always have a package or two of these hidden in the freezer for a quick dessert option!

Since these Ice Cream treats melt quickly, My missy and I decorated them the night before and put them back in the freezer to re-harden.
Pro Tip:
For these frozen Ice Cream Mummies, you do have to work fast. I recommend decorating only two at a time and most important, practice your technique on a sheet of wax paper first!
They really are easy to make! (and so much fun to eat!)
Easy Mummy Ice Cream Treats
You need:
- Ice cream Bar or sandwich of choice
- White icing
- Candy eyes
- Flat piping tip
- Plastic sandwich bag
- Wax paper
How to Make the Mummy Ice Cream Treats
Step 1:
Snip corner of plastic baggie or piping bag and slip decorating tip into the bag. Fill with icing.
Step 2:
Add a small dab of frosting to the bar for the eyes and a bigger dab for the nose. (The dab for the nose will create a “nose like” bump under the mummy wrapping.)
Press the candy eyes into place.

Step 3:
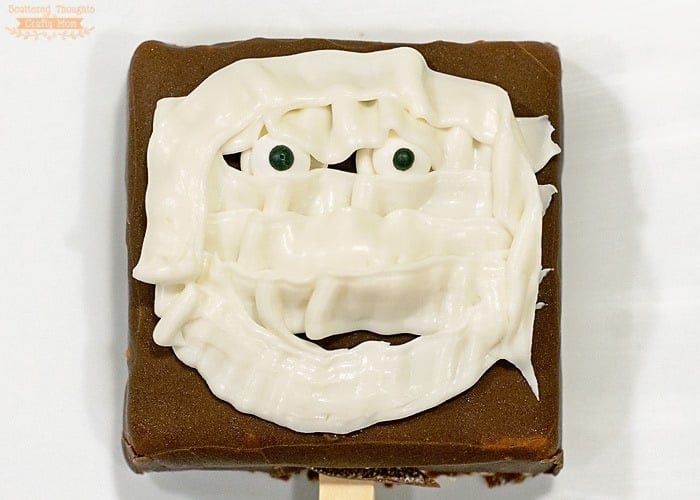
Start by piping the frosting over and under the eyes, overlapping the top and bottom of the eyes for the “mummy” look.

Keep going over the nose and leave a bit of the Ice Cream Bar showing as the mouth.

Pretty up the edges, with one more line of the frosting around the face.
You are done! Aren’t they cute? Return the bars to the freezer until ready to serve.
These were the cutest (and yummiest) Ice cream treats ever!!!
Other Fun Halloween Themed Goodies to Make:
- Easy Monster Cupcakes for Halloween
- Witch Hat Cookies
- “Killer” Pumpkin Banana Cookies
- Easy Graveyard Pudding Cups
- Halloween Oreo Rice Krispie Treats
- Spooky Monster Eyes Deviled Eggs

Easy Mummy Ice Cream Treats
- Prep Time: 5 minutes
- Total Time: 2 hours (includes chilling time)
- Yield: as many as you want to make
Description
These Easy Mummy Ice Cream Treats are fun to make and are the perfect quick treat for Halloween!
Ingredients
- Ice Cream Bar or Sandwich of Choice
- White icing
- Candy eyes
Tools needed:
- Flat piping tip
- Plastic sandwich bag
- Wax paper
💌 Save this article
Instructions
- Snip corner of plastic baggie or piping bag and slip decorating tip into the bag. Fill with icing.
- Add a small dab of frosting to the bar for the eyes and a bigger dab for the nose. (The dab for the nose will create a “nose like” bump under the mummy wrapping.)
- Press the candy eyes into place.
- Pipe the frosting over and under the eyes, overlapping the top and bottom of the eyes for the “mummy” look.
- Keep going over the nose and leave a bit of the Ice Cream Bar showing as the mouth.
- If needed, pretty up the edges by adding one more line of the frosting around the face.
- Return the bars to the freezer until ready to serve.
Nutrition
- Serving Size: 1 mummy

I didn’t think Klondike bars could possibly get any better, but adding icing AND making them into an adorable spooky family treat? That’s just genius!!
This is such a cute idea! Its still usually warm here in October so these would be perfect for us!
Such a fun easy idea! My kiddos would love these!
How did I not know that there were so many varieties of Klondike bars?! I love the mummies you added – my kids would be so excited!