No Sew Table Runner
Disclosure: This post may contain affiliate links. As an Amazon Associate, I earn from qualifying purchases.
We have company coming for the Memorial Holiday Weekend. My kitchen table still had some Easter decor on it, so I figured I should probably change it out to something more appropriate for Summer and the upcoming holidays.

💌 Save this article

I still had several bandannas leftover from the Bandanna Tablecloth I made last Spring, so I grabbed a couple of bandannas and got to work!
The table cloth was really easy to make.
Materials needed:
- 3 Bandannas (Don’t limit yourself to bandannas, you could use any fabric. All one piece of fabric or cut the fabric in to large patchwork pieces like I did…)
- hem tape (for the no-sew version)
- scissors
- iron
Instructions:
1. First, decide the width and length you want for your table runner. I like to keep my table runners narrow because my kids are so messy.
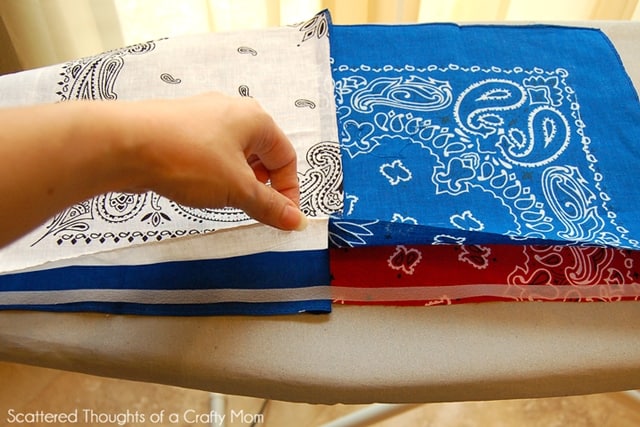
2. I cut the bandannas in to 4 equal pieces and laid them out into a pleasing pattern. As you are arranging your pattern make sure to keep the hemmed edge of the bandannas to the outside of the table runner. (If you are using fabric don’t worry about the edges, I will address that later.)
3. Next, I grabbed the two bandanna squares from the first row and put them right sides together. I cut a piece of hem tape to the appropriate length and placed it at the edge of the two bandannas, where I needed the seam. Then I ironed the seam according to the directions for my brand of hem tape.
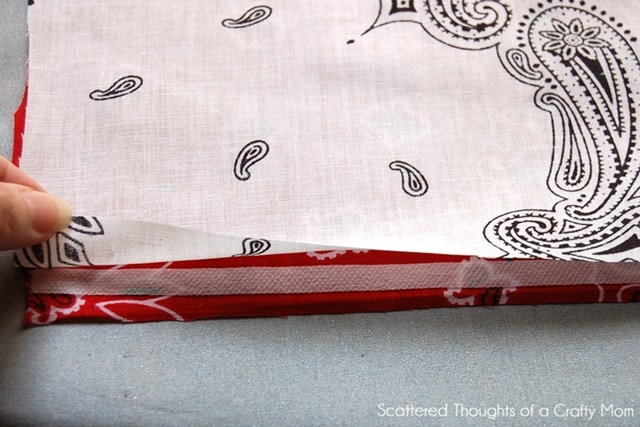
4. Once the tape cooled a bit, I flipped open the seam and pressed it flat.
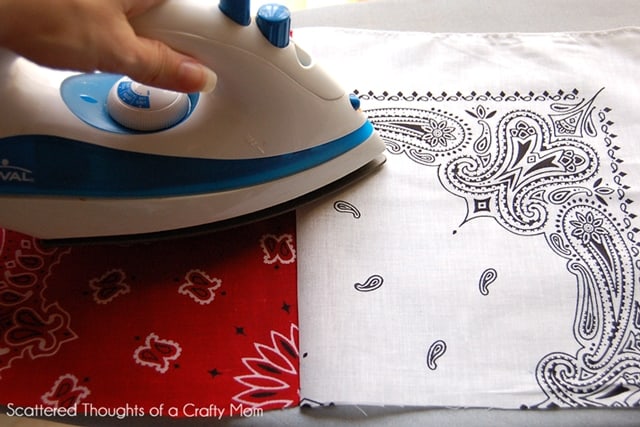
I kept repeating this process until all my rows of two were “hemmed” together.
5. Next, I started connecting my rows of two together the same way. I laid out the bandanna pieces right sides together, lining up the center seams, and ironed them together.
After the seams had cooled, I flipped the table runner over and gave the seams another good press.

Keep in mind bandannas are irregular and your outside edges may not be straight. Mine were not, but that was the look I was going for. If you are using regular fabric or just want to straighten your edges, you can fold the edges of your table runner over 1/2 inch (towards the wrong side) and iron. Then just use the hem tape to hem the edges.
That’s it! Took all of about 20 minutes to create this cute No Sew Table runner.

I did lay a pieces of batting under my table runner to help protect my table from the wire basket and hopefully I will be able to replace my origami flowers with some real ones this weekend! 🙂
Don't miss any more posts!


Really like this country look!
I sewed mine. Made first one with fall co!ors, then one with Christmas colors, then a third with non holiday colors. I am thinking of going back to them & backing them with whole bandanas. The bandanas purchased at Wal-Mart were better quality than those ordered online, but online was the only way to get some of the colors I wanted. Thanks for the idea.
I am going to go all out and make this as I would any other runner ….with batting and a border. Think it will look pretty amazing!
Wow! That looks incredible. I’m so impressed. Pinned and tweeted. We appreciate you stopping by to party with us. We hope to see you, tonight at 7 pm. Happy Monday! Lou Lou Girls
No sew wow i loved this idea. Would be cute under a lamp.
Thank you so much for showing us how you made the runner.
Very cute! I like the fact that it's no sew!
Blessings, Grace
Adorable and super creative!! Thanks for sharing at Uncommon! featuring this tomight on our FB page!! 🙂
That is great! Love the colors as well :o)
Thanks for sharing this week!
Stacey of Embracing Change
This is such a clever idea, fun!
Cute and perfect for summer parties!
This is So adorable!! Hope you can link up at my trendy tuesday party!!! http://www.sweetlittlegals.com
Super cute!! I am going to have to make this for my home!!
Very cute and very easy looking!
This is gorgeous! I would use that all summer long.. so fun and festive!
xoxo
Amie @ Pinkapotamus
Love it! I would love for you to link up to The CSI Project this week. The challenge is Patriotic Projects! Hope to see you there.
http://www.thecsiproject.com
XOXO
Dee, the CSI Girl
YAY for no sewing!!!! It looks fabulous!!
Thanks for sharing at The DIY Dreamer.. From Dream To Reality!
This is great, super easy, just right. I've come by from Show and Share #42