

15 Easy Halloween Party Crafts for Kids
Disclosure: This post may contain affiliate links. As an Amazon Associate, I earn from qualifying purchases.
Need an easy Halloween craft to keep the kids busy? These Halloween party crafts for kids use simple supplies and include fun ideas for ghosts, pumpkins, bats, spiders, and monsters.
Most are easy to prepare for a classroom or group, but they’re just as much fun for a Halloween afternoon at home.
💌 Save this article
Halloween-Themed Crafts
It’s sad to say, but my kiddos are growing up, and I don’t know how much longer they’ll let me do all the fun Halloween stuff I love to do with them. This year we are planning to participate in all the local activities, including our neighborhood Halloween block party. I’m in charge of the craft stations and have come up with several awesomely easy crafts to help keep the kids busy and entertained. I’ve rounded up some of my favorite easy Halloween Crafts here for you today.
Use them for a classroom Halloween party, a neighborhood get-together, a church group, a playdate, or just a fun afternoon at home.
Why You’ll Love These Halloween Crafts
- Easy-to-find supplies – Most use inexpensive craft supplies or things you may already have around the house.
- Ideas for different ages – There are simple peel-and-stick projects for younger children and more detailed crafts for older kids.
- Cute, not too spooky – Expect friendly ghosts, silly monsters, sparkly pumpkins, and lots of googly eyes.
- Good for groups – Several of the projects are easy to prepare ahead for a classroom or Halloween party.
- Fun to bring home – Many of the finished crafts double as decorations, treats, party favors, or keepsakes.
Tips for Making Halloween Crafts With a Group
Crafting with a group of kids can get a little chaotic, but a few minutes of preparation makes everything go much more smoothly.
- Precut any pieces that would be difficult for younger children to cut themselves.
- Divide supplies among small trays, paper plates, or bowls so everyone can reach what they need.
- Choose projects that don’t require a long drying time if the children will be moving between several activities.
- Use glue dots, glue sticks, self-adhesive foam shapes, and stickers whenever possible.
- Cover the table and keep a few baby wipes or damp paper towels nearby.
- Make one finished example, but don’t worry if the children’s versions look nothing like it. That’s half the fun!
1. Lollipop Ghosts
These little lollipop ghosts are one of the easiest Halloween crafts you can make. They only take a few minutes, and the finished ghosts can double as classroom treats or party favors.

Supplies
- Round lollipops
- White fabric squares or white paper napkins
- Narrow Halloween ribbon
- Googly eyes, eye stickers, or a black marker
- Glue dots, if using googly eyes
Center a white fabric square or paper napkin over the top of the lollipop. Gather the fabric beneath the candy and tie it securely with a piece of ribbon.
Finish the ghost by attaching googly eyes or drawing a simple face with a black marker.
Make some of the ghosts happy, some surprised, and a few a little spooky. Before long, you’ll have an entire ghost family!
2. Sticker-Decorated Pumpkins
Pumpkin decorating doesn’t have to involve carving tools or pumpkin guts all over the table. Mini pumpkins and self-adhesive foam shapes make this an especially easy, low-mess Halloween craft for younger children.

Supplies
- Mini pumpkins
- Halloween foam stickers
- Self-adhesive felt or craft-foam sheets for cutting shapes
- Googly eyes or gem stickers
- Child-safe scissors, if needed
Set out the pumpkins with an assortment of stickers, faces, shapes, and googly eyes. The kids can peel and stick the pieces directly onto their pumpkins to make monsters, jack-o’-lanterns, animals, or whatever else they come up with.
If you’re doing this with younger children, cut several eyes, noses, mouths, hats, and other shapes ahead of time. Older kids can cut their own designs from adhesive-backed felt or craft foam.
You could even give out silly awards for the funniest, fanciest, spookiest, or most colorful pumpkins. Just make sure everyone wins something!
3. Candy Corn Necklaces
Yum, candy corn! What’s more fun than a necklace you can eat?
Candy corn can crack as you thread it, so make sure you have plenty of extra pieces. The broken ones are obviously for quality-control purposes.

Supplies
- Candy corn
- Strong thread or thin cord
- A blunt plastic needle or tapestry needle
- Scissors
Cut a length of thread long enough to slip over the child’s head, with a little extra for tying. Thread the needle and carefully push it through the center of each piece of candy corn.
Continue adding candy until the necklace reaches the desired length. Remove the needle and tie the ends together securely.
Because this project uses a needle and small pieces of candy, it requires adult supervision and is better for older children. Everyone should also start by washing their hands if they plan to eat their necklaces.
4. Halloween Sidewalk Lanterns
We live in a dark sky community, so that means no street lights or outdoor lights that create light pollution, which makes for a very dark neighborhood, which is great for most times of the year, but for Halloween, our house needs all the help it can get to convince trick-or-treaters to stop!
These Halloween sidewalk lanterns were a perfect craft!
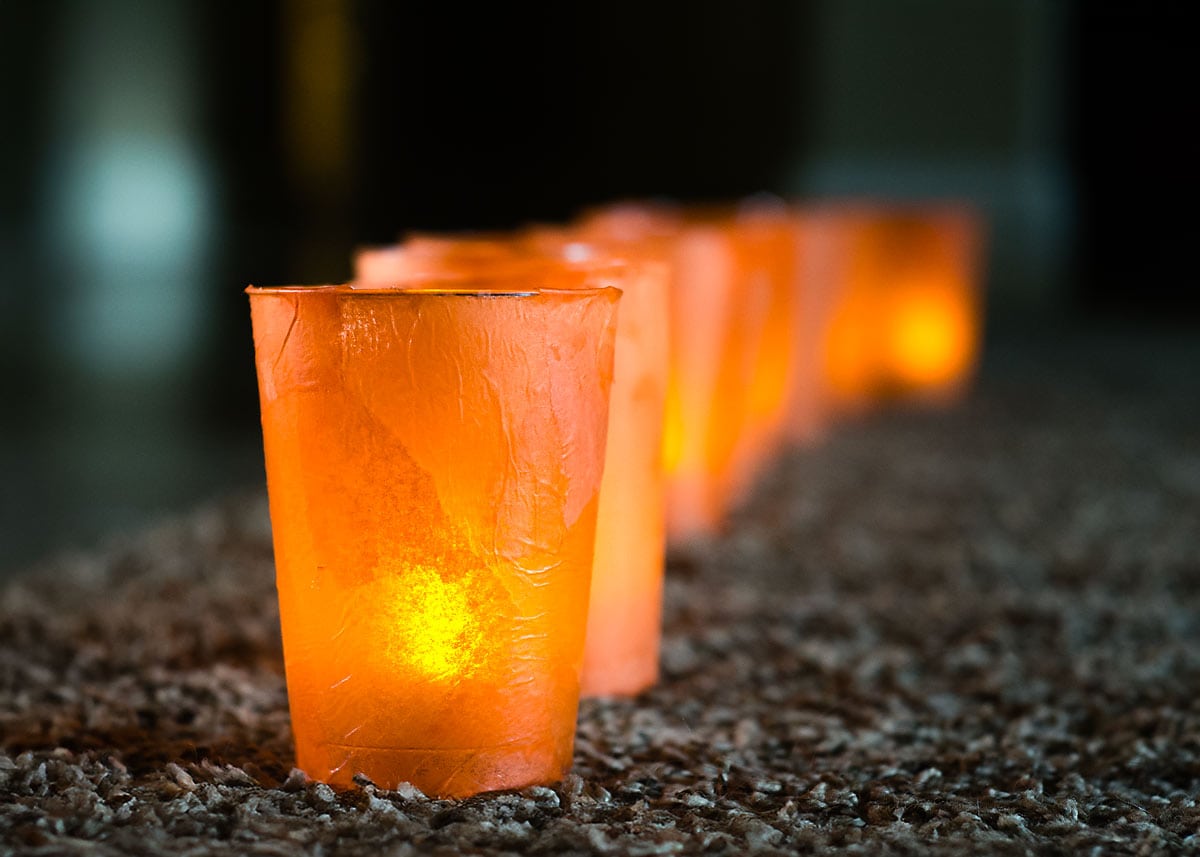
This is a paper-mâché-style craft, so it’s a little messy, but that’s also what makes it fun. Kids love spreading glue with their fingers and layering tissue paper. We used plastic cups, tissue paper, glue, and battery-operated tea lights to make 14 little lanterns. Plastic cups turned out to be perfect because I didn’t have to worry about glass getting kicked over or broken by an excited trick-or-treater.
Once the lanterns are dry, place them along a walkway, porch, party table, or windowsill. If it’s windy, add some small rocks to the bottom of each cup to keep them from blowing away.
See the complete Halloween Sidewalk Lantern tutorial.
5. Paper-Plate Jack-O’-Lanterns
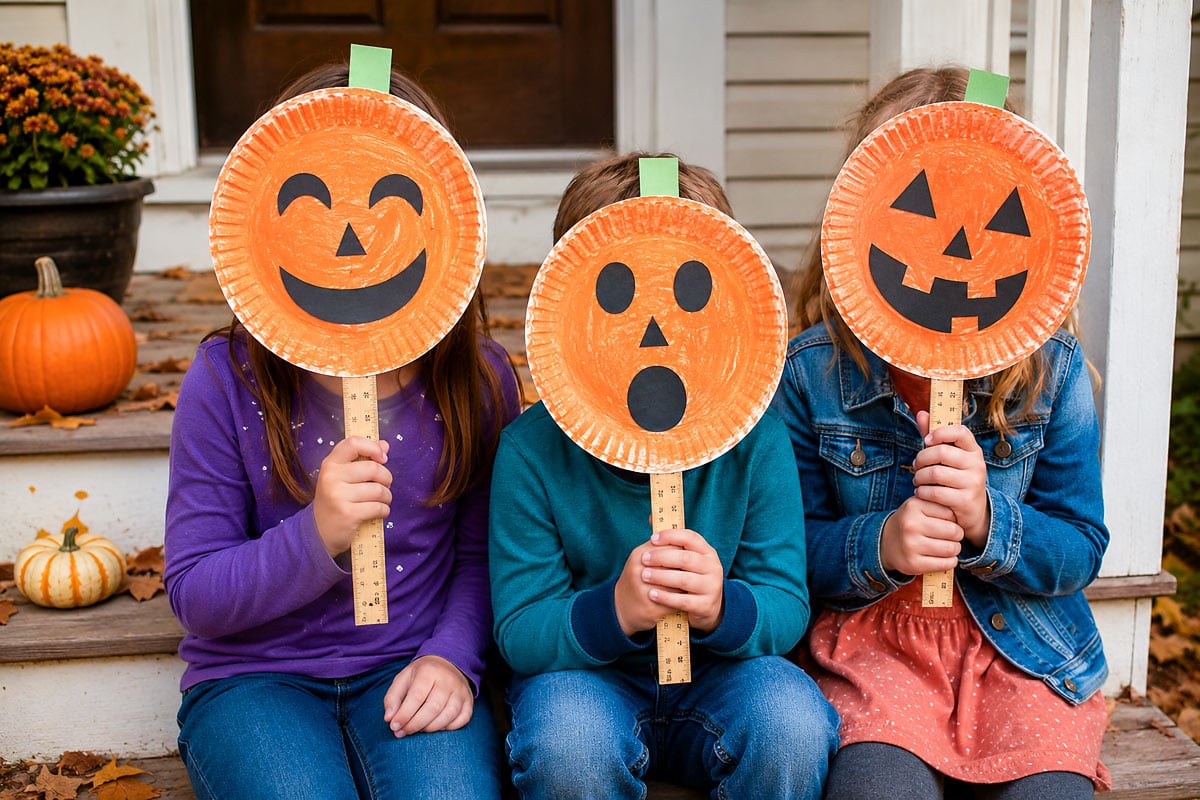
With a stack of paper plates and a few basic supplies, kids can create an entire pumpkin patch filled with funny faces. Add wooden ruler handles, and the pumpkins become cute Halloween photo props!
Supplies
- White paper plates
- Orange crayons, washable markers, or paint
- Black construction paper
- Green construction paper, optional
- Scissors
- Glue sticks
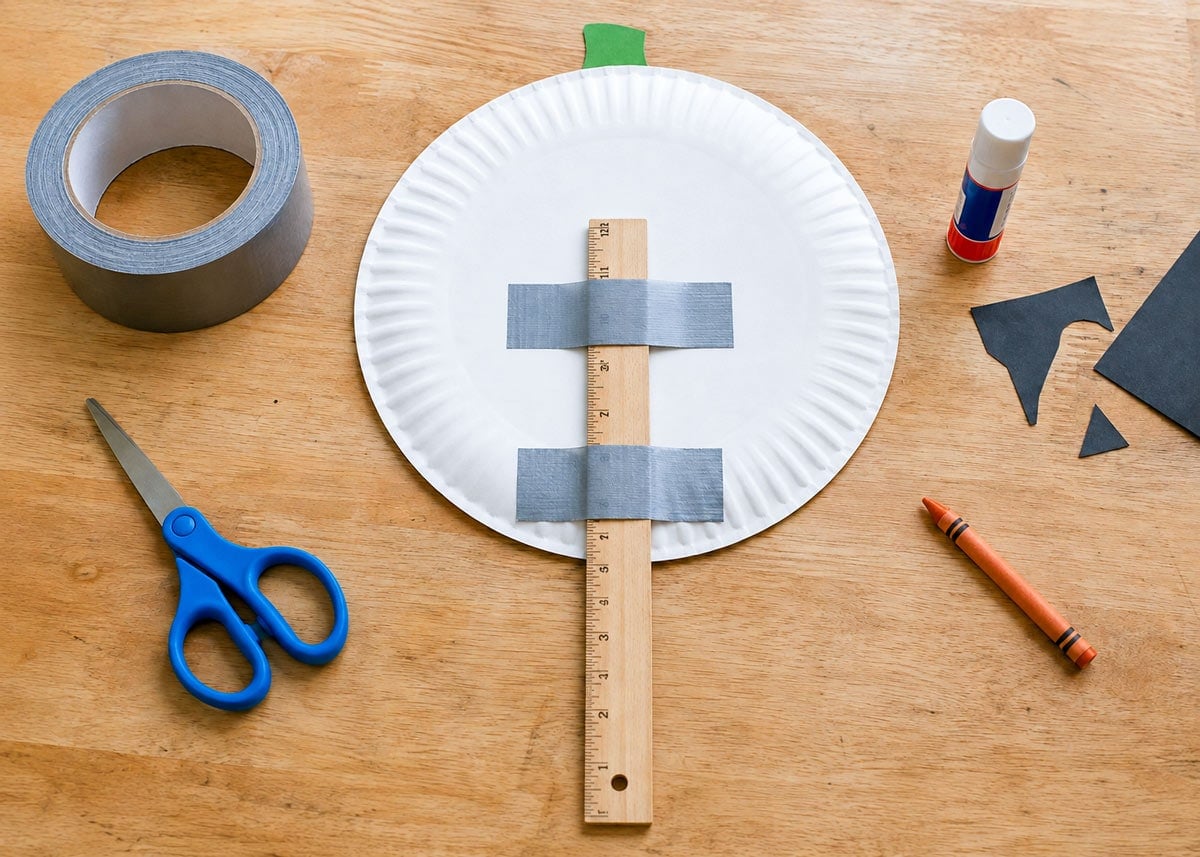
- Optional: 12-inch wooden rulers or paint stirring sticks
- Optional: Strong packing tape or duct tape for attaching the rulers
Color or paint the front of the paper plate orange. While the paint dries, cut eyes, a nose, and a mouth from black construction paper.
Glue the facial features to the plate, then add a green paper stem if desired. Encourage the kids to make their jack-o’-lanterns happy, spooky, surprised, or just plain silly.
Attach a 12-inch wooden ruler to the back of each plate with two strips of strong tape. The ruler gives the pumpkin a sturdy handle but can still be removed and reused after Halloween.
Once the pumpkins are finished, let the kids hold them in front of their faces for pictures. A group of children hiding behind their silly jack-o’-lantern faces would make the cutest Halloween photo!
The pumpkins can also be arranged in a bucket, tucked into an indoor planter, or used as temporary outdoor decorations. Just remember that paper plates won’t hold up well in wet weather.
For a lower-mess version, skip the paint and use orange crayons or washable markers.
6. Bats on the Wall
You can find paper bats flying across walls all over Pinterest and magazines! We made our own paper bats, and they are so easy to make.

The free template includes large and small bat shapes that you can cut with a Cricut or Silhouette machine, or print and cut by hand. Fold the wings forward slightly to make the bats look three-dimensional, then attach them to a wall, door, mantel, or party backdrop.
My kids loved how they looked and immediately wanted me to make more!
Children can also add googly eyes, draw faces, or attach the bats to craft sticks to make little bat puppets.
Get the free paper bat template and complete instructions.
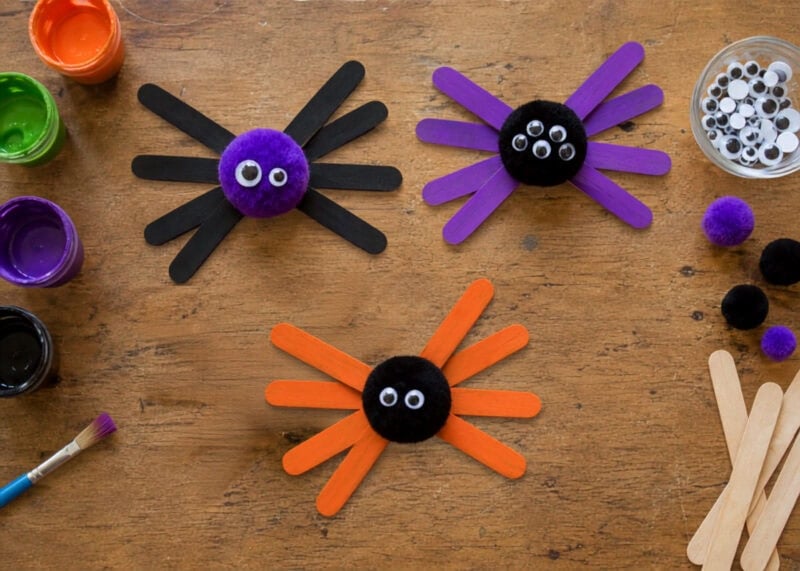
7. Popsicle-Stick Spiders
These silly spiders are a fun way to use craft sticks, pom-poms, and the ever-popular googly eyes.
Supplies
- Four wooden craft sticks per spider
- Black, purple, orange, or green washable paint
- Paintbrushes
- Large pom-poms
- Googly eyes
- Craft glue
Cross four craft sticks over one another to create eight spider legs. Glue the sticks together in the center and allow the glue to dry.
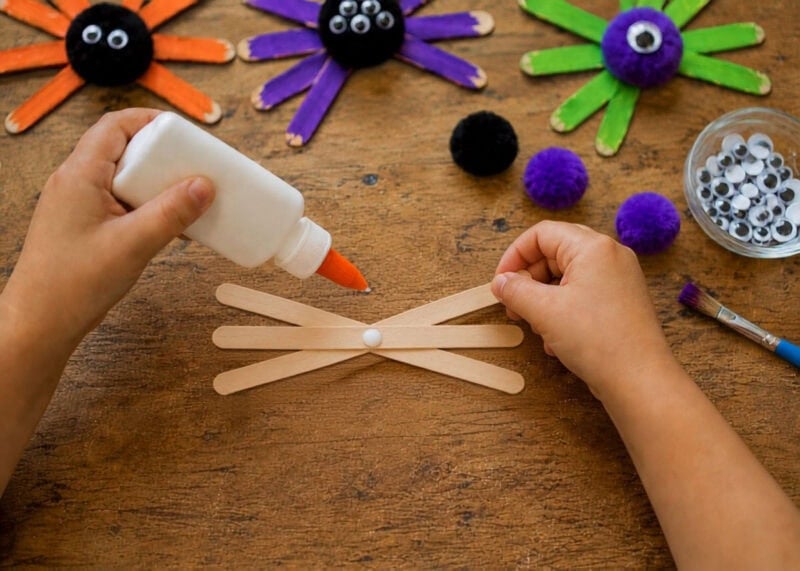
Paint the legs, then glue a large pom-pom over the center. Add one, two, or an entire cluster of googly eyes to give each spider its own personality.
If time is limited, paint and assemble the craft-stick legs ahead of time. The children can add the pom-poms, eyes, and other decorations during the party.
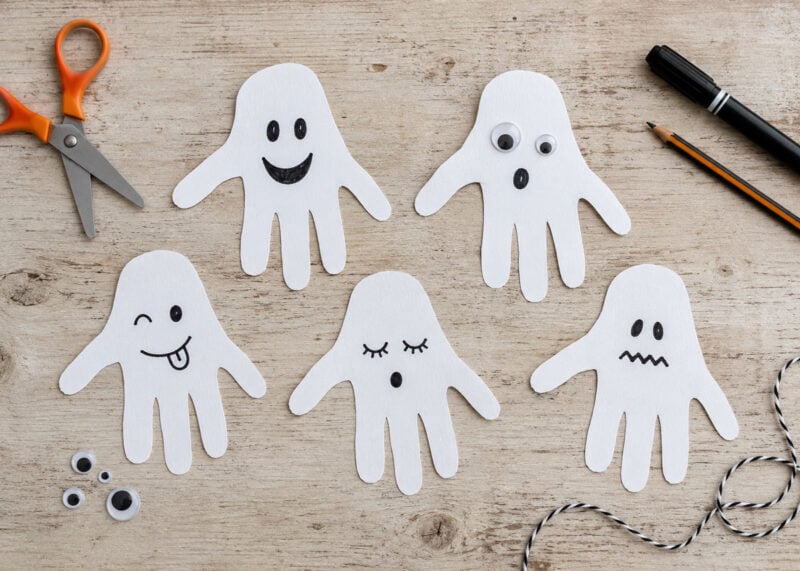
8. Paper Handprint Ghosts
Handprint ghosts are easy enough for younger children and make a cute Halloween keepsake.
Supplies
- White cardstock
- Pencil
- Child-safe scissors
- Black marker
- Googly eyes, optional
- Ribbon or string, optional
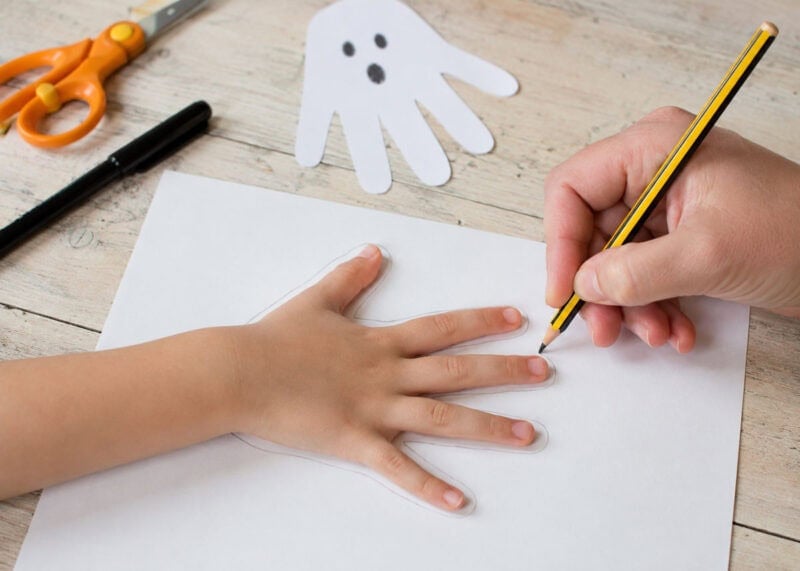
Trace the child’s hand onto white cardstock and cut around the outline. Turn the cutout upside down so the fingers become the wavy bottom of the ghost.
Draw a face with a black marker or attach googly eyes. Add the child’s name and the year to the back if you want to save it as a keepsake.
The finished ghosts can also be taped to windows, attached to craft sticks, or strung together to make a garland.
9. Halloween Nightlights From Foam Cups
If your kids are anything like mine, they love poking holes in things. Toothpicks through plastic, poking my sewing pins into my tomato pin holder, or just going to town on the thin foam that sometimes lines the boxes of fragile purchases.
These DIY Halloween nightlights combine two things kids love: poking holes in stuff and playing with flashlights.
They’re made with foam cups, paint, toothpicks, and mini flashlights. After painting the cups, the kids poke holes in their designs to let the light shine through. The more holes they make, the more light they get.
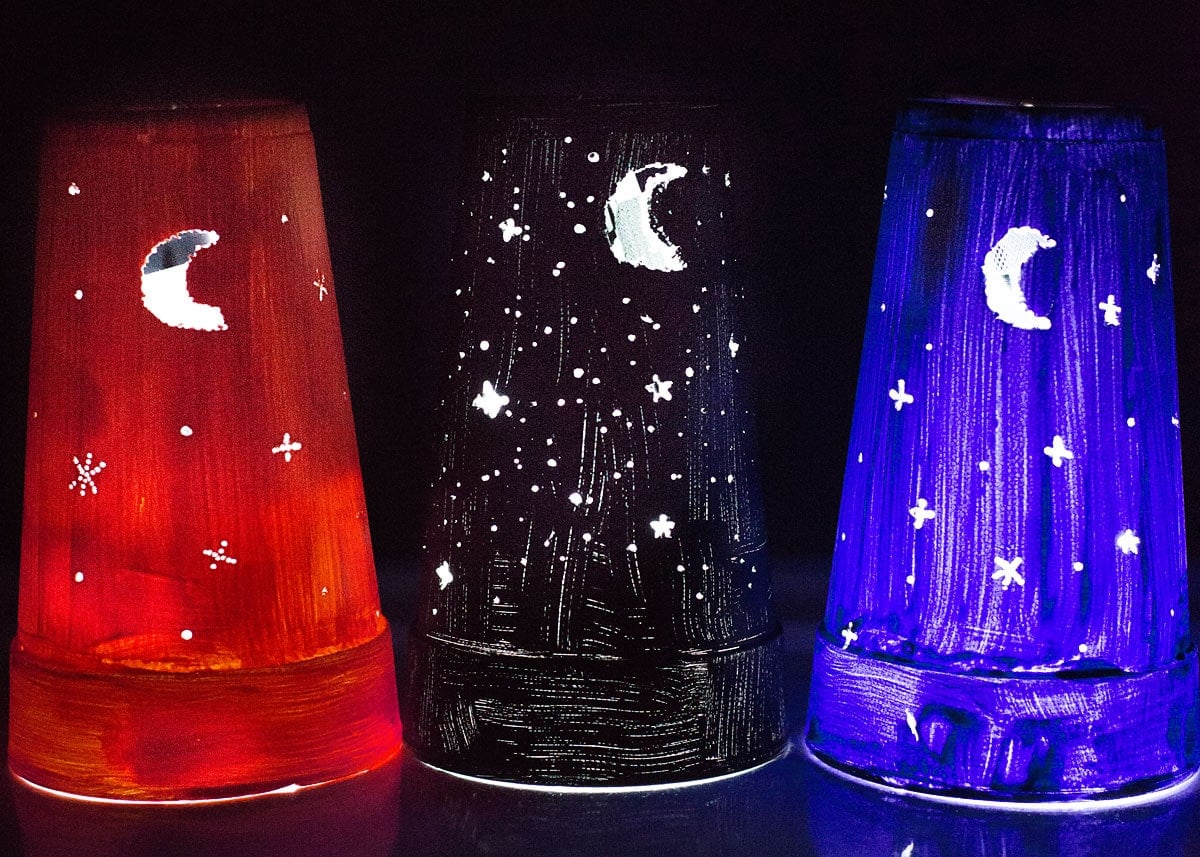
Try a jack-o’-lantern face, ghost, bat, moon, or a completely random pattern. The best part comes when you darken the room and turn them all on!
An adult should supervise the hole-poking step and help attach the flashlight.
See how to make the DIY Halloween Nightlights.
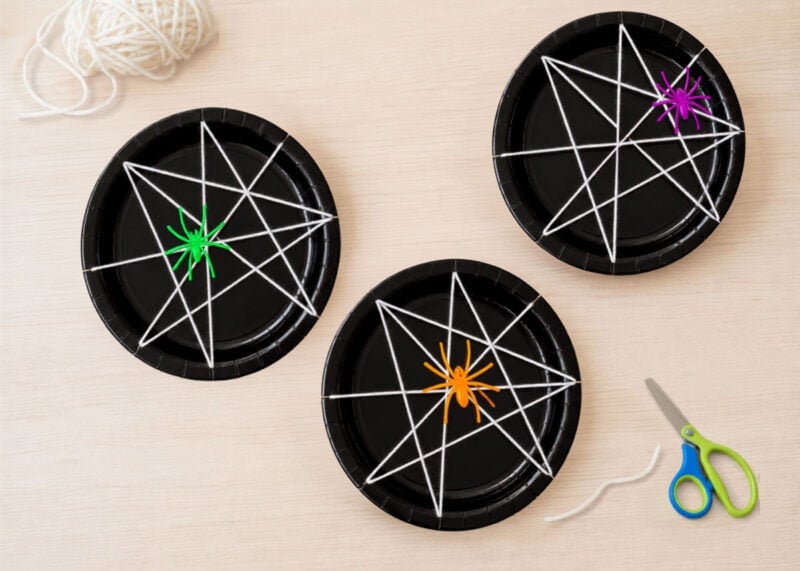
10. Paper-Plate Spider Webs
Threading yarn through a paper plate creates a different spider web every time. It’s also a good fine-motor activity for preschool and elementary-age children.
Supplies
- Black paper plates
- White yarn
- Tape
- Scissors
- Optional plastic spiders
Cut eight short slits around the edge of the paper plate, spacing them as evenly as possible.
Cut about two yards of yarn. Tuck one end into a slit, pull a short tail to the back of the plate, and secure it with clear tape.
Wrap the yarn back and forth across the front of the plate, slipping it securely into a different slit each time. You can use the same slits more than once. Keep wrapping until you are happy with the web.
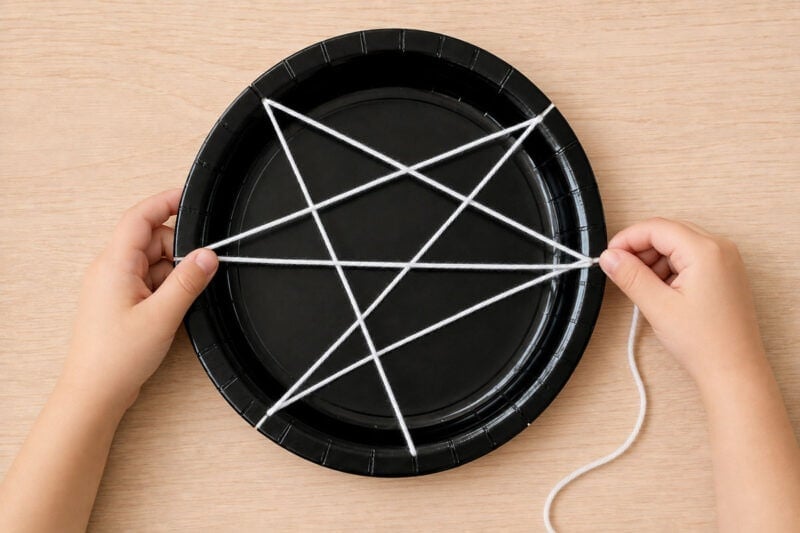
Bring the remaining yarn through a slit to the back of the plate and secure the end with another piece of tape.
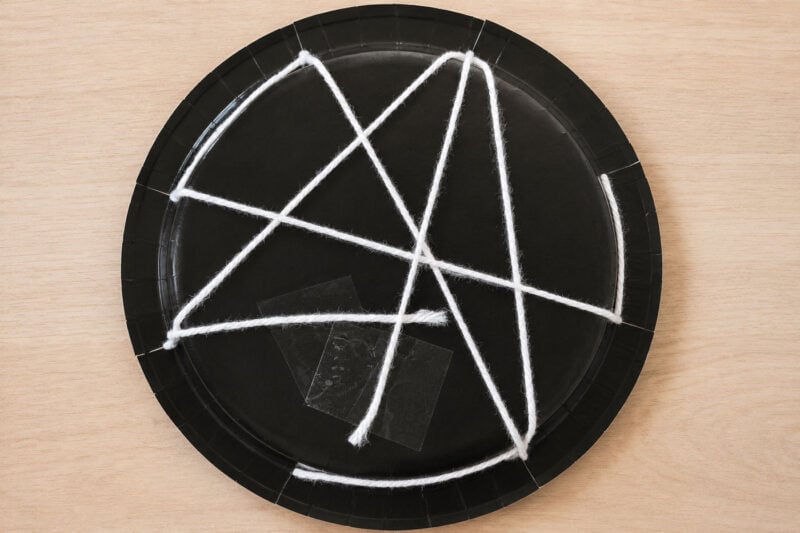
Finish by placing a plastic spider on the web or gluing on a spider cut from construction paper.
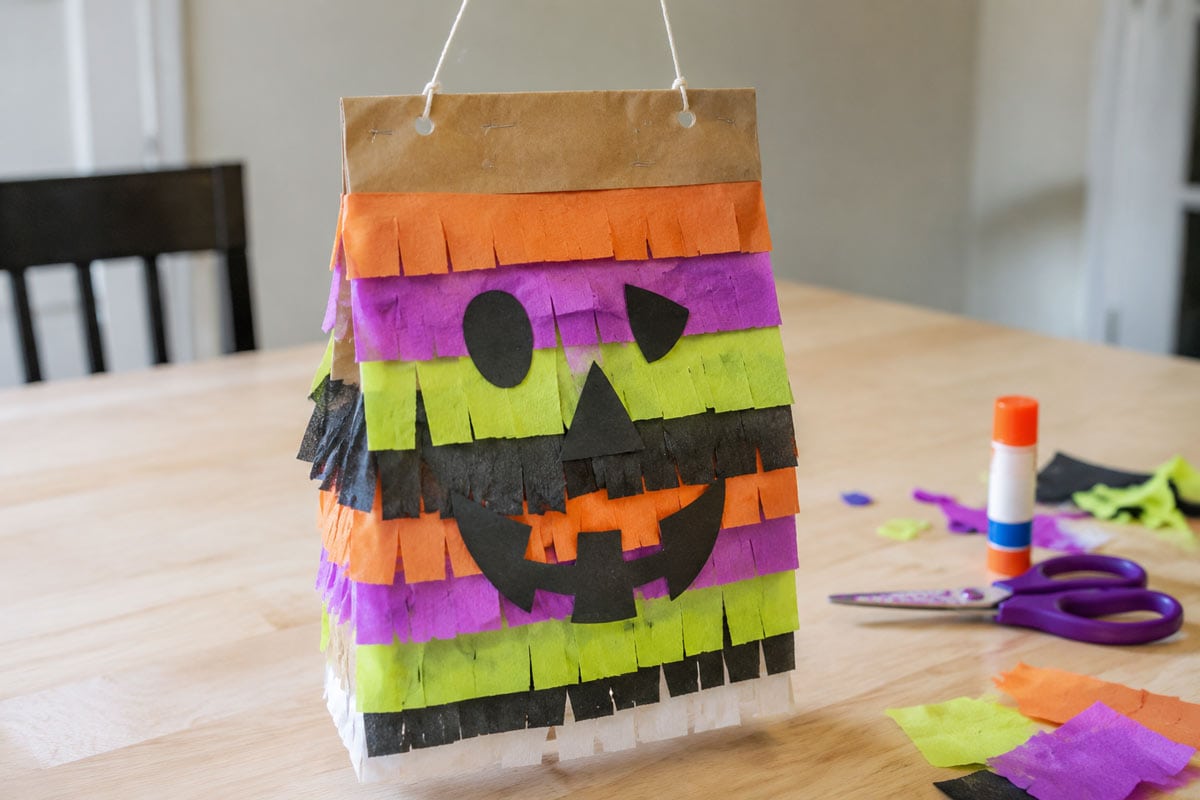
11. Mini Halloween Paper Bag Piñatas
I originally made these paper bag piñatas with my kids as part of a summer activity schedule. The craft was easy, turned out cute, and hardly made any mess at all. My kind of craft!
Of course, the best part came at the end of the day when we got to break open the piñatas and eat the candy.
For Halloween, decorate the bags with orange, black, purple, green, and white tissue-paper fringe. Add construction-paper faces to turn them into pumpkins, ghosts, monsters, bats, or even candy corn.
Supplies
- Paper lunch bags
- Colored tissue paper
- Glue sticks
- Scissors
- Construction paper, optional
- Candy or small Halloween treats
- Stapler
- Hole punch
- String
- Soft bat or tightly rolled paper
See the complete Paper Bag Piñata tutorial.
12. Easy Jack-O’-Lantern Luminaries
I originally made these jack-o’-lantern luminaries as mini Halloween decorations for my kids’ rooms.
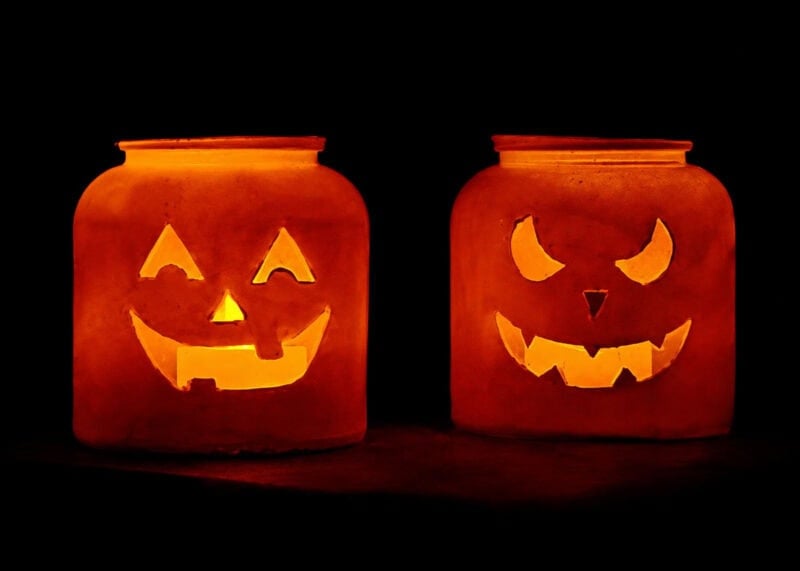
They were also a good excuse to use some of the old jelly, baby food, and dip jars I had been hoarding. Please tell me I’m not the only one with a cabinet full of jars that might be useful someday!
The pumpkin faces are created with sticker paper, and the jars are painted before the stickers are removed. Add a battery-operated tea light, and the light shines through the jack-o’-lantern’s face.
Since this project uses glass jars, paint, and cutting tools, an adult should prepare the face stickers and supervise the painting. This craft would also work using clear plastic cups. (Similar to the ones used in the Sidewalk Lantern Craft above.)
See the complete Jack-O’-Lantern Luminary tutorial.
13. Pom-Pom Painted Jack-O’-Lanterns
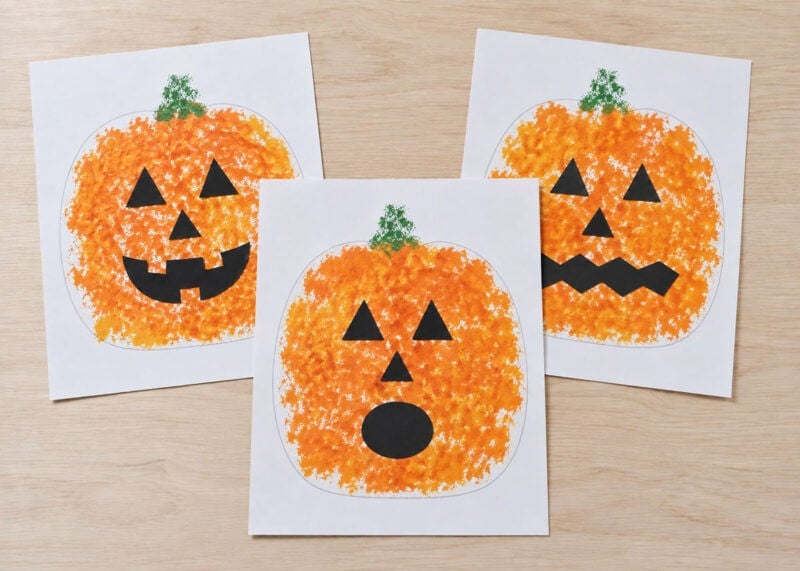
These pom-pom-painted jack-o’-lanterns are a fun, hands-on Halloween craft that lets every child create a pumpkin with its own personality.
Supplies
- Printable pumpkin template
- Heavyweight white paper or cardstock
- Two shades of orange washable tempera paint
- Green or brown washable tempera paint
- Cotton balls or large craft pom-poms
- Wooden clothespins, optional
- Paper plates
- Black construction paper
- Child-safe scissors
- Glue sticks
Print the pumpkin template on heavyweight white paper or cardstock.
Pour two shades of orange washable tempera paint onto a paper plate. Clip a cotton ball or large craft pom-pom into a clothespin, dip it lightly into the paint, and stamp inside the pumpkin outline. Overlap the two colors to give the pumpkin a fun, mottled texture. A cotton ball can also be held directly with your fingers.
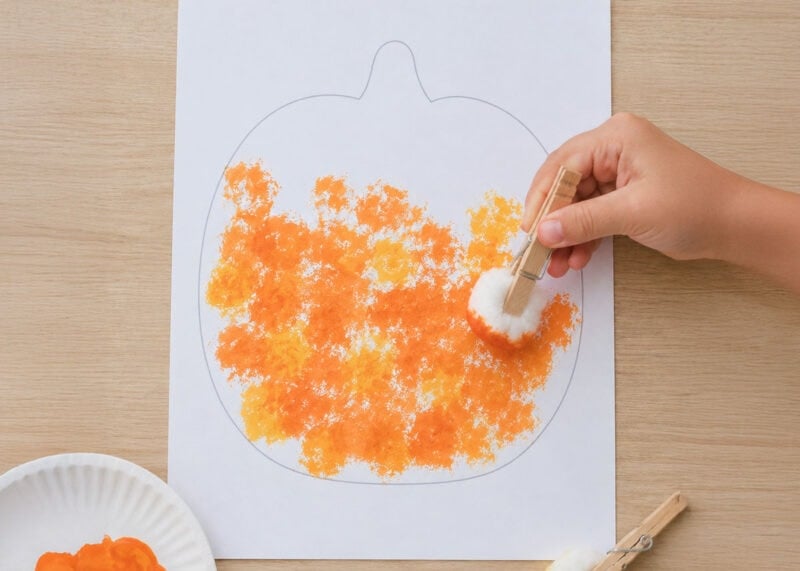
Use green or brown paint and a smaller cotton ball or pom-pom to fill in the stem. Set the pumpkin aside until the paint is completely dry.
While the paint dries, cut eyes, a nose, and a mouth from black construction paper. (You can also just cut out the face shapes provided in the template.) Glue the pieces onto the pumpkin to create a silly, spooky, or happy jack-o’-lantern face.
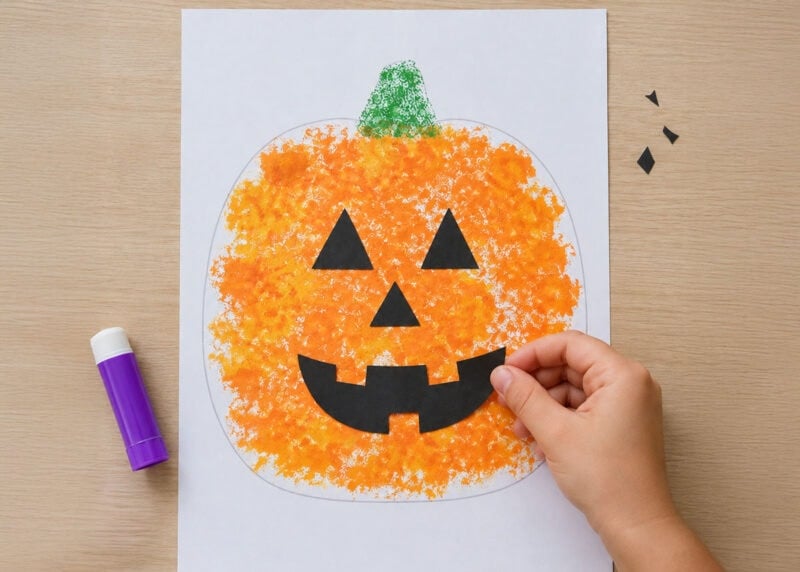
Add the child’s name and the year at the bottom of the page. The finished pumpkins would be especially cute displayed together on a classroom bulletin board.
14. DIY Glitter Pumpkins
Anything with glitter is all right by me, so naturally, these DIY glitter pumpkins had to make the list.
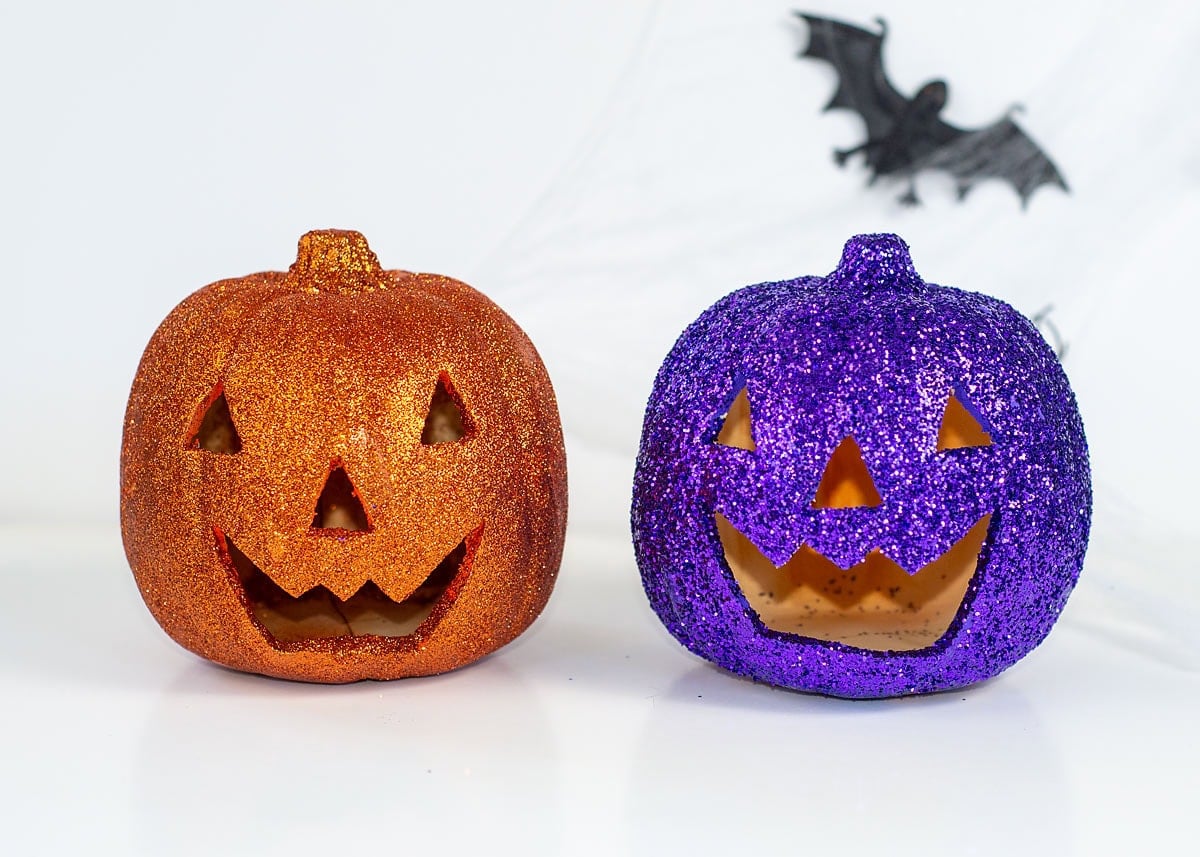
I used faux pumpkins because they can be packed away and brought back out year after year. Nothing replaces the tradition of carving real pumpkins and roasting the seeds, but it’s nice to have a few decorated pumpkins that don’t turn to mush on the porch.
Paint the pumpkins any color you like, apply glue to selected sections, and cover them with glitter. This is probably a better project for older children or a small group because, well, glitter. Work over a tray or large piece of paper so you can collect and reuse the excess.
See the complete DIY Glitter Pumpkin tutorial.
15. Free Printable Ghost Garland
This free printable ghost garland gives kids a chance to create their own silly, spooky, or sweet little ghost family.
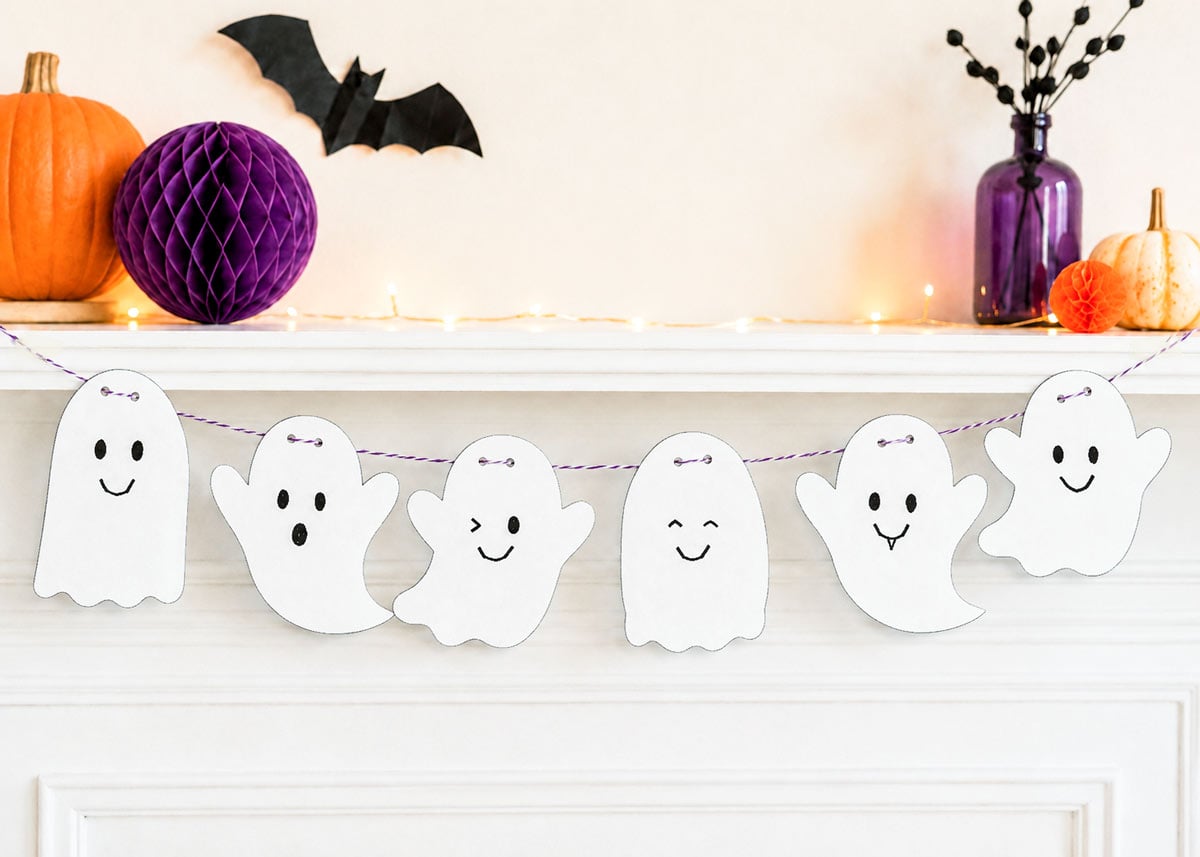
The printable includes several different blank ghost shapes sized to print on regular 8.5-by-11-inch cardstock. The faces are intentionally left blank so the kids can add their own expressions before cutting out the ghosts.
Some ghosts can be happy, some surprised, and some downright goofy. Kids can also color them, add stickers, glue on googly eyes, or write their names on them.
For a classroom project, let each child decorate one ghost and combine them into one long class garland. For a party, each child can make a smaller garland to take home.
Get the free printable Ghost Garland and complete instructions.
Best Halloween Crafts for a School Party
For a classroom or large party, I’d choose a project that can be prepared ahead, doesn’t require much drying time, and won’t leave the classroom covered in glue and glitter.
These are my top choices:
- Lollipop ghosts
- Sticker-decorated pumpkins
- Paper-plate jack-o’-lantern photo props
- Paper bats
- Handprint ghosts
- Mini Halloween paper bag piñatas
- Free printable ghost garlands
If time is short, precut the paper pieces and place each child’s supplies in a small tray or bag. For a longer party, set up two or three craft stations and let the kids rotate between them.
Save the sidewalk lanterns, painted spiders, and glitter pumpkins for a smaller group or a party where the crafts have plenty of time to dry.
Frequently Asked Questions
What is the easiest Halloween craft for preschoolers?
Sticker-decorated pumpkins, paper-plate jack-o’-lanterns, handprint ghosts, and the printable ghost garland are all good choices for preschoolers. Precut the smaller paper pieces and use glue sticks, stickers, or self-adhesive foam whenever possible.
Which Halloween crafts require the least preparation?
Lollipop ghosts, sticker pumpkins, paper-plate jack-o’-lanterns, and handprint ghosts require very little advance work. Place the supplies on the table, and the kids can get started almost immediately.
The printable ghost garland is also easy to prepare. Print the ghost pages on cardstock and set out markers, scissors, a hole punch, and string.
What can I use instead of paint?
Crayons, washable markers, construction paper, stickers, and self-adhesive craft foam are all good alternatives. They’re less messy and don’t need time to dry.
How many crafts should I plan for a Halloween party?
For most parties, one main craft is enough, especially if you’re also planning games, snacks, and other activities.
For a longer event, set up two or three simple craft stations and let the children rotate between them.
More Halloween Fun for Kids
Once the craft table is ready, add a few games to keep the fun going. My collection of Halloween party games for kids includes ideas for classrooms, family parties, neighborhood gatherings, and groups of different sizes.
You can also print my Halloween Bingo game or Halloween Candy Dice Game when you need an activity that requires very little preparation.
Now it’s your turn. Which Halloween craft do you think your kids would choose first?
Don't miss any more posts!

Stay connected by following along on Pinterest, Facebook, Instagram, and TikTok for more fun content, easy recipes, free sewing patterns, and creative inspiration.

What cute craft ideas for the little ones to help with! I love those ghosts. I love the idea of a Halloween block party. I wish we had done something like that when my kids were young.
The candy corn necklaces are really cute. I am sure my daughter would love to make them. She loves crafts like that!
These ideas are so cute! I love the little ghosts. I’m going to have to try to make them with the twins.
Those are really cute craft ideas to make for my kids this Halloween I will def try to make that for them.
I miss doing more crafts, these are some awesome Halloween party craft ideas. Super simple, affordable and creative, a total win!
I love those pumpkins! I want to decorate some to put on my Halloween candy tray. That’s a great idea to use foam with a sticky back.
This is awesome. I am hosting the halloween party for my littles class. So I need all the help I can get!