Simple 5 Inch Fabric Flower Tutorial
Disclosure: This post may contain affiliate links. As an Amazon Associate, I earn from qualifying purchases.
Learn how to make a 5-inch fabric flower with this easy step-by-step tutorial. This craft is perfect for making hair accessories, embellishing clothes, or adding a pop of color to any project.

💌 Save this article
I’ve been going a little crazy making these cute fabric flowers lately. The flowers come together fairly quickly and go great on everything from clutches to hair accessories.
5 Inch Fabric Flower Tutorial
I was working on a new dress for my missy and decided the dress needed some sort of contrasting embellishment at the top to tie in the rest of the fabric. I played around with some of my scraps and decided a big fabric flower at the center of the bodice would be really cute.
 *Update: See the Tank Sundress Tutorial here.
Hand Sewn Fabric Flowers
These 5-inch Fabric flowers are a creative way to add a touch of color and flair to any outfit. The flowers can be used to accessorize a dress, adorn a hat, or decorate a purse. Even better, they are a great way to use up your fabric scraps! Such a quick and easy project that can be used in a wide range of scrap fabric projects.
Fabric flowers can also be given as gifts or made into jewelry. The possibilities are endless! And because they are hand-sewn, each fabric flower is completely unique.
To make these flowers, all you’ll do is trace and cut a scallop shape, (I have linked to the printable flower template under supplies needed.) everything else is done with a needle and thread and maybe a little glue if needed.
More Quick and easy Scrap-Busting Projects
- No Sew Fabric Flowers
- Scrap Busting Fabric Flower
- DIY Big Bow Headbands
- 5 Minute Catnip Toy
- Flower Cuff Bracelet and Tutorial
Are you ready to make a few of these flowers?
Here is what you need to make the 5-inch Fabric Flower:
- Scrap fabric (about 23 inches wide by 3.25 inches tall for a 5-inch-ish flower- the tightness of the gather and stiffness of the fabric will affect the total size.)
- Flower Petal Template
- Small piece of felt (optional – you will need this if adding a pin or clip.)
- Marker, needle, thread, scissors (and glue if making a pin or hair accessory)
Instructions:
Print and cut out template.
Trace the template onto the back of the fabric.
Keep moving the template over and draw at least 9 petals. (For a slightly fuller flower, you could add one or two more petals. I used 9 petals on the pink and teal flowered fabric.)

Cut out the pattern you drew.

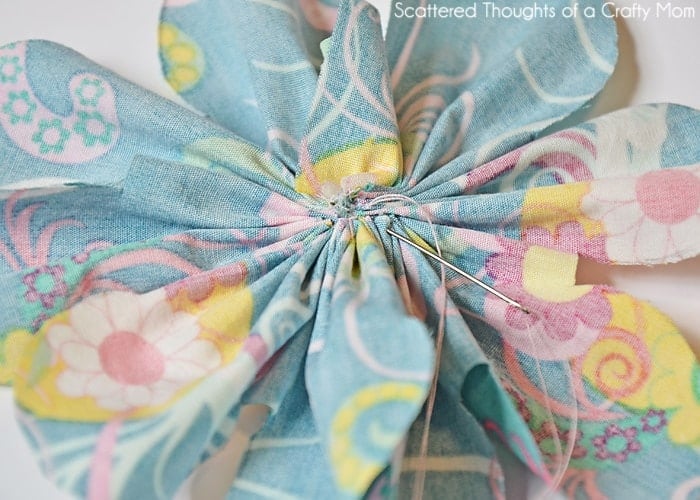
Use a needle and thread to evenly sew a wide basting stitch along the bottom of the fabric edge. (I did try basting on my machine, but the gathering just did not quit work. You need a longer, looser stitch to get the center of the flower to come together prettily. )

Gather the fabric and sew the ends together to make the flower shape. Add a few stitches through the center to secure the flower.
Sew on a button or other embellishment if desired

If you are using the flower as a pin or hair accessory, hand stitch (or use glue) a small circle of felt with glue to the back of the flower.

Tip: Since I plan to put the pink flower through the wash, I added a quick border stitch around the petals to keep the flower from fraying too much.

So cute!

Share Your Finished Project!
Please leave a star ⭐️⭐️⭐️⭐️⭐️ rating and/or a review in the comments section below. If you share an image on Instagram, be sure to tag me and use #scatteredmompatterns! You can also share an image to my private Facebook sewing group!
Don't miss any more posts!


I will say these are very cute. However, I wish you had included a few more steps or pictures/videos of you making one. My 13 year old granddaughter wanted to make these for her sister for Christmas. I ended up helping her more than I thought I would. The beginning was no problem but trying to keep the center gathered was difficult. I put a number of stitches in the top to keep it together, more than I thought we would need too. Not 100% happy but she is going to make them into hair pieces so should cover up any imperfections.
Sorry if this comes across negative it’s not meant to, just thoughts for the next time.
I love so many of your crafts and I want to make some.
I just found your great tutorial via Pinterest and added myself to your email list – thanks
Thank you, Leslie!
What do you do to the edges to keep them from unraveling?
"Since I plan to put the pink flower through the wash, I added a quick border stitch around the petals to keep the flower from fraying too much." This worked pretty well.
~Jamie
These are too cute! And look easy to make!
Love your flowers! Just wish I knew how to make the template smaller for the AG dolls lol. (me & math not on speaking terms lol)
Congratulations! This post is going to be featured over at Diana Rambles tomorrow and has been pinned in the Featured at Diana Rambles board at Pinterest, Tweeted, and Recommended on G+. Please grab a featured button off my sidebar or via the link under the features. Thanks for sharing this awesome idea!
Super cute! Pinned. Thanks again for stopping by our party. I hope to see you tonight. Lou Lou Girls