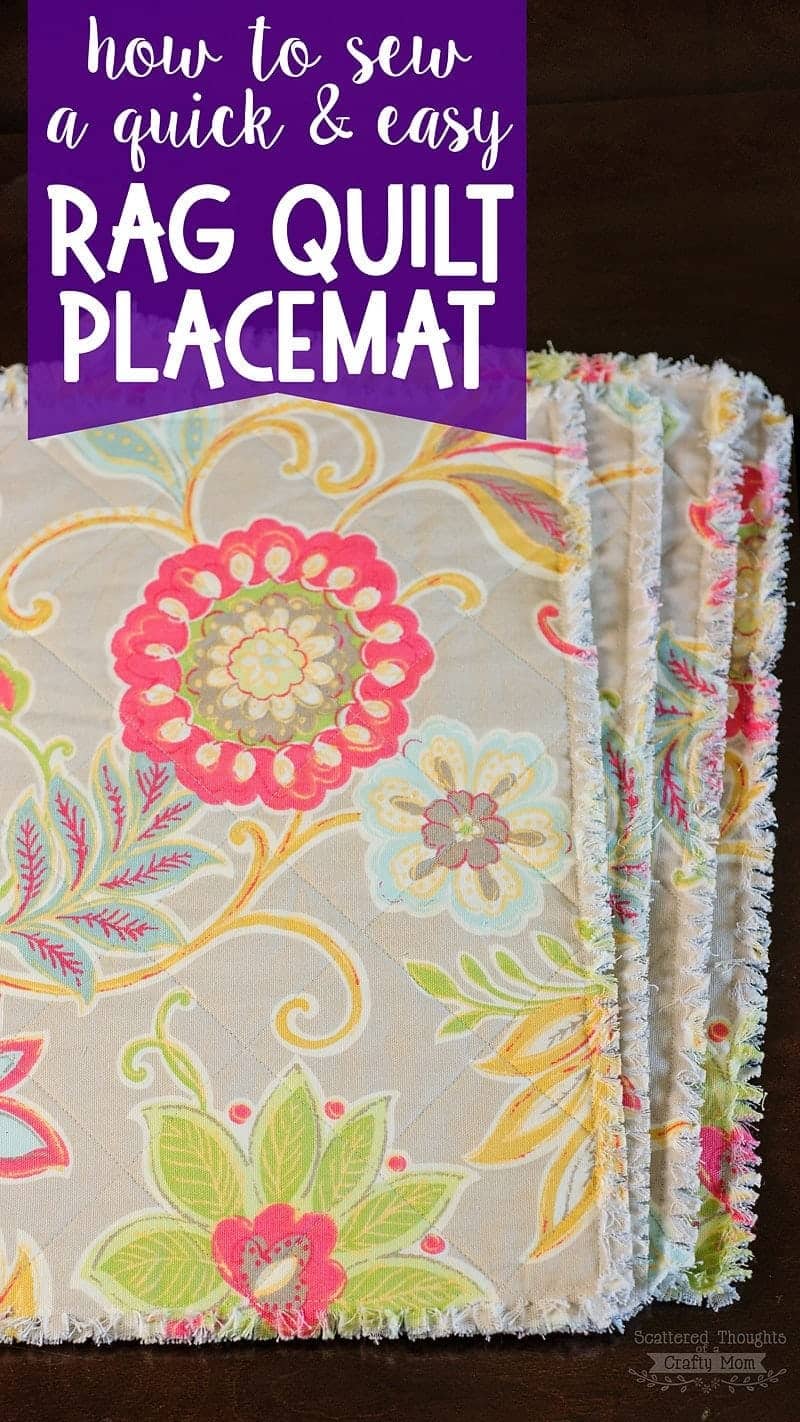
How to Make a Rag Quilt Placemat
Disclosure: This post may contain affiliate links. As an Amazon Associate, I earn from qualifying purchases.

Have you ever wondered how to make placemats with fabric? Then this placemat tutorial is for you! You will love how easy it is to brighten up your table with this colorful and easy Rag Quilt Placemat Tutorial.
How to make a Rag Quilt Placemat
We have a large breakfast area that is a big focal point of the kitchen. When the table is not in use, I like to keep the table clear and dressed with coordinating decorative placemats and a centerpiece.
Making your own fabric placemats is actually really easy! I have made several styles of placemats to coordinate with the season and my current decorating theme. (I’ve made some good ones – see the other placemat tutorials I’ve shared here.)
My kids are pretty messy eaters, and we definitely need to be using placemats to protect the table. The issue I have with my DIY placemats though, is they end up being purely decorative as I’m too afraid to use them since once washed, they never look as good as when I first made them!

I have a love-hate relationship with the plastic/vinyl placemats you can purchase from the store. (Love how easy they are to clean/hate that if a kid spills any liquid and I don’t notice, moisture gets under the placemat and will mar the finish of the table – plus they don’t offer any protection from heat.) So washable fabric placemats are definitely what our family needs.
My solution to this placemat conundrum? Make a set of “pre-distressed” Rag Quilt Placemats that I won’t be afraid to wash!

This style of Rag Quilt Placemat is meant to be washed over and over. The more you wash these placemats the fluffier and softer the edges will be – which is what I need in a placemat. I definitely won’t be afraid to throw these DIY rag quilt placemats in the wash.
The fabric I used for these placemats is a cotton twill from Joann’s. (They reverse to a grey ikat rprint on the other side.)
I will admit, once my rag quilt placemats were done, I had second thoughts about putting them into the washing machine, lol! This fabric was just so pretty and once again! I “manned up” and forced myself to drop them into the wash, lol. I really do think they turned out pretty good and as a result, we’ve even been using the table more over the breakfast bar, which is always a good thing.

Other easy quilt projects you might enjoy:
- Free Motion Quilting – Embellished Towels
- Easy Fabric Ornament Gift Toppers Tutorial
- Quilted Pocket Camera Cover Tutorial
- My First Quilt! (plus lessons learned…)
- Jelly Roll Stripwork Dress
How to Make Placemats
Placemat Tutorial notes:
- You might opt to make a reversible placemat. If so split the fabric amount in half and purchase two coordinating fabrics
- If making a reversible placemat, make sure to put a thread color in the bobbin that coordinates with your bottom fabric
Materials needed to make a Rag Quilt Placemat:
- 1 3/4 yard fabric ( makes 4 placemats)
- fusible cotton batting
- thread
- sharp scissors
- ruler
- disappearing ink marker
- iron
- other basic sewing supplies

Instructions:
Step 1. Cut out fabric and batting.
Cut 2 pieces of fabric 14 inches tall by 19 inches wide.
Cut 1 piece of cotton fusible batting, 13 inches tall by 18 inches wide.
Step 2: Assemble Placemat.
Sandwich the batting between the two pieces of fabric.

Iron both sides of the fabric pieces to fuse the batting in place.

Step 3: Quilt the placemats together.
Measure 5/8 of an inch from all four edges. Using your disapearingink marker, mark the lines and sew along the marks.

Using a ruler and the disappearing ink pen, draw straight lines at a 45 degree angle in both directions as shown below.

To make the quilting process even quicker, try to get your lines to intersect along the edges. (I managed to get these marks to intersect on a couple of my placemats and I was able to quilt the entire placemat without lifting my needle.

Sew along all your marked lines.

Step 4: Finishing the placemat.
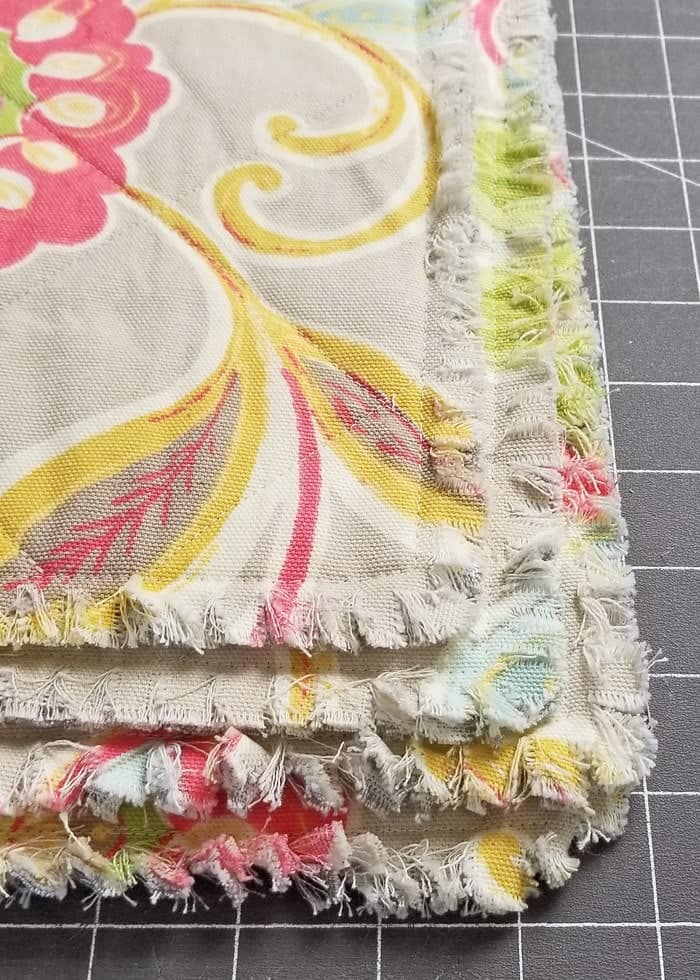
Tie off and trim any loose treads, using the fray check where needed.

Check the batting placement around the edges of the placemat, if it’s hanging out too much in any one spot, you’ll want to trim it just a bit.

Using a pair of sharp scissors, snip the edges of the placemat in 3/8 inch increments around all 4 edges. Take care not to cut into the seam around the border of the placemat.

Toss the finished placemats into the washing machine and dry on high heat. (you might need to repeat for another cycle for your desired rag finish.
Here is my placemats after the 1st wash and dry. (I think they need one more wash/dry cycle for the edges to rag/fluff up more.)
That’s it, you’re done, enjoy your new placemats!
Let me know if you end up making any of these!
Don't miss any more posts!


I made coasters like these. Didn’t think of placemats. Thanks for the idea.
Should I prewash my fabric before I begin?
I only prewash when sewing clothing. It’s more of a personal preference IMO.
I love the way they look. Will make this week, just waiting for my batting to arrive (amazon). Like all the pictures and diagrams. Very helpful.
Do you have to use fusible batting? What if you don’t….what happens?
nothing, you just have to pin alot more
This is a great idea. I need round placemats because I have a round table. The idea of all that binding always put me off. I am definitely going to make these. Thanks ?
Thanks! These placemats have been one of the most used items I’ve ever made. Still using them.
How many yards of fabric will I need to make 12 of these?
TIA & xo
Janet
Well, my guess would be, if it takes 1.25 to make 4, you would need about 3.75 to make 6? But it would also depend on if you have a super wide or narrow fabric, you might need more or less.
Love these!!! What brand of iron-on batting did you use? Plus did you say cut batting
same size as fabric? I can’t wait to try these.
thank you so much
Hi, I linked to the batting in the supply list. I Dead cut the batting slightly smaller. I don’t remember the exact dimension but you will find the instructions in the tutorial.
Good luck,
Jamie
Do you need to pre wash and dry the fabric to prevent shrinkage of the finished place mats?
Don’t prewash, it adds to the charm after quilting.
I can’t wait to make these!! Will any cotton fabric work or does it have to be a cotton twill?
I have not tried the rag quilt method on regular quilting cotton, but I think it will be fine!
I LOVE these! I love to make my own placemats but I’m not a fan of sewing them wrong sides together and turning them. I’ve been looking for a frayed edge placemat and these are perfect! Where do you use the fray check? Thanks! ?
just on the loose ends of the quilting threads.
what fabric line is this?
It came from Joann’s, but there is no brand information on the selvage, sorry.
BEAUTIFUL place mats.
Thank you!
Question: In the notes your batting is the same width as your fabric but the picture looks as though it slightly smaller. Should the width be the same or an inch smaller?
Thank you. 🙂
Can’t wait to grab my fabric and try these!
Yes, you are correct, it should have been 13 by 18. Correcting that now.